VMI TURNKEY PROPERTY MANAGEMENT GUIDE
Overview
This project is dedicated to creating a suite of documentation designed to complement and enhance the current clearing house project. It aims to meticulously document both the operational workflow of the tally dashboard and outline a proposed process flow for seamlessly incorporating a new leads management system into the existing turnkey solution. This comprehensive documentation effort will serve as a vital resource for ensuring clarity, efficiency, and a smooth integration process for all stakeholders involved.
Documentation Scope Overview
The below Overview outlines the documents that are included in this project.
-
Technical Documentation
- API Documentation: Outlines specifications for the turnkey application's APIs, detailing endpoints, data exchange formats, and security protocols.
- Architecture Documentation: Provides an overview of the application's architecture, covering the technology stack and component interplay.
- Database Schema: Describes the structure of the existing turnkey database, including tables, relationships, and key constraints.
-
User Documentation
- User Manual: Offers comprehensive guidance in pdf format for end-users, featuring operational instructions and visuals.
-
Developer Documentation
- Development Setup: Details the necessary environment setup for developers, including tools, libraries, and configuration steps.
-
Design Documentation
- Architecture Diagram and Documentation: Visual and written representation of the current turnkey system's architecture, emphasising component structure and data flow.
- System Process Flow Diagram and Documentation: Illustrates and describes the workflow and processes within the system, highlighting operational sequences and decision points. This will be done for both the current turnkey solution and also the proposed updates to include the Tally Dashboard.
-
Testing Documentation
- Test Plan: Outlines the testing strategy, objectives, and methodologies to ensure application quality and performance.
- Test Cases/Scripts: Provides detailed steps to validate application functionalities and requirements.
- Test Reports: Summarises testing outcomes, including identified issues and their resolution status.
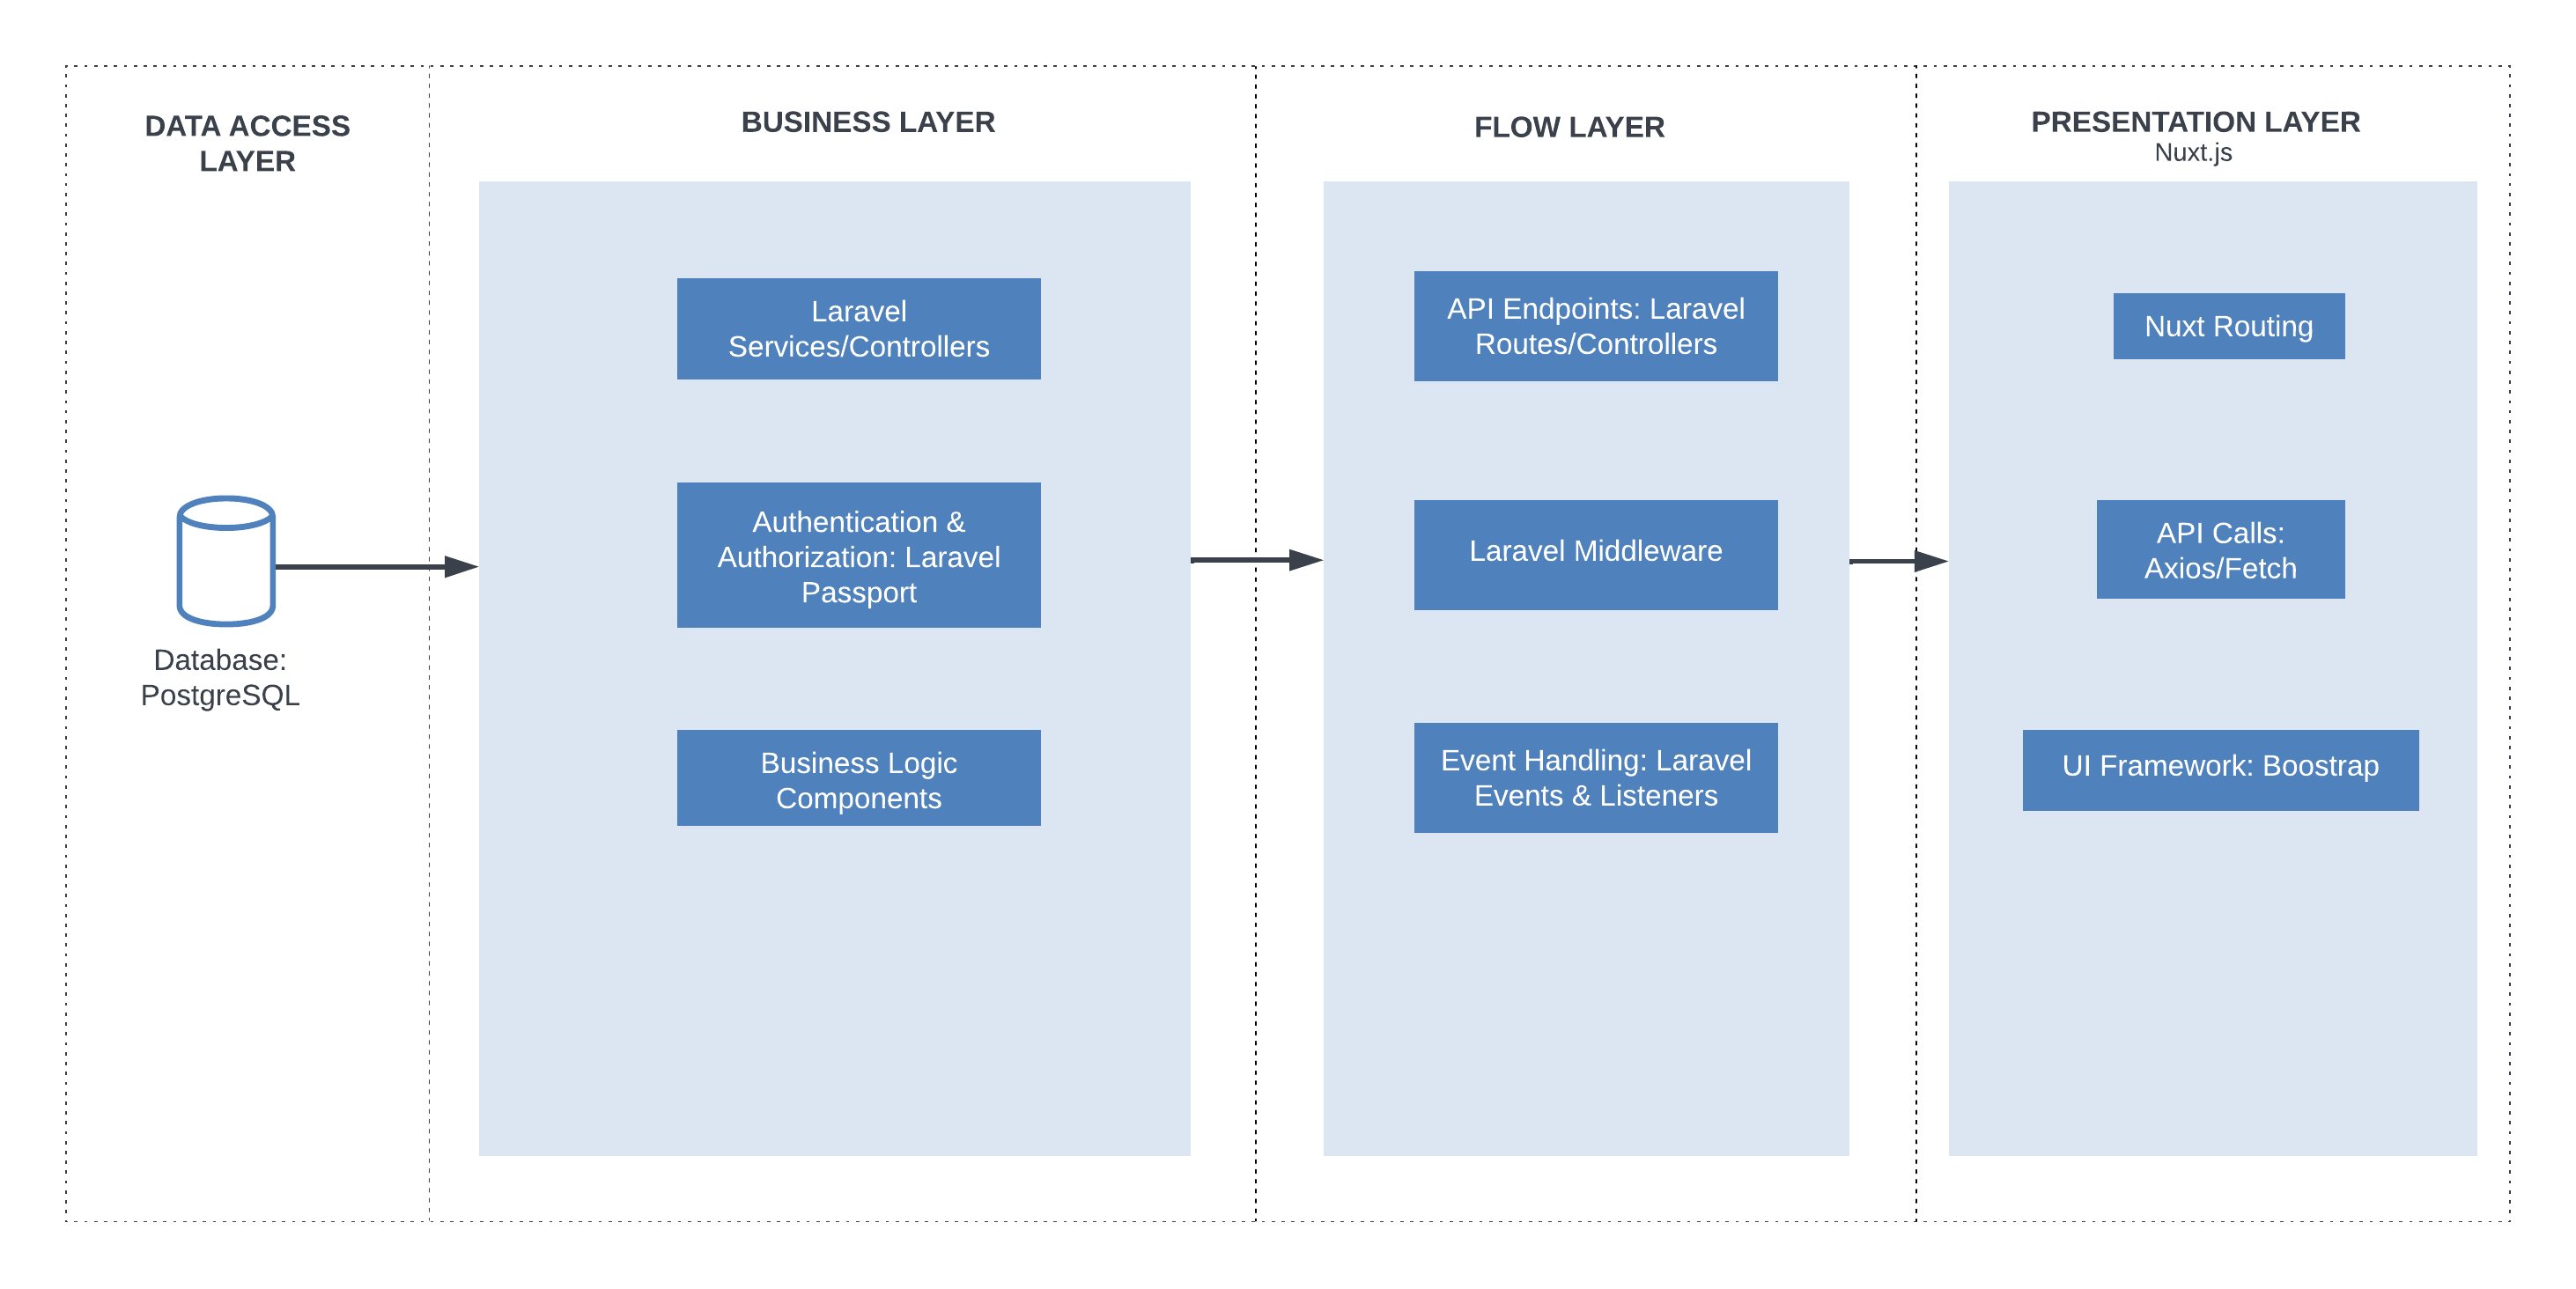
Architecture Documentation
Technical Documentation
User Manual
User Guide: Mastering the VM Property Services Application for Users and Administrators
This user guide provides step-by-step instructions on how to navigate the VM Property Services application as both a user and an admin. It covers various tasks such as searching for properties, calculating mortgages, selecting realtors and lawyers, submitting offers, and managing transactions. Whether you are a buyer or a property professional, this guide will help you effectively use the application to streamline your property-related tasks.
1. Table of Contents
Navigating The Application As A User
- Finding a property/home
- Calculating a mortgage
- Steps on how to obtain a mortgage
Navigating As A Buyer, Lawyer, Realtor, Valuator, Surveyor, and Bank Officer
- Viewing the list of properties
- Assigning A Mortgage Institution
- Adding A Source Of Fund
- Booking an appointment
- Assigning An Attorney
- Generating offer to purchase letter
- Getting a valuation report
- Getting a surveyor report
- Paying deposits
- Disbursing funds
- Closing the mortgage process
Logging in and Navigating the Backend as Admin
- Accessing the Admin Dashboard
- Managing Users and Data
- Customizing System Settings
2.Getting Started
- Open your web browser and navigate to the House Finder Application website.
- Upon landing on the homepage, you will be presented with a search interface.
3. Navigating the VM Property Services Application
This section of the user guide aims to equip users with the knowledge needed to
effectively use the VM Property Services Application. Starting with the
streamlined property search functionality and learning how to apply various
filters such as location, price, and property type to pinpoint the ideal
property with ease. Following this, we delve into the financial aspects of
property acquisition by introducing our mortgage calculator tool. This feature
is designed to provide users with an estimated monthly mortgage payment,
factoring in the property price, down payment, the loan term, and the interest
rate. This comprehensive guide ensures users have a clear understanding of both
the search process and financial planning.
4. Accessing Properties via the "Life Goals" Tab
- Log in to the application using your credentials.
- Locate and click on the "Life Goals" tab in the main navigation menu.
- Once the "Life Goals" tab is selected, a list of dropdowns will appear.
- From the dropdowns, choose the option labeled "Properties."
- Upon selecting "Properties," the screen will change, and a list of available properties will be displayed.
- Users can then search for specific properties using filters or choose from the options generated.

Property Search Funtionality
5.Property Search Functionality
The VM Property Services Application offers a user-friendly property search feature. Here's how to navigate it:
- Start: Begin by accessing the property search interface.
- Filters: Utilize various filters such as location, price, currency, property type and specifications to refine your search.
- Pinpointing Properties: Use filters to narrow down options and find your ideal property effortlessly.
6. Searching for Property
- Navigate to the search feature, found to the right of your screen.
- Specify the following criteria:
- Building Style: Choose the preferred architectural style or layout
- Type of Property: Indicate whether you're interested in a house, apartment, etc.
- Budget Limits: Set your budget constraints to filter search results accordingly.
- and other filters of your choice

7. - After entering the specified criteria, the search results will display homes that align with your financial plan and meet the specified preferences.

8. - Users can browse through the listings, view property details, and explore additional information such as images, amenities, and more.

The 8-Step Mortgage Process
9. The 8-Step Mortgage Process. Below are the steps involved in obtaining a mortgage:
-
Pre-qualification: Provide basic financial information to receive an estimate of the loan amount you may qualify for.
-
Property Selection: Conduct a property search within the recommended price range.
-
Offer and Acceptance: The process of forming a contract between the vendor and the purchaser to accept or reject a desired price, also deposit will be determined, and a sales agreement will be prepared.
-
Loan Application and Submission: Engage the financial institution and provide necessary documentation then submitting documents related to the property, applicants, and proof of income/credit information.
-
Credit Analyst Preliminary Review: Conduct a preliminary review of provided documents and information.
-
Underwriter's Decision: Approved/Denied: After careful analysis, the underwriter decides on loan approval.
-
Securities and Registration (Mortgage Registration): Conduct mandatory checks to ensure no restrictions on the property.
-
Funding and Disbursement: The purchase process is complete, and funds are disbursed.
10. Accessing the 8-Step Mortgage Process
- Locate and click on the "Resources" dropdown in the main navigation menu.
- From the dropdown menu options, select "The 8-Step Mortgage Process."

11. - Upon selecting "The 8-Step Mortgage Process," users will be directed to a detailed guide outlining the steps involved in obtaining a mortgage.

12. Calculating Mortgage via "Calculators" Tab
- Navigate to the "Calculators" tab located in the main menu.
- Select the "Mortgage" dropdown from the options available.

13.Financial Planning with the Mortgage Calculator
In addition to property search, the application offers a mortgage calculator tool. Here's how to use it:
- Accessing the Mortgage Calculator: Locate the mortgage calculator feature within the application by navigating to the tab Calculator
- Input Parameters: Enter relevant details such as property price, down payment, loan term, and interest rate.
- Estimated Mortgage Payment: Receive an approximate monthly mortgage payment based on the provided information.
14. - Upon selecting the "Mortgage" dropdown, users will be presented with various mortgage calculation tools and options.
- Users can input relevant details such as loan amount, interest rate, loan term, and down payment to calculate their mortgage payments.
Additional Tips:
- Use the provided fields to enter accurate information for precise mortgage calculations.
- Save or print the calculated mortgage details for future reference.

15. Clicking the "Apply NHT" button initiates the process for applying NHT benefits for the selected property.
Additional Tips:
- Ensure you meet the eligibility criteria for NHT benefits before proceeding with the application.
- Review the application process carefully and provide accurate information to avoid delays.

16. Users may select homes they are interested in to see mortgage breakdown.

17. Navigating As A Lawyer, Buyer, Realtor, Evaluator, Surveyor, And Bank Officer
- Lawyers: Details the document management system, secure communication channels with clients, and a repository for legal resources and templates.
- Buyers: Offers tools for searching properties, mortgage calculators, and guides for making offers, aimed at simplifying the home-buying journey.
- Realtors: Provides access to listing management, appointment scheduling, and client relationship tools to enhance property selling and buying experiences.
- Evaluators: Includes features for property valuation, access to historical data, and report generation tools to assist in accurate property assessment.
- Surveyors: Outlines tools for uploading and managing survey reports, integrating geographic information systems (GIS), and collaborating with other real estate professionals.
- Bank Officers: Describes functionalities for loan origination, mortgage processing, and financial product offerings tailored to both buyers and real estate investors.
18. Buyers interested in browsing the full range of available properties can start by locating the "Properties" dropdown menu on the website's main navigation bar. Within this menu, they'll find the "All Properties" option, which, when clicked, will direct them to a detailed page showcasing an extensive selection of properties for sale or rent.
This page typically includes filters and search tools that allow buyers to refine their search based on specific criteria such as location, price range, property type, and more, helping them to efficiently find listings that match their preferences and requirements.
19. Buyers looking to explore available properties can do so by navigating to the "Properties" dropdown menu and selecting the "All Properties" option. This will display a comprehensive list of properties currently on the market.

20. To locate a particular property, start by identifying the search bar. Once
you've found the search bar, proceed to enter the exact name or relevant
keywords associated with the property you're seeking. As you type, the system
may offer suggestions or autocomplete options based on your input.
After entering the desired property name or keywords, press the
"Enter" key or click on the search icon to initiate the search.
The results page will display a list of properties that match your search
criteria, from which you can select the one you are interested in for more
details.

21. To allocate a realtor to a specific property, buyers should click on the
hamburger icon (three horizontal lines) situated next to the property's listing
details.
This action will open a few options including view, set inactive, and assign
realtor. Click "Assign Realtor" to assign a realtor to a property.

22. To proceed with your property purchase, first ensure you are logged into your
Purchaser/Buyer account.
Once logged in, navigate through the platform to locate the home that interests
you. Upon finding the desired property, click the "Own Now" button,
typically positioned prominently on the property's listing page.
Clicking this button will initiate the process to move forward with the
acquisition of the property.

23. To select your payment method, first pick a preferred purchase option, such as mortgage or cash. After making your choice, click on the "Continue" button to proceed to the next step.

24. To initiate a search for a financial institution, click on the button labeled "Search for a Financial Institution." This will lead you to a dedicated section within the platform where you can input specific criteria or keywords related to the financial institutions you are interested in.
The system may provide options to refine your search based on factors such as location, services offered, or ratings. Once you enter your search parameters and initiate the search, the platform will display a list of financial institutions that match your criteria.

25. To select a financial institution, carefully review the list that appears on
your screen, which may include various banks, credit unions, or other lending
entities.
Each institution listed will offer different terms, rates, and services,
consider what aligns best with your financial needs and goals.
Once you've evaluated the options, click on the name of the financial
institution you wish to engage with.
This action will take you to another page for further steps, such as filling out
a form or initiating contact, to begin your financial dealings with the selected
institution.

26. Purchasers/Buyers are required to upload necessary documents during the pre-approval process to verify their financial stability and eligibility for a mortgage or loan. These documents typically include proof of income, employment verification, and credit reports, among others.
Lenders use this information to assess the buyer's ability to repay the loan, determine the loan amount they qualify for, and establish appropriate interest rates. Uploading these documents promptly and accurately is crucial as it enables financial institutions to conduct a thorough evaluation, ensuring that buyers can secure financing that aligns with their financial situation and the property they intend to purchase.
27. Purchasers or Buyers looking to initiate the pre-approval process for a loan or mortgage are required to provide specific documents that verify their financial background and creditworthiness. This step is crucial for lenders to assess the buyer's ability to afford the property they are interested in. To upload these documents:
- Locate the "Choose File" button on the platform, which is typically found in the section dedicated to loan pre-approval or financial verification.
- Click on this button, which will open a file explorer window on your device.
- Navigate through your files and select the document(s) you need to upload. These might include recent pay stubs, tax returns, bank statements, or any other required financial documentation.
- Once you've selected the right file(s), click "Open" in the file explorer window to attach the document(s) to your application.
- After attaching all necessary documents, click "Upload" to ensure the documents are properly submitted for review.

28. Bank officers can review pre-qualification requests by clicking on the "Pre-qualification Request" button. This action allows them to access and evaluate applications from potential borrowers seeking to determine their eligibility for loan products.

29. Bank officers should click on the hamburger icon, which presents a menu containing options to pre-qualify, disqualify, or review documents related to loan applications. To initiate the pre-qualification of an applicant, they should select the "Pre-Qualify" option from this menu.

30. Buyers looking to progress through their application process for purchasing a property or securing a loan can do so by taking the following detailed steps:
- Review Your Information: Before proceeding, ensure that all the information entered in the current phase of the application is accurate and complete.
- Click on "Continue": After reviewing your information and ensuring everything is in order, click on the "Continue" button. This action signals that you have completed the current section and are ready to move on to the next phase.
Next Steps: Upon clicking "Continue," the application will automatically take you to the next section, this involves additional information input, further document uploads, or a review section. In some cases, you might encounter a brief loading period as the system processes your progress.

31. To submit proof of funds, start by clicking on the "Choose File" button to select the document from your device. After selecting the appropriate file, proceed by clicking on the "Upload" button to successfully submit the document.

32. Realtors looking to access job requests can do so by navigating to the "Sell Properties" button. Upon clicking the "Sell Properties" button, realtors will be directed to a section where job requests are listed. This section will provide detailed information about each request, including property details, seller expectations, and any specific requirements for the realtor. By accessing these job requests, realtors can efficiently connect with potential clients, understand their needs, and initiate the process of listing and selling properties.

33. Once a buyer's source of funds has been submitted and reviewed, to proceed with the next steps, click on the hamburger icon (three horizontal lines) usually located next to the buyer's submission details.
Upon clicking, a dropdown menu will appear, presenting several options such as
- View Documents
- Approve
- Reject
Depending on the review outcome, choose one of the following options:
- Approve: If the buyer's financial documents meet the criteria, select "Approve" to advance the application.
- Reject: If the documents are insufficient or do not meet the requirements, choose "Reject." Provide a reason or feedback for clarity.

34. To progress to the subsequent stage in the process, locate and click on the
"Continue" button. This action typically signifies that you have
completed the current section and are ready to move forward.
By clicking this button, the system will automatically navigate you to the next
phase, which involves inputting additional information requests. Ensure that all
required fields and any necessary information in the current section have been
accurately filled out before proceeding to avoid any disruptions in your
progression.

35. Scheduling Appointments with the "Add Appointment"
-
Upon clicking the "Add Appointment" button, a form or dialog box will appear, allowing realtors to input details for the proposed meeting.
-
Realtors can specify the date, time, location, and purpose of the appointment (e.g., property viewing, consultation, discussion).
-
After filling in the required information, realtors can save the appointment, which will be added to the calendar or appointment list.
Additional Tips:
- Use descriptive titles for appointments to easily identify their purpose (e.g., "Property Viewing - 123 Main St").

36. Scheduling an Appointment
- Upon selecting a suitable time and clicking "Request This Time," your appointment request will be submitted.
- You may receive a confirmation message indicating that your request has been successfully submitted.

37. To finalize the scheduling of your appointment, follow these detailed steps:
- Review Your Selection: Before confirming your appointment, ensure you have selected the correct date and time that best suits your availability.
- Locate the "Book Appointments" Button: This button is typically found at the top right of the calendar screen, clearly labeled to indicate the action of booking the appointment.
- Click on "Book Appointments": Once you have confirmed that all the information is correct and you are ready to proceed, click the "Book Appointments" button. This action signals the system to register your appointment based on the selections and information you have provided.

38. Buyers looking to move forward in their purchasing journey or application process can do so by following these detailed steps:
- Review Your Current Information: Before advancing, take a moment to carefully review all the information you've provided in the current step. This ensures that all your entries are accurate and complete, which is crucial for a smooth continuation of the process.
- Locate the "Continue" Button: The "Continue" button is typically positioned at the bottom of the section you are currently working on. It's designed to be easily noticeable, often highlighted or emphasized to draw your attention.
- Click on "Continue": After confirming that all the information is correct and you're ready to move on, click the "Continue" button. This action signals the system that you have completed the current phase and are ready to proceed to the next.

39. Buyers interested in securing legal representation for their transactions have the option to either find a lawyer through our platform or appoint one they already have. To do this, they should click on the "Search" button to browse available legal professionals listed on our site or select the "Use My Own" button if they prefer to enter the details of a lawyer they've personally chosen.

40. To secure the services of a turn-key legal representative, buyers should follow these detailed steps:
- Access the List: Navigate to the section of the platform where turn-key legal representatives are listed. This list is typically curated to include professionals with expertise in real estate transactions, offering a range of services from contract review to closing assistance.
- Review the Options: Take some time to review the list of available legal representatives. Each listing includes the professional's name, qualifications, and areas of expertise. This information is crucial in helping you make an informed decision.
- Make Your Selection: Once you have evaluated the options and identified the legal representative who best meets your needs, locate their name on the list.
- Click on the Corresponding Name: Click on the name of the legal representative you wish to engage.
- Confirm Your Choice: After clicking on the chosen legal representative's name, you may be prompted to confirm your selection or provide additional information to facilitate the engagement.

41. To advance in the process of selecting a legal or professional representative, follow these detailed steps:
- Review the Representative's Details: Before making your selection, ensure you have thoroughly reviewed the information provided about the representative.
- Locate the "Choose This Representative" Button: After deciding on the representative you wish to engage with, look for the "Choose This Representative" button.
- Click on the Button: Click the "Choose This Representative" button to indicate your selection. This action typically signals your preference. After which, you will be redirected to the next steps in the engagement process.

42. Lawyers working on behalf of purchasers have the ability to review incoming job requests through the platform. These requests may include various legal tasks related to real estate transactions, such as contract reviews, due diligence, or closing services. Each listing will provide detailed information about the request, including the nature of the legal work, the client's details, deadlines, and any specific requirements or preferences. This feature enables lawyers to efficiently manage their workload, prioritize tasks, and engage with potential clients.
43. Lawyers who represent purchasers have a systematic way to access job requests relevant to their field of expertise. Here’s a detailed breakdown of how they can navigate this process:
- Navigate to the Job Requests Section: Once logged in, lawyers should look for the section or tab labeled something akin to "Job Requests. This section is dedicated to listing the various requests or inquiries from potential clients or entities seeking legal assistance.
- Click on the "Job Request" Button: By clicking this button, lawyers will be taken to a list or dashboard that displays all the current job requests available. Each listing will typically include details about the job, such as the nature of the legal assistance required, the location of the property or client, any specific qualifications or experience sought, and the proposed timeline or deadline for the job.

44. To thoroughly review a buyer's request, follow these detailed steps:
- Identify the "View Request" Button: Within the list of requests, each entry will typically have an associated "View Request" button or link. This button is designed to give you access to the full details of the buyer's request.
- Click on "View Request": Click this button to open the detailed view of the buyer's request. The system may take you to a new page where the complete information regarding the request is displayed.
- Review the Details: Take your time to carefully read through all the information provided in the buyer's request. This may include their desired property type, location preferences, budget range, any specific features they are looking for, and their timeline or urgency level.

45. Lawyers representing purchasers have the option to either accept job requests as they are or submit counter bids if the terms or compensation do not meet their expectations. This process allows for negotiation and agreement on terms that are satisfactory to both the lawyer and the client.

46. To complete the process of engaging a lawyer, buyers must enter their credit card details and then select the "Pay" button to finalize the transaction.

47. To advance to the next stage in the application process, you should carefully follow these detailed steps:
- Review Your Current Entries: Before moving forward, take a moment to go over all the information you've provided in the current stage of the application. This ensures that all your inputs are accurate and complete, minimizing the chances of errors or omissions that could affect your application's progress.
- Click on "Continue": Once you're satisfied that all the information is correct and complete, click the "Continue" button. This action signals to the system that you are ready to move on from the current section and proceed to the next phase of the application.

48. Buyers can initiate the creation of an offer to purchase by selecting the "Incomplete" button, which typically indicates that certain actions or documents are pending completion.

49. To ensure your progress is preserved and to move forward, follow these detailed steps:
- Review Your Inputs: Before saving, take a moment to review all the information you've entered or changes you've made. This step is crucial to ensure accuracy and completeness, as it might be more challenging to correct errors later.
- Locate the "Save" Button: Typically, the "Save" button can be found at the bottom of the page you are working on.
- Click on "Save": Once you've confirmed that all the information is correct, click the "Save" button. This action commands the system to store your current data and progress to the next stage. There might be a brief moment of loading as the information is being saved.

50. To finalize and submit your offer, follow these detailed steps:
- Review Your Offer: Before submission, carefully review all the details of your offer. Ensuring the accuracy of these details is crucial, as they will form the basis of your proposal and potential agreement.
- Locate the "Submit" Button: The "Submit" button is typically positioned to the bottom right of the form where you've entered your offer details. It's designed to be easily identifiable.
- Click on "Submit": After confirming that all the information in your offer is correct and you're ready to proceed, click the "Submit" button. This action sends your offer to the seller or the seller's agent for review. Be prepared for a brief loading period as the information is processed and transmitted.

51. Realtors have the option to either accept or reject incoming purchase offers by navigating to the "Review Offers" tab. This will reveal the purchase offers available for the realtor to reject or accept. Click the corresponding button to either reject or accept an offer.

52. To solidify your decision regarding an offer, whether to accept or reject it, you should follow these steps:
- Make Your Decision: Carefully review the offer in question and decide whether you want to accept or reject it. Consider all aspects of the offer, including price, terms, conditions, and any contingencies that may apply.
- Select Your Choice: Once you've made your decision, indicate your choice by selecting the appropriate option, typically presented as "Accept" or "Reject."
- Locate the "Continue" Button: After indicating your decision, look for the "Continue" button. This button is located to the bottom right of the page.
- Click on "Continue": Click the "Continue" button to proceed. This action will register your decision in the system and may lead to a confirmation page or prompt further actions based on your choice.

53. Buyers seeking a valuator should press the "Search" button to initiate their search. This will bring up a list of approved and licensed valuators where you will be allowed to choose a specific valuator.

54. To select a preferred valuator, click the appropriate name from the list and then that Valuator along with the services they offer will be selected. Click "Choose This Valuator" to confirm your choice move forward.

55. Valuators can view new job requests by selecting the "Job Requests" tab. A screen with Job Requests and their details will be shown to the user. These details include the request Date, type, cost, due date, property and status.

56. Viewing Job Requests
- Upon clicking "View Request," detailed information about the selected job request will be displayed.
- When filtering by status, the table will update to show only job requests that match the selected category.
Additional Tips:
- Use the search bar or additional filters to narrow down results further.

57. Viewing Job Requests
- Upon viewing a job request, you will see two tabs (Offers and Delivery).
- Under the "Offers" tab, specific details about the job request will be displayed, including the offer price, deposit fee, and requested time.
- Valuators have the option to either accept offers or submit counter bids.
- To accept an offer, click the "Accept" button.
- To accept a counter bid, click the "Counter Bid" button.

58. Buyers must enter their credit card details to secure a valuator's services and then click the "Pay" button to complete the process.

59. Now under the Delivery tab Valuators can upload valuation reports. To do so one should click the "Upload File" button where they can upload a pdf or doc file which contains their report.

60. After your file has been uploaded to the system you can will be presented with the option to download the Valuation Report which you can do by clicking "Download Valuation Report". If you want to move on click the "Continue" button to move on to the Surveyor's report.

61. Buyers may search for surveyors by clicking the "Search" button and entering the desired surveyor's details.

62. To select a surveyor, click on the desired individual. Their bio and services offered will be displayed. If you are satisfied with this surveyor then click the "Choose This Surveyor" button in order confirm selection of this surveyor.

63. Surveyors can view new Job requests by clicking on the "Job Request" tab. This will bring you to the Job request page where you can view details about Job Requests.

64. All the Job Requests will be listed and an overview of their request date, request type, cost, due date and property will be listed. For more details about a specific request, click the "View Request" button and it will bring you to a page which contains more details about a particular request.

65. On this page surveyors can view specific details about a request such as service delivery, time budget, offer price and deposit fee. Users have the option to accept the bid or propose a counter bid. This can be done by either clicking the "Accept" or "Counter Bid" button depending on which corresponds with their desired action.

66. In order to complete the process of choosing a surveyor, users must enter their credit card information and approve the purchase by pressing the "Pay" button.

67. Once payment is completed, surveyors may upload report by clicking the "delivery" tab. Afterwards click the "Upload File" button, where the surveyor will be prompted to choose and upload their report in the form of a pdf or doc file.

68. The Purchaser's Lawyer can view assigned properties by selecting the "Attached Properties" tab. This will bring up a tab that will show the assigned properties and an overview of their details.

69. The user will see a table where the attached property along with it's address, property type, number of bedrooms, number of bathrooms, price and status will be displayed. To get more information on a specific attached property, click the "View Sale" button. This will bring the user to a page which contains more details about the selected property.

70. After choosing to view the Sales details of a specific property, the Purchaser's Lawyer will see additional information about the sale. Under the delivery tab the Purchaser's Lawyers may submit the sale agreement and instrument of fund by clicking the "Choose File" option. They will be prompted with the option to choose a pdf or doc file. The Purchaser's Lawyer will then be able to upload their chosen file. To view what they have uploaded the Purchaser's Lawyer can click "Download Signed Sale Agreement" or "Download Signed Instrument Of Transfer" button.

71. After Purchaser's Lawyer has uploaded both documents they can click continue to end the process. If they want to check what they have uploaded they can click the "Download Signed Sales Agreement" or "Download Signed Instrument of Transfer" button.

72. Buyers can make deposits either by uploading proof of payment or by using a debit/credit card. To upload proof deposit click the "Upload Proof of Deposit" button while to pay with your credit or debit card click the "Pay wit Debit/Credit Card" button. If you click the "Upload Proof of Deposit Option" it will prompt the buyer to upload a file.

73. After the user uploads the png, jpep, pdf or doc file they may click the "Submit" button to finalize the process. If they want to view what they have uploaded they can click the "Download" button. If the user wants to remove the file that they uploaded they can press the "Delete" button. The user should press the "Submit" button in order to complete the submission of their Proof of Deposit.

74. The user will be shown the name of the file which they had previously submitted as proof of a deposit. To view their submission the user can click the "Download" button. In order to complete the "Deposit Payment" step, the user should click the "Continue" button.

75. The Purchaser's Lawyer will see the name of the specific Sale Agreement. In order to upload the relevant document the user can upload the sale agreement by selecting the "Choose File" option. They will be prompted to upload a jpeg, png pdf or doc file which contains the Stamped Sale Agreement.

76. This page is used to collect the seller documents for a specific sale. Realtors may upload documents for processing by clicking the "upload" button where they will be prompted to upload a pdf or doc files of the relevant information.

77. After their upload is complete, they can choose to either download or delete what they have uploaded by pressing the corresponding icon underneath the action column. If they realtor is finished their file upload they should click the "Submit" button to proceed.

78. This page deals with the collection of any additional documents the Purchaser needs to upload. The page will list all uploaded document's names and upload date with a table. The Purchaser will also be able to download a specific document by clicking the button under the "Action" heading. Purchasers may upload any additional document then select " submit mortgage application" to proceed.

79. Bank officers are able to review mortgage applications by navigating to the "Mortgage Applications" tab. This will bring them to a page that will show all Mortgage Applications.

80. Bank Officers will see a table containing the mortgage product, applicant name, property, property price. To Accept, Reject or view documents for applicants, Bank Officers may select the hamburger button in the "Action" tab. This will display the options and the Bank officer should click their preferred action.

81. Upon approval of a mortgage, Bank Officers can upload the commitment letter by clicking the "Choose File" option. They will be prompted to upload a pdf or doc file. After they have selected their specific file, Bank Officers should click the "Submit" button to finalize the submission of the selected documents.

82. Bank Officers can attach letter of undertaking by clicking the hamburger button in the "Action" column. They will be given the option of either viewing the documents which have already been uploaded or attach a letter or undertaking. The Bank officer should click the "Attach letter of undertaking" option upload the letter of undertaking.

83. Bank officers have the option to disburse funds or view documents by navigating through the hamburger menu under the "Action" column. They will be provided with the option to either "View Documents" or "Disburse Funds". The Bank officers should click Disburse Funds option.

Administrator Role
84. Logging In & Navigating The Backend As Admin
Welcome to the User Documentation section dedicated to administrators on logging
into the VM Property Services Application and navigating the backend. This guide
offers comprehensive instructions for the initial login process and navigating
the backend efficiently.
85.Logging In
- Access the VM Property Services Application login page.
- Enter your administrator credentials (username and password).
- Click on the "Login" button to access the admin dashboard.

86.Navigating the Backend
Once logged in, administrators can utilize various backend functionalities:
- Admin Dashboard: The central hub providing an overview of system activities and key metrics.
- Partners: Add, edit, or remove partner information. Manage partnerships and agreements.
- Lenders: Add new lender details, update existing information, and maintain communication channels with lenders.
- Documents: Upload, organize, and access various documents securely. Maintain a comprehensive repository of essential paperwork.
- Fees: Fees section allows you to configure and manage fee structures associated with property transactions, such as commission fees or service charges
- Properties: Properties section serves as the core database for all property listings available within the application

87. Accessing Featured Partners via the Admin Dashboard
- Upon selecting "Featured Partners," the screen will display a list of all partners currently featured within the application.
Additional Tips:
- Use filters or search functionality to narrow down the list of featured partners if needed.

88. - Users can view details of each featured partner, including their name, contact information, and any additional relevant details.
Additional Tips:
- Click on a partner's name to access further details or make edits if necessary.

89. If you wish to access a comprehensive list of all lenders added to the system, simply select the "Lenders" option. This will provide you with a detailed overview of all registered lenders within the VM Property Services Application.

90. Admin may add a lender by Selecting the "Add Lending Institution" button.

91. To view document types, simply select the "types" option from the dropdown menu within the "Documents" section. This feature allows users to categorize documents based on their type, making it easier to organize and access specific document categories such as contracts, agreements, certificates, and more..

92. Adding a Document Type from Admin Dashboard
- Clicking on "Add document type" will open a new window or form where you can input the details of the new document type.
- You will be prompted to enter the name, description, and any additional information related to the document type.
- After completing the form, submit the information to add the new document type to the system.
Additional Tips:
- Ensure to provide clear and concise information when adding a new document type.
- Document size should meet the system required size found in the technical documentation

93. If you would like to view a list of all document templates created, click "templates" from the document dropdown.

94. For each document, you may create a template by clicking the " Add document template button.

95. Viewing Fees from Admin Dashboard
- After selecting "fees," administrators will be able to view and manage the list of fees utilized within the system.
- Each fee will be listed along with its name, transaction type, and fee type..
Additional Tips:
- Administrators can edit or delete existing fees as needed.
- Changes made to fees will affect their usage across the entire system.

96. - New fees can be added to the system by clicking on the appropriate button or link.

97. Customize fees by adding a name, transaction type, and fee type. Note, fees can be enabled and disabled at any point and the feature property type exclusively permits a fixed cost.

98. If you would like to view a list of all properties, Click "All Properties" under the "Properties" main menu.

99. Click the hamburger icon to view, set inactive or assign realtor to a property.

100. Viewing Wishlist Items from Admin Dashboard
- Upon clicking "wishlist," the system will display a list of wishlist items.
- Each item will include details such as property name, user information, and date added.

101. If you would like to add a service type and/or view the list of all service types being offered, Select "Service Types"

102. Adding a Service Type from the Admin Dashboard
- Clicking "Add service type" will open a new form or modal window where administrators can input details for the new service type.
- The form include fields such as service name, description, role, and other relevant information.

103. To access "Income Types", "Expense Types" and "Transactions" Click the "Financials" menu dropdown

104. Adding Income Type from Admin Dashboard
- Clicking on "Add Income Type" will prompt a new form or dialog box to appear.
- Users can then enter details for the new income type, such as name, description, and any associated parameters or settings.
- After completing the form, submit the information to add the income type to the system.
Additional Tips:
- Ensure to provide clear and descriptive names for new income types to facilitate easy identification.

105. View all transactions by clicking "transactions" from the menu bar.

106. To view or flag a transaction, click the hamburger icon beside the selected item.

107. If you would like to add users, view the list of users and assign roles and permissions within the system , Click "User Management"

108. Adding a New User from the Admin Dashboard
- Clicking on "Add User" will prompt a new user creation form to appear.
- The form will include fields for entering user details such as username, email, password, and user role.
- Upon completing the form and submitting it, the new user will be added to the system.

109. If you would like to view property feedback, select "sell property feedback" from the menu bar.

110. Select the hamburger menu beside a user to view feedback details.

111. You may edit your account information by selecting "Settings" from the menu bar.

112. Click "Account settings" to edit your login details.

113. If you would like to update the figure for featured partners, featured properties and interest rate, click "default settings"

114. Click currency to change the currency

115. Adjusting Payments via Admin Dashboard
- Upon clicking "Payment Settings," the system will display options to adjust payment configurations.
- Users can modify settings such as payment methods, currency, or billing cycles as needed.

116. Accessing Audit Log from Admin Dashboard
- Upon clicking "Audit Log," the system will display a log of recent activities, including user actions, system changes, and security-related events.
- Users can view details such as the date and time of each event, the user responsible, and a description of the action taken.

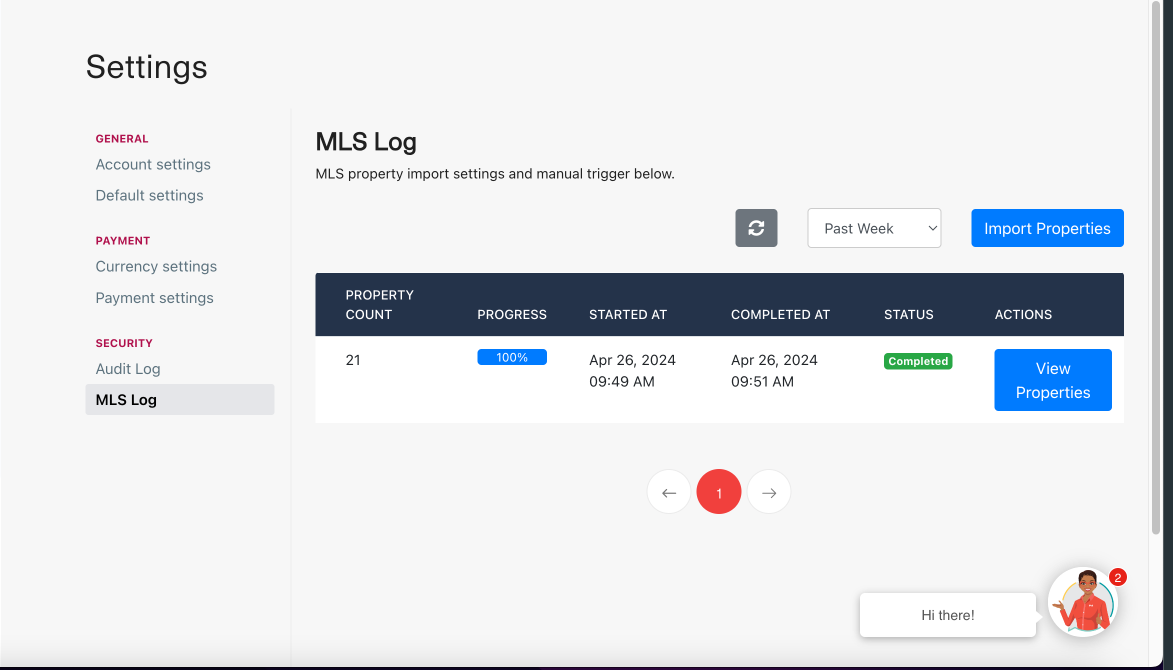
117. Accessing MLS Log from Admin Dashboard
- Upon clicking "MLS Log," the user would have to select a period first in order to import properties.
- A record would be added to the table stating the process of the import and status if its pending, completed or cancelled.
- Under the action column of the table, the user can invoke an action that will open a modal to show a list of properties that were added or existing ones that were updated.
- Clicking on the "Refresh List" button will update the progress bar and status indicators to reflect the most current data regarding property imports.
Lead Management Feature
Administration Panel
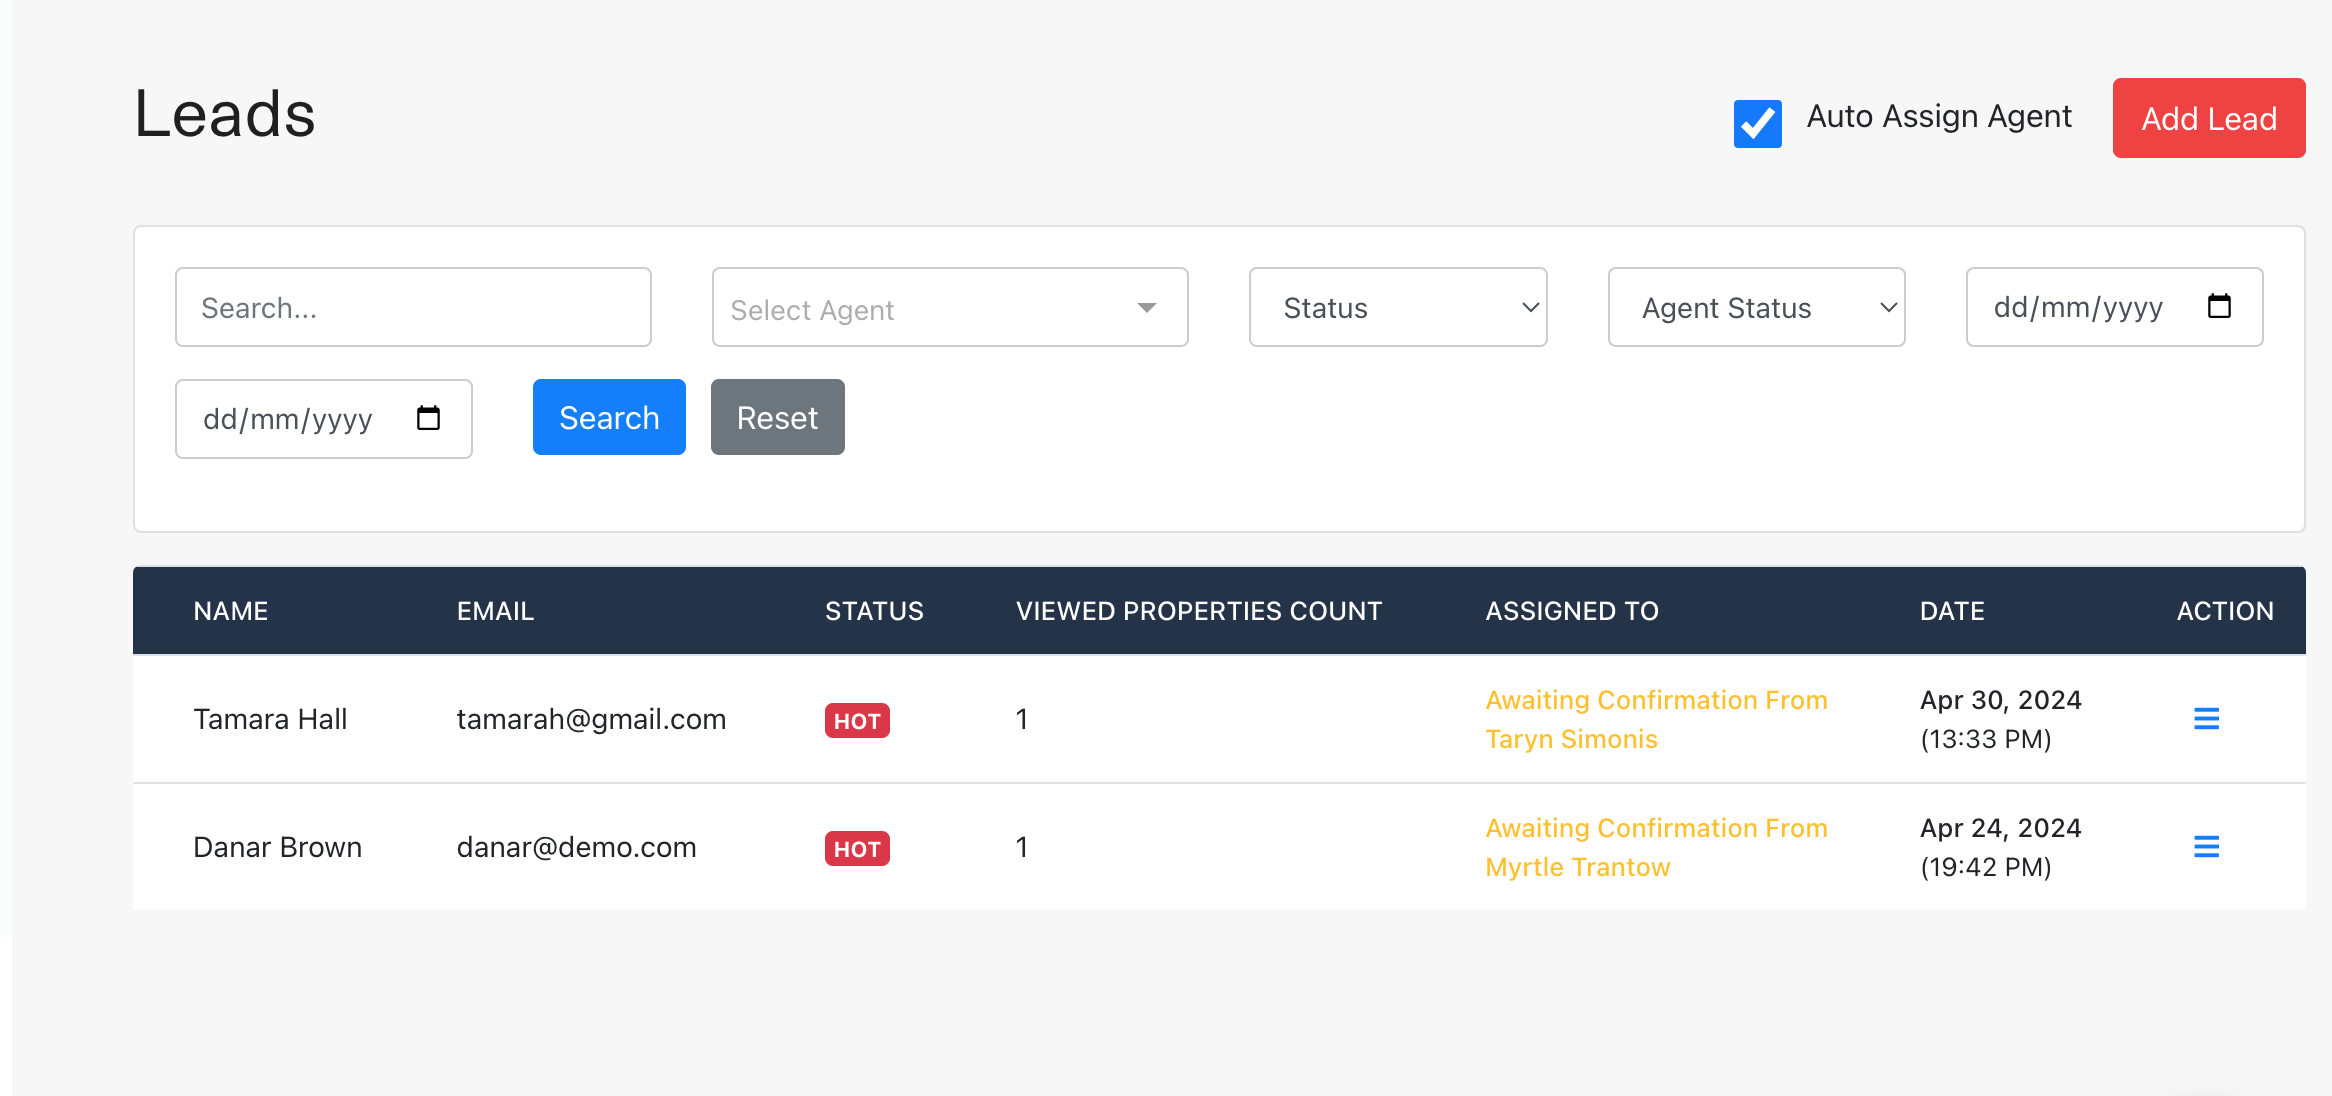
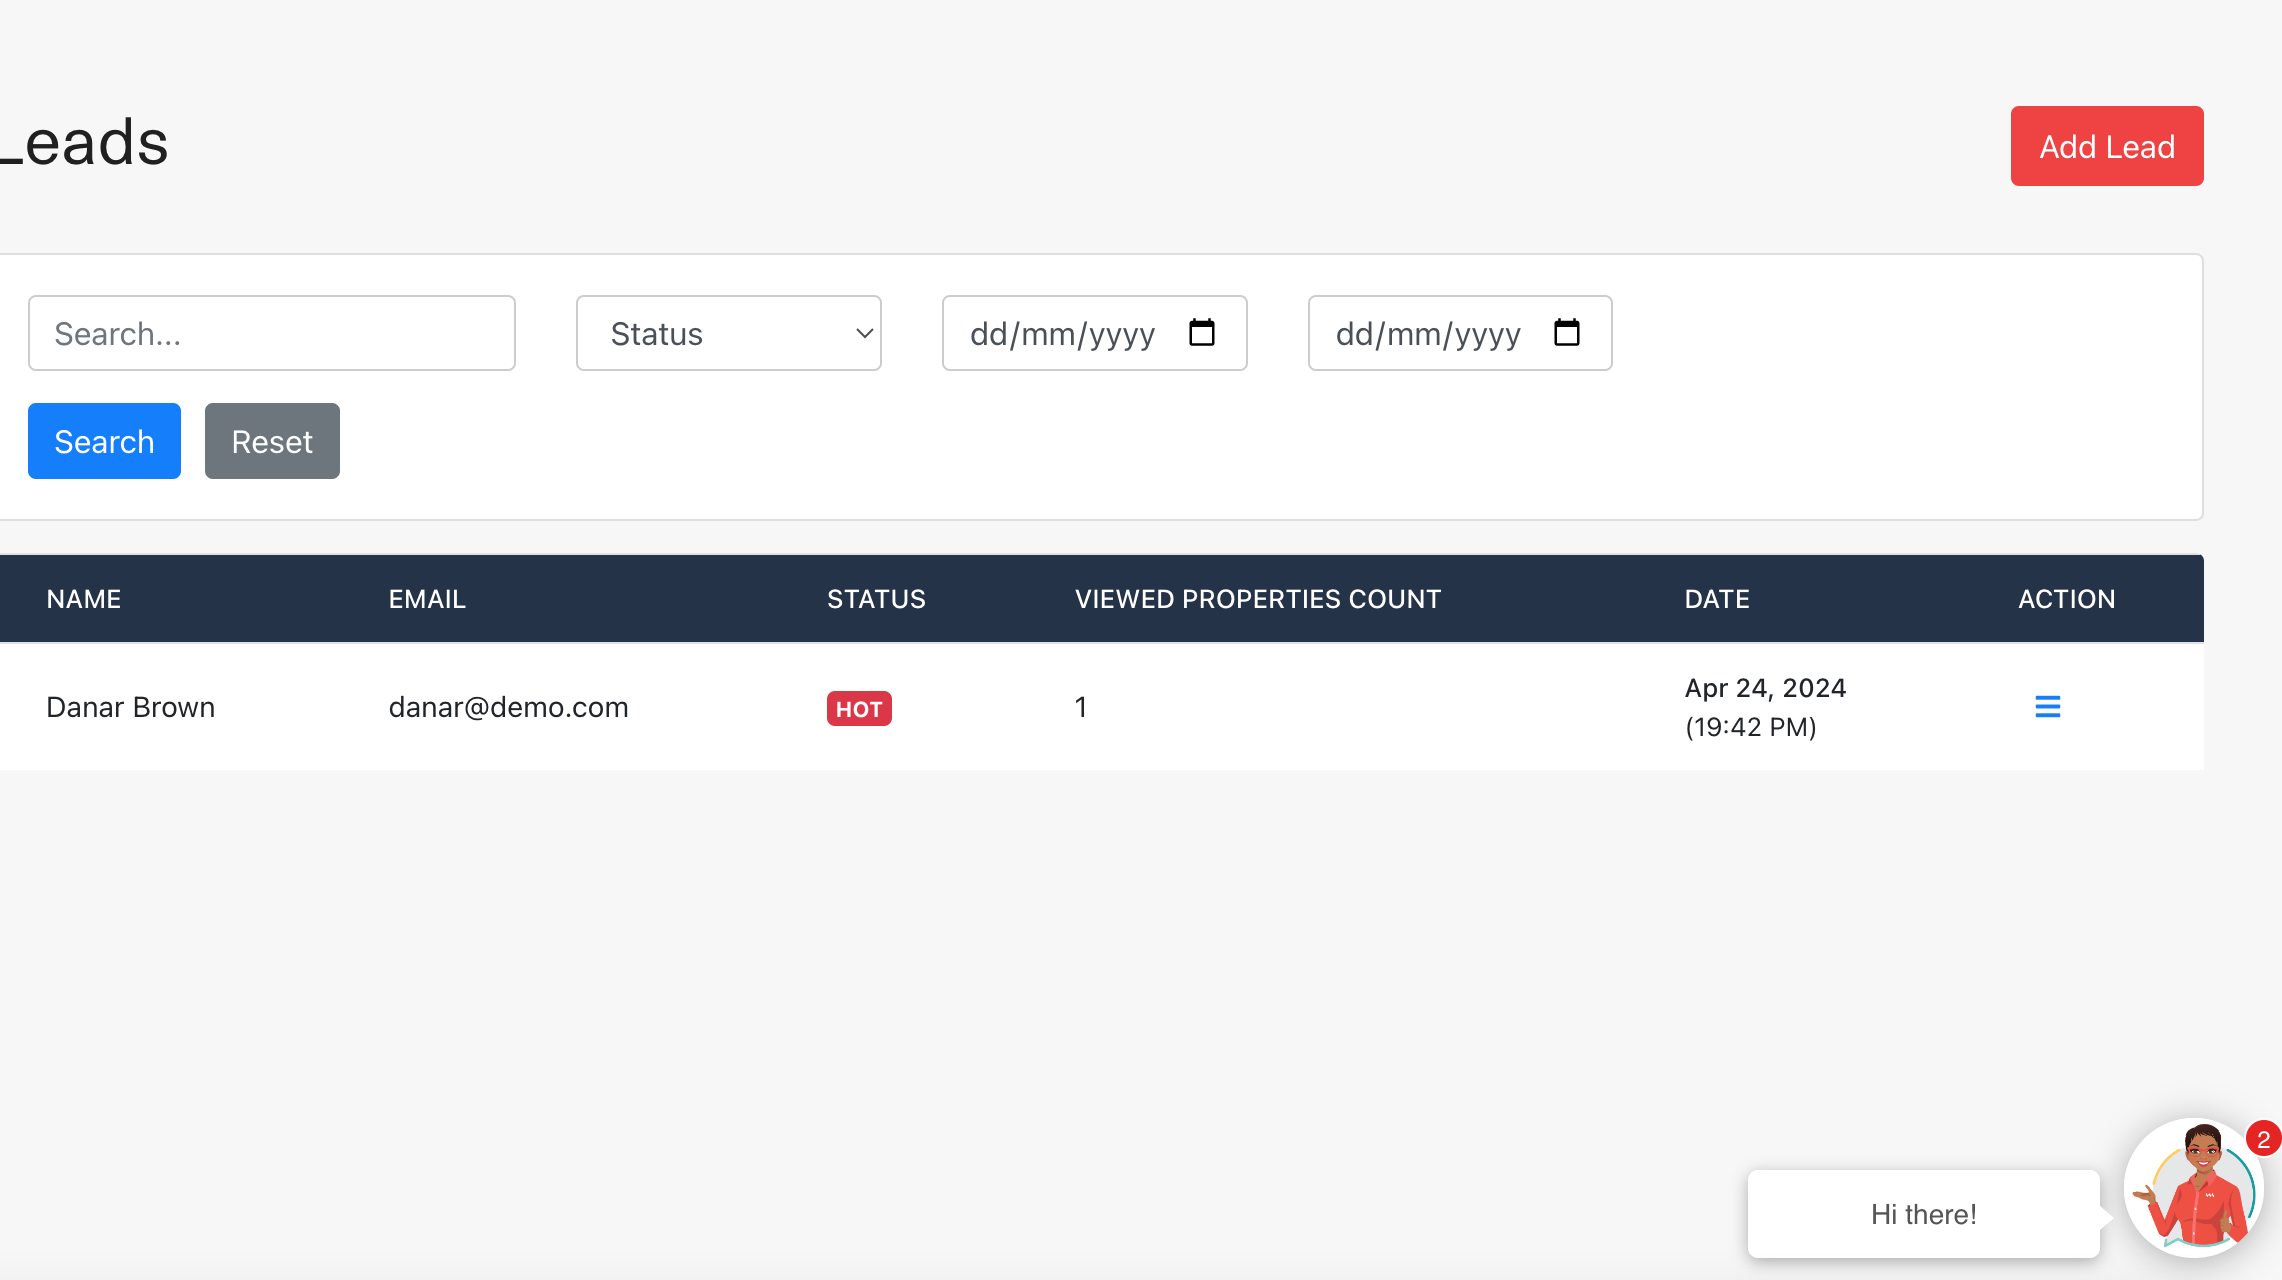
Administrators can manage leads through the admin dashboard, which provides tools for tracking, analyzing, and distributing leads among agents. Features include:
- Personal dashboard to view a list of leads, search for leads using provided filters, and manage assigned leads.
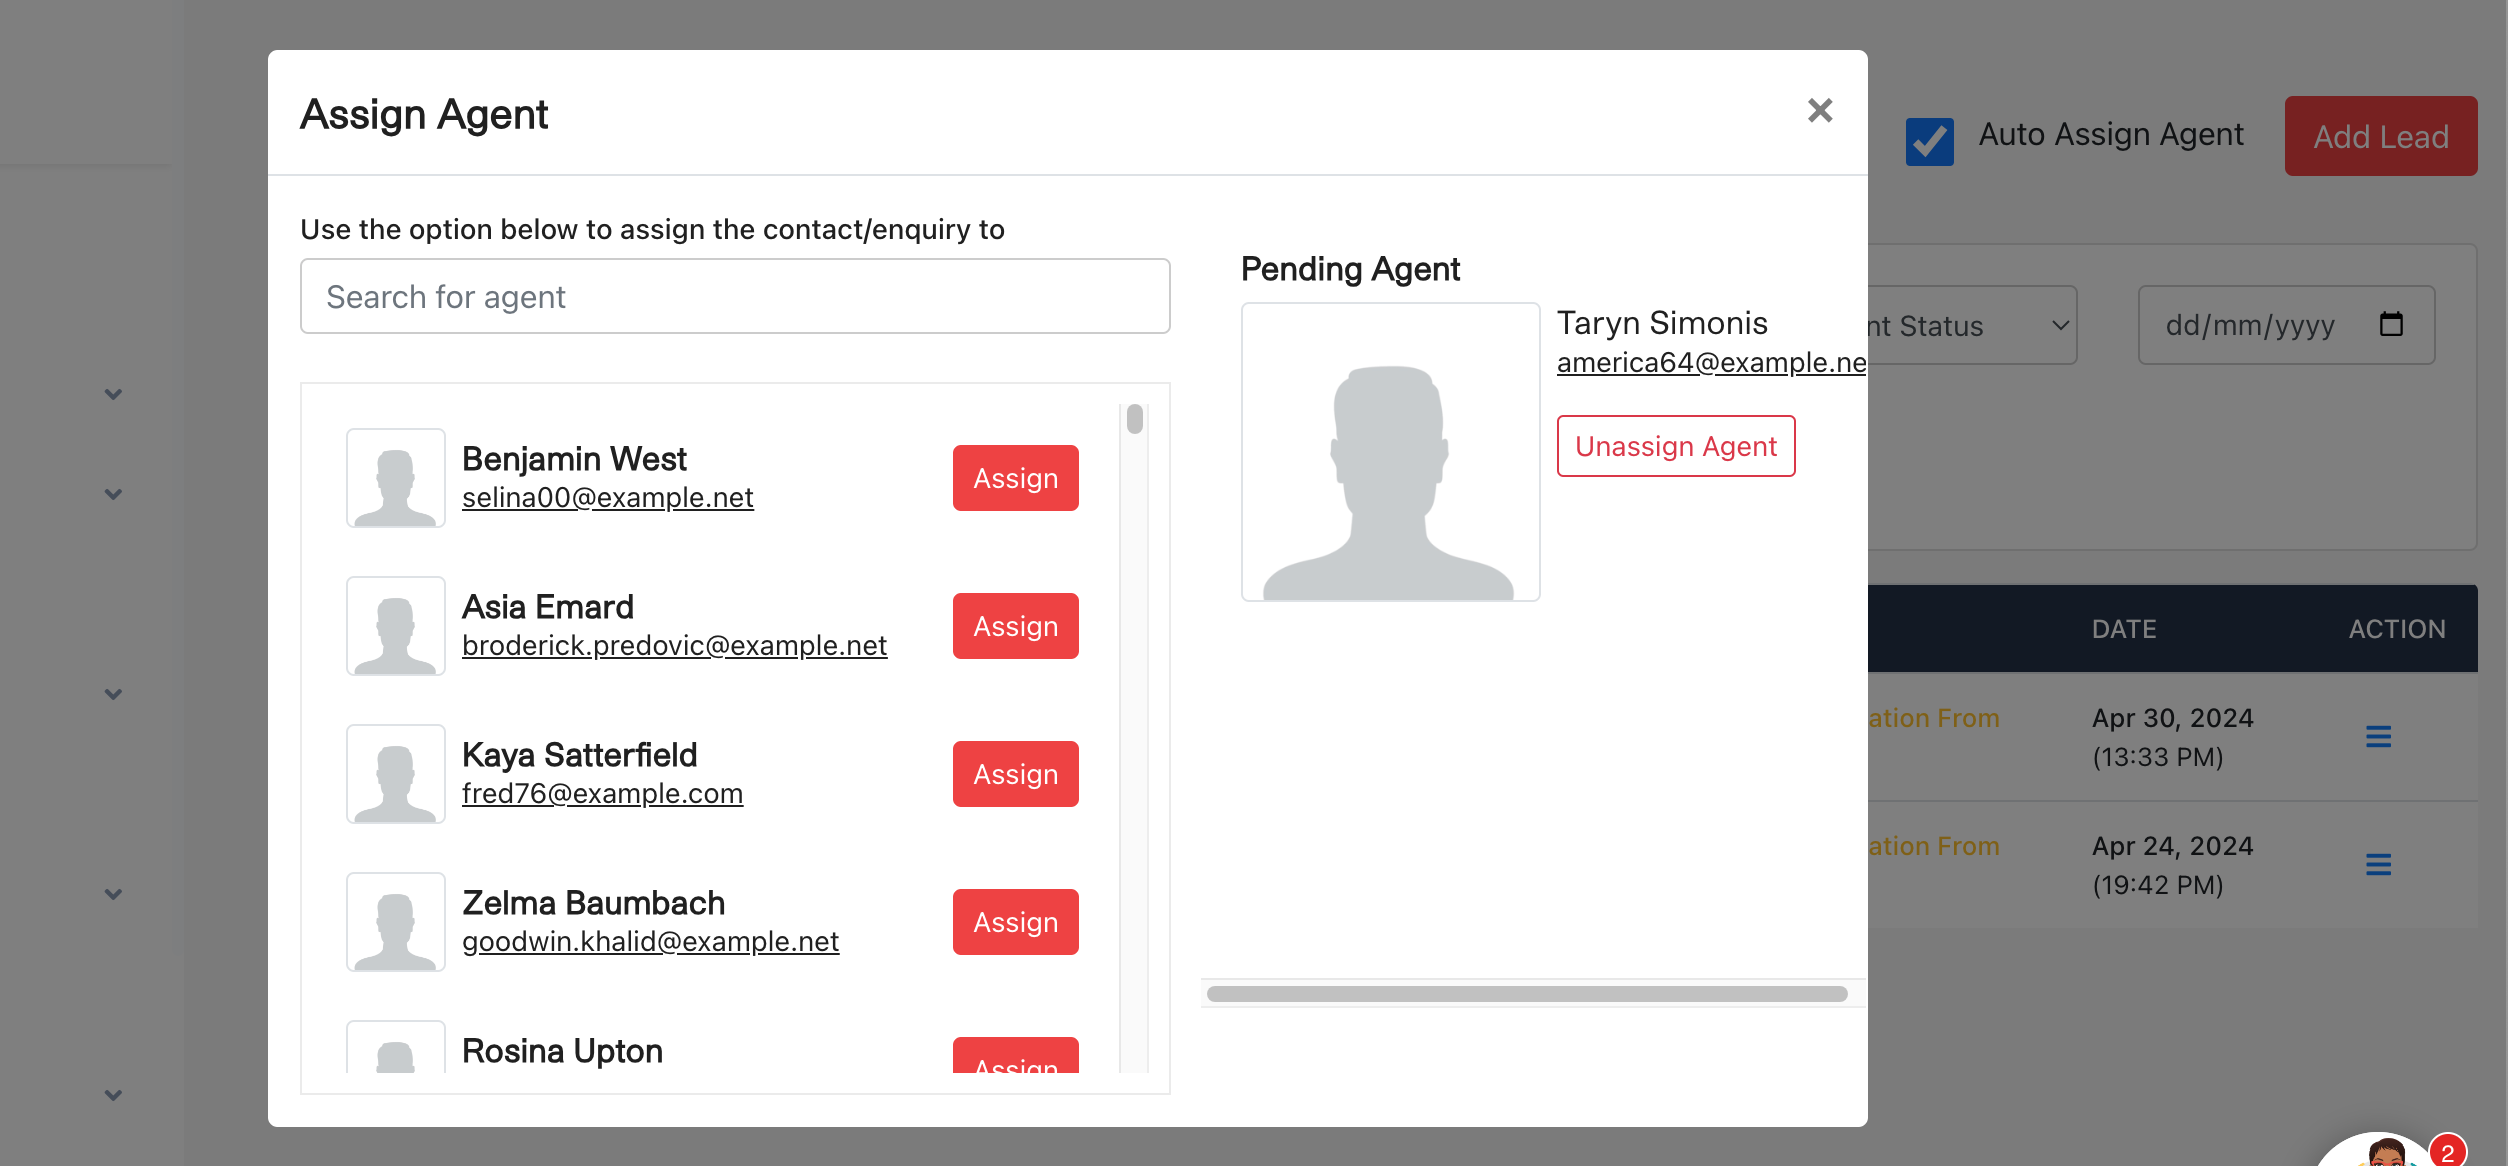
- Functionality to automatically assign agents to leads or manually assign an agent to a specific lead.
- Administrators can add and prioritize tasks for specific agents to streamline workflow management.
- Administrators can set up alerts to ensure timely notifications for new and updated leads, helping agents respond swiftly. These alerts track lead status changes, task deadlines, and communication needs, optimizing engagement and conversion opportunities.
Feature Screenshots
In this section, we provide visual insights into the various features available in the lead management system. These screenshots demonstrate the functionality and user interface that administrators experience while using the system.
The Leads Table View
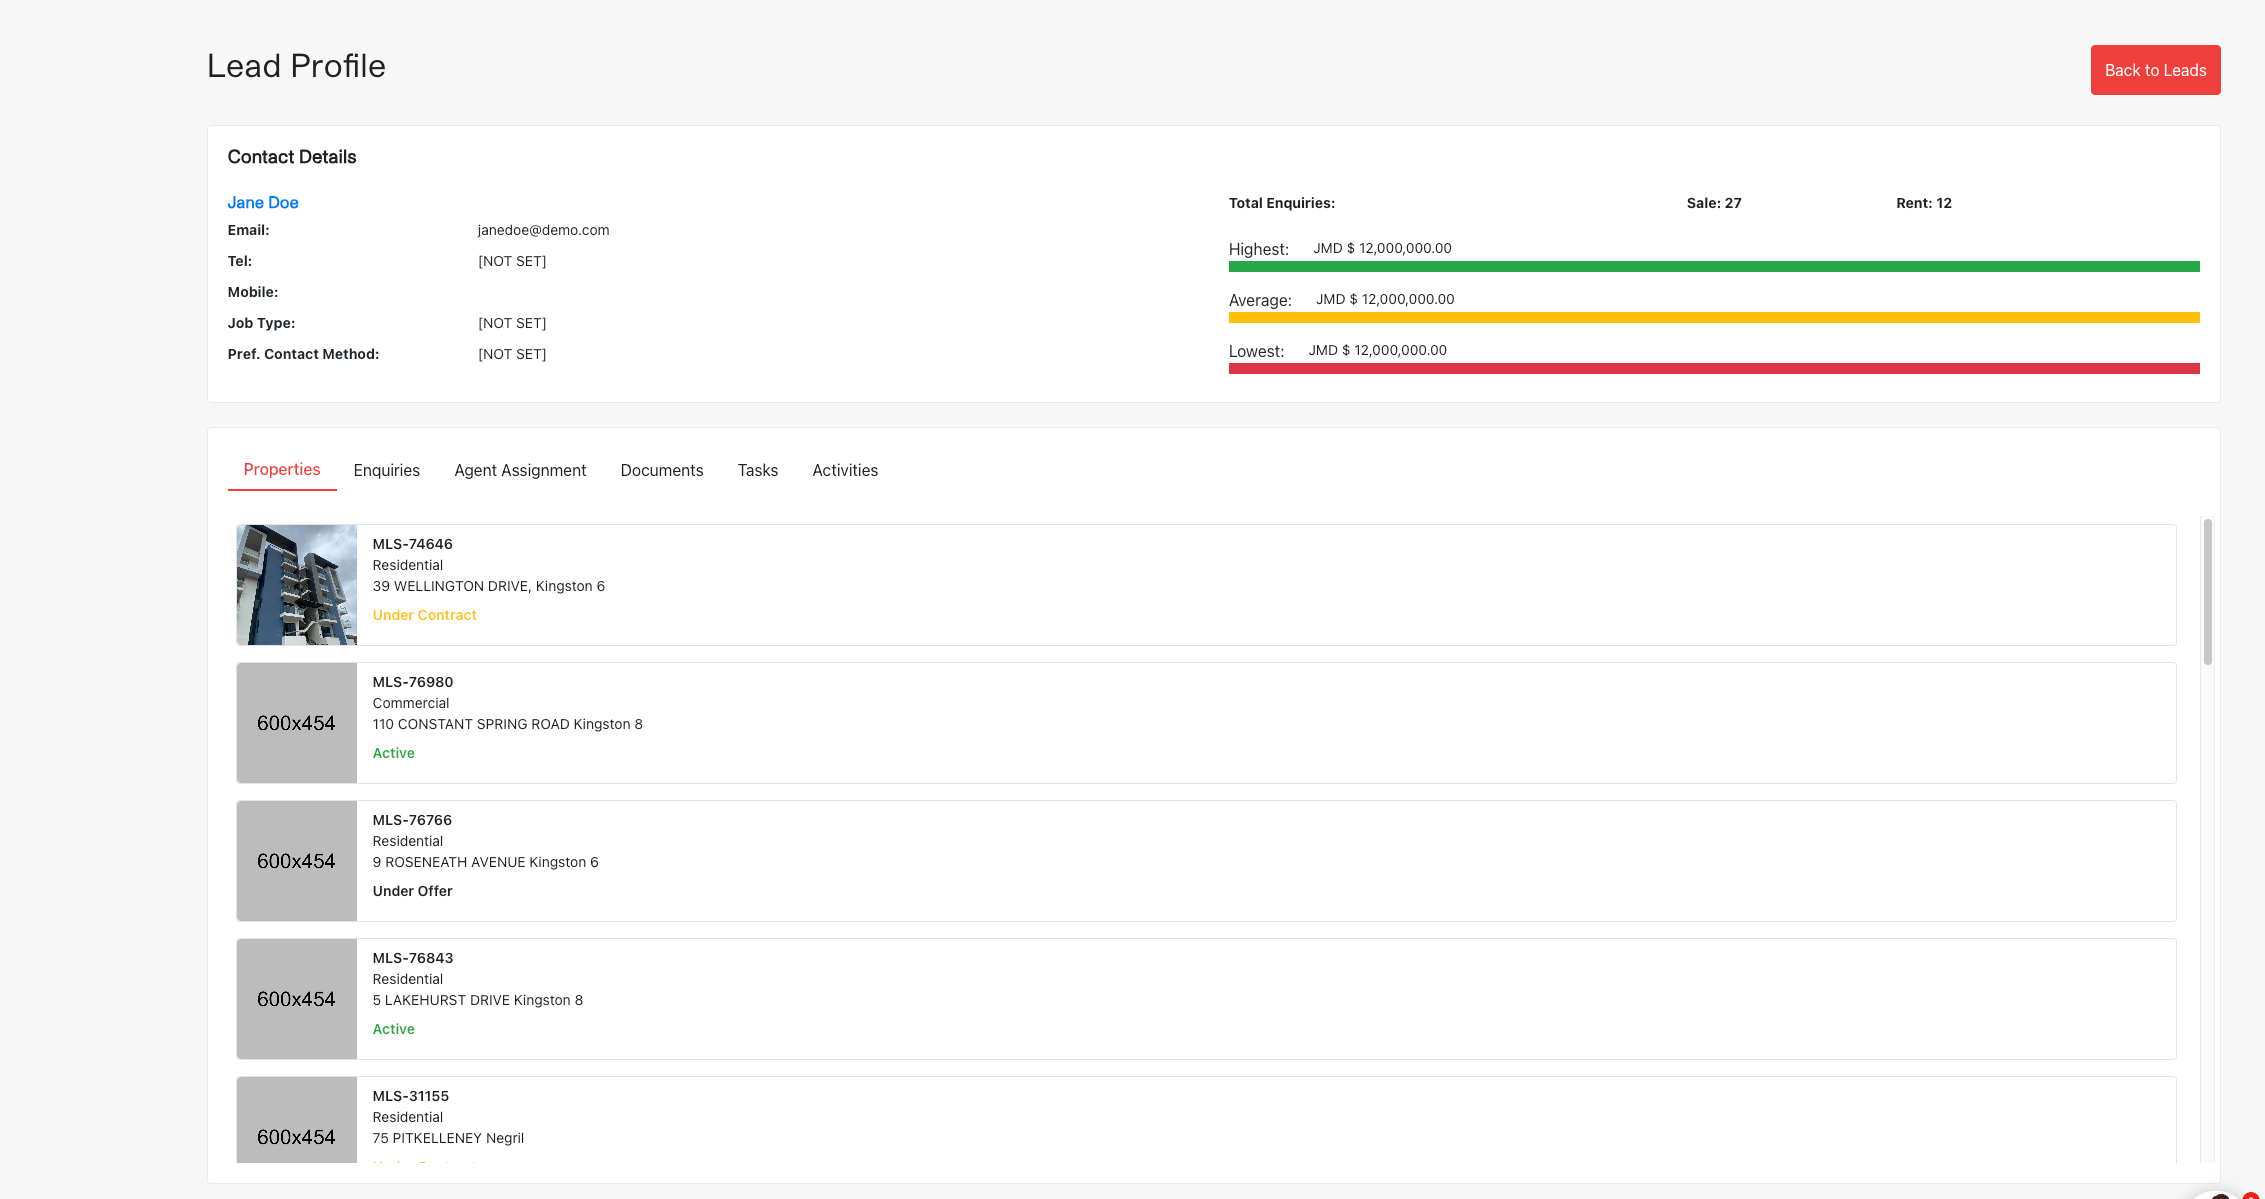
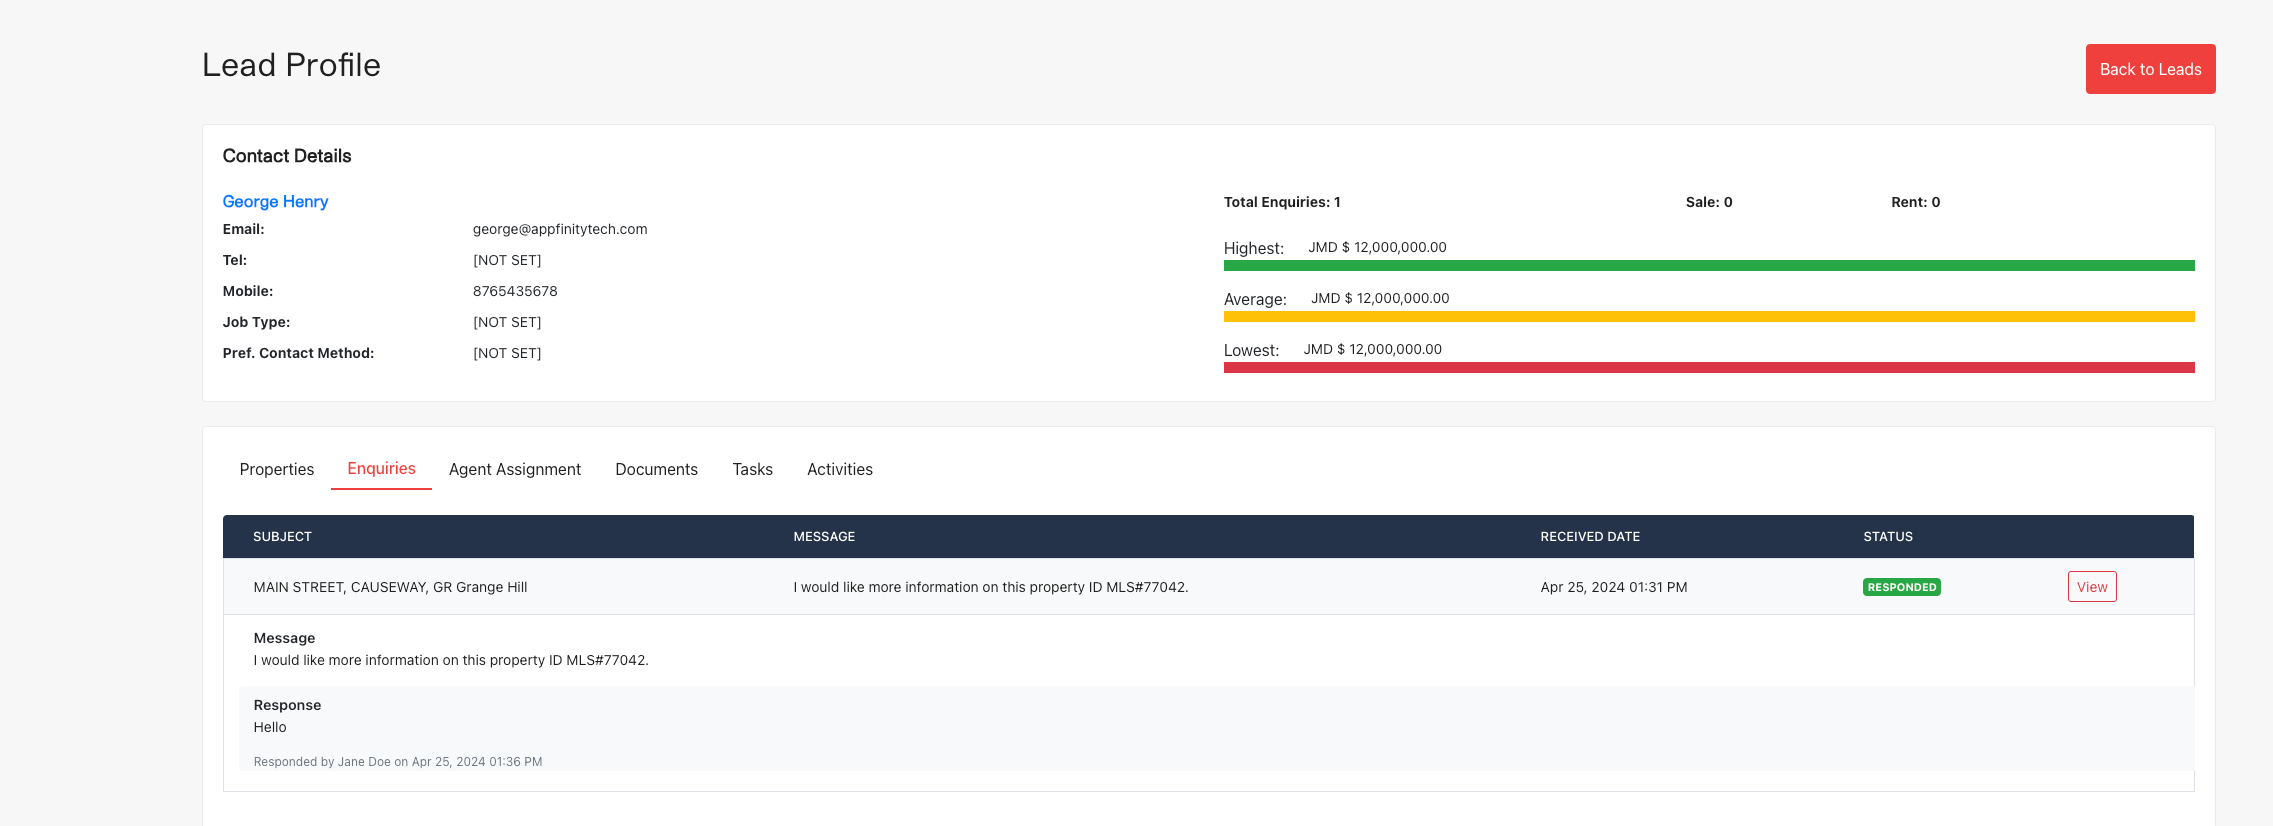
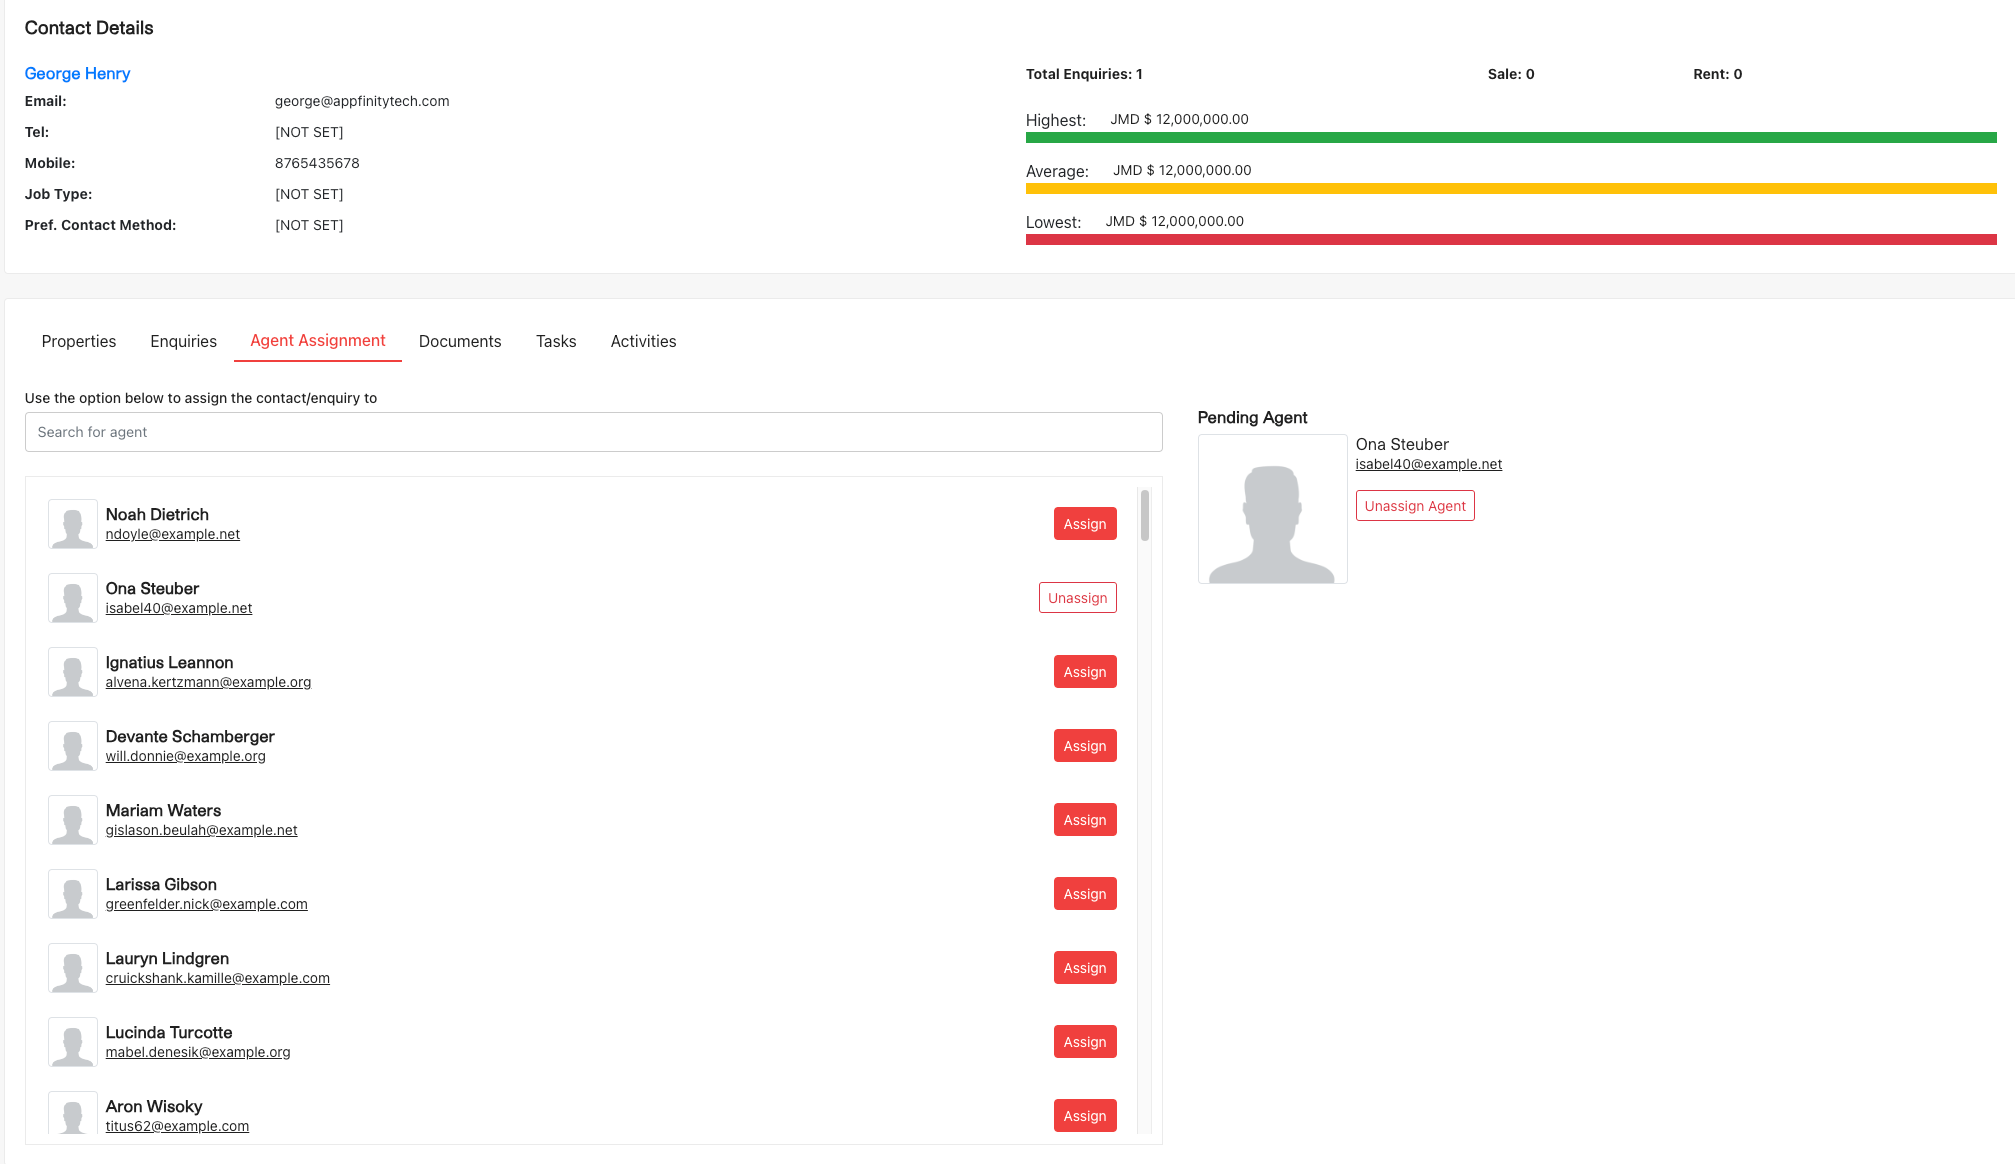
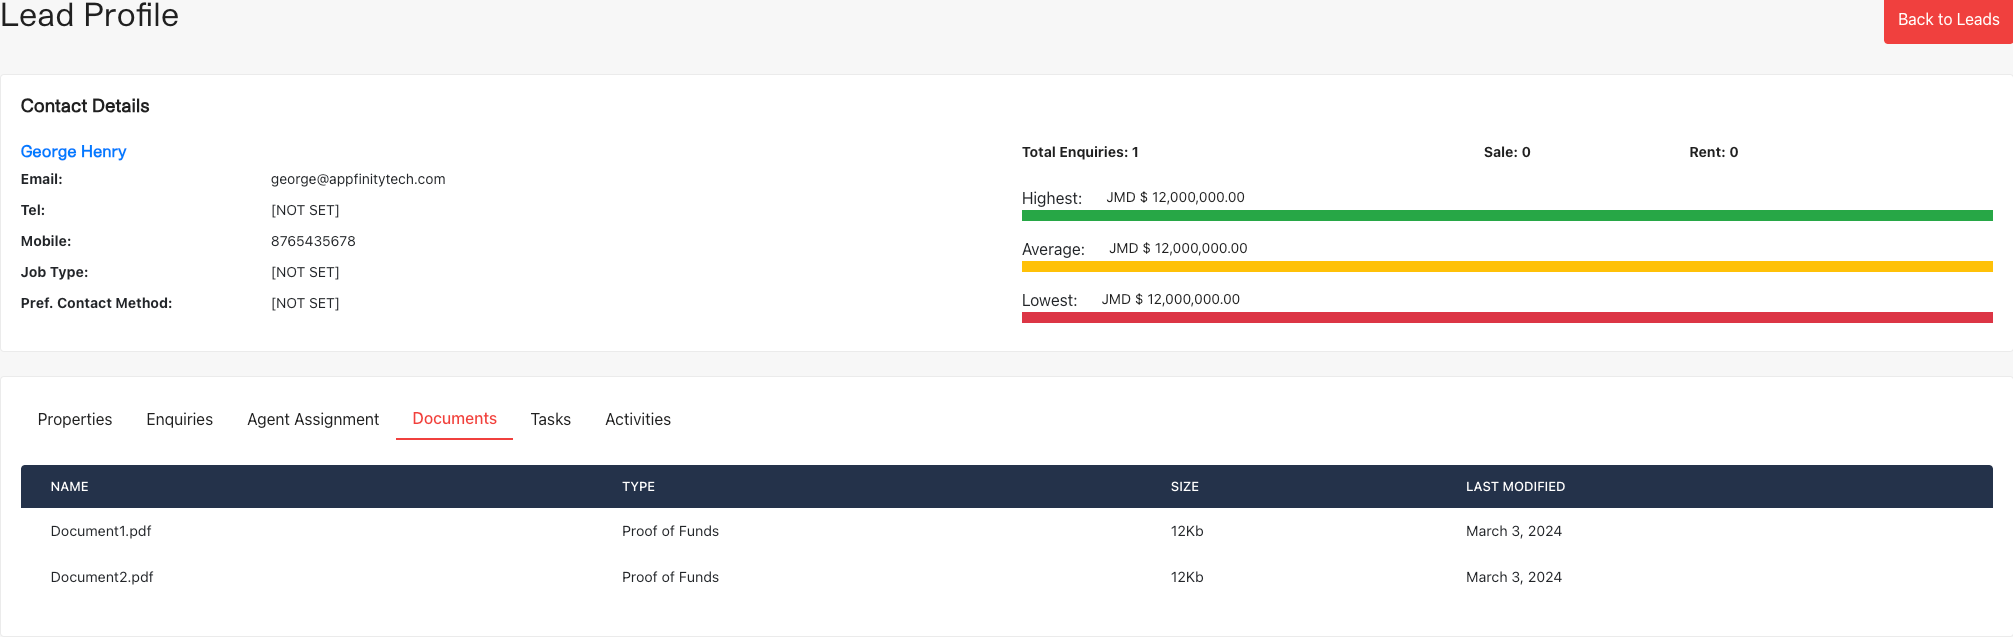
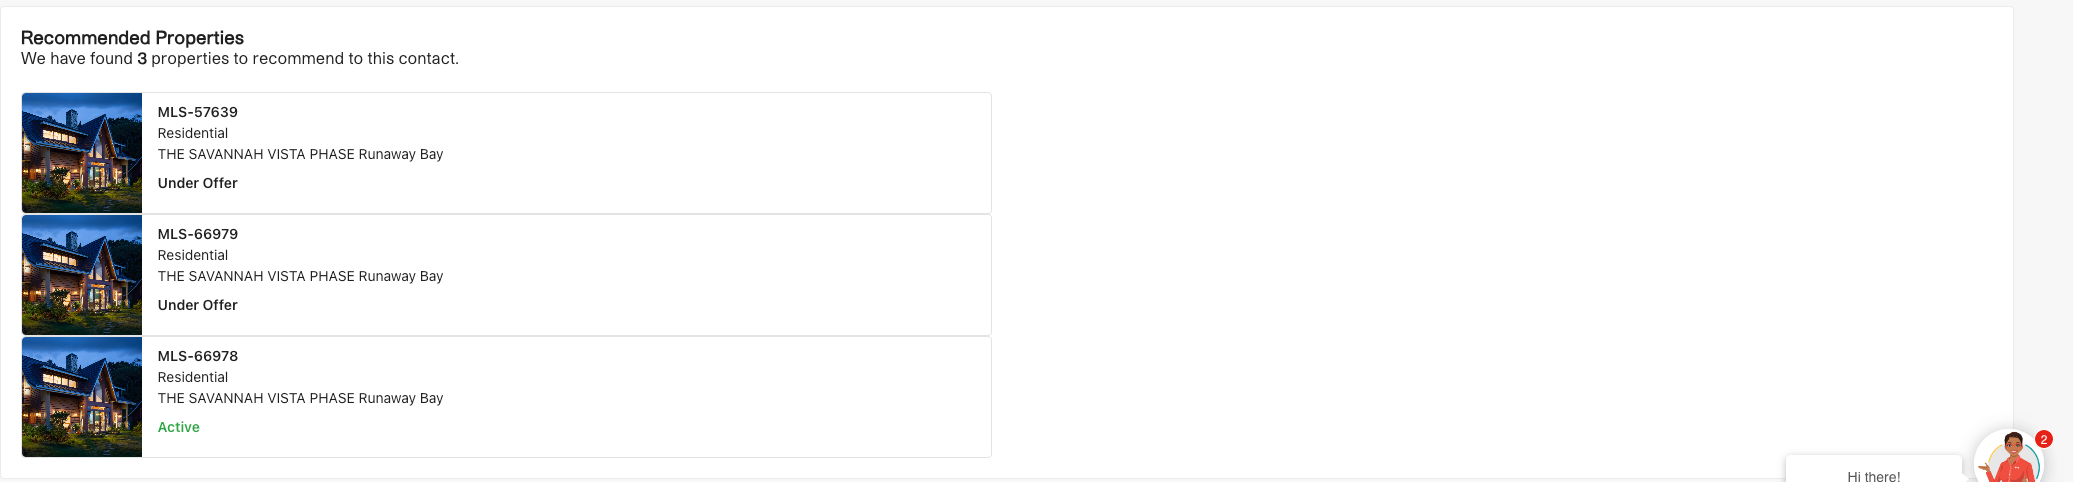
The Leads Profile
The lead profile is the interface where administrators can view, edit, and manage the details of a lead. This interface includes tabs for viewing the lead's properties, enquiries, assigning agents, and managing documents.


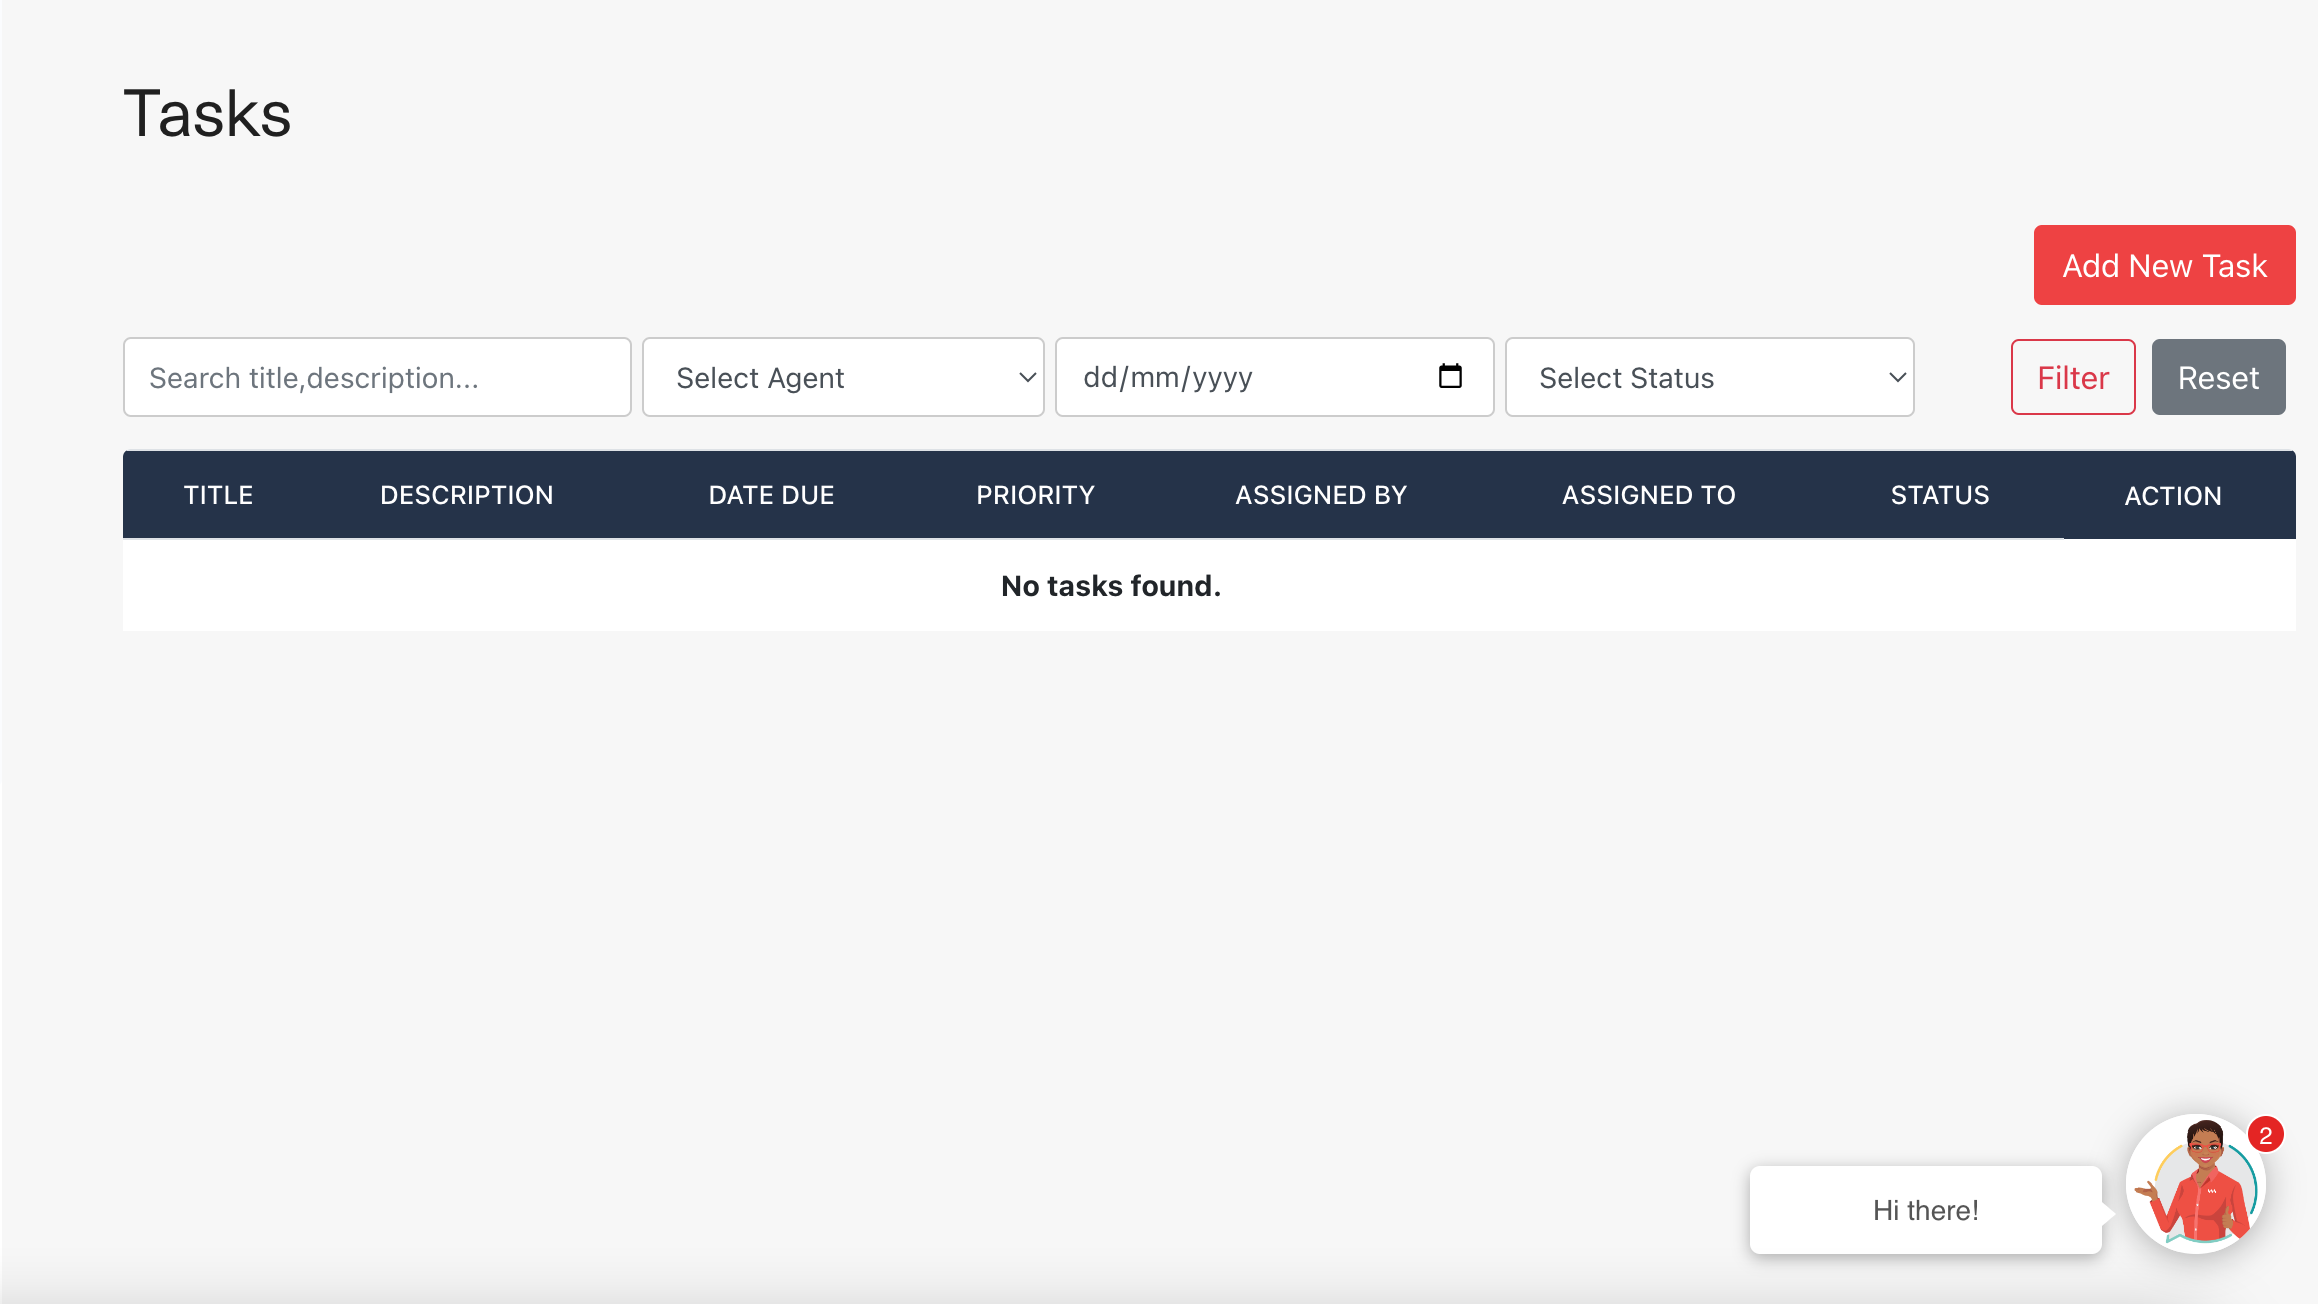
Tasks
The task interface allows administrators to create, view, and edit tasks associated with a lead. This interface includes fields for setting the task's title, description, due date, and assignee.
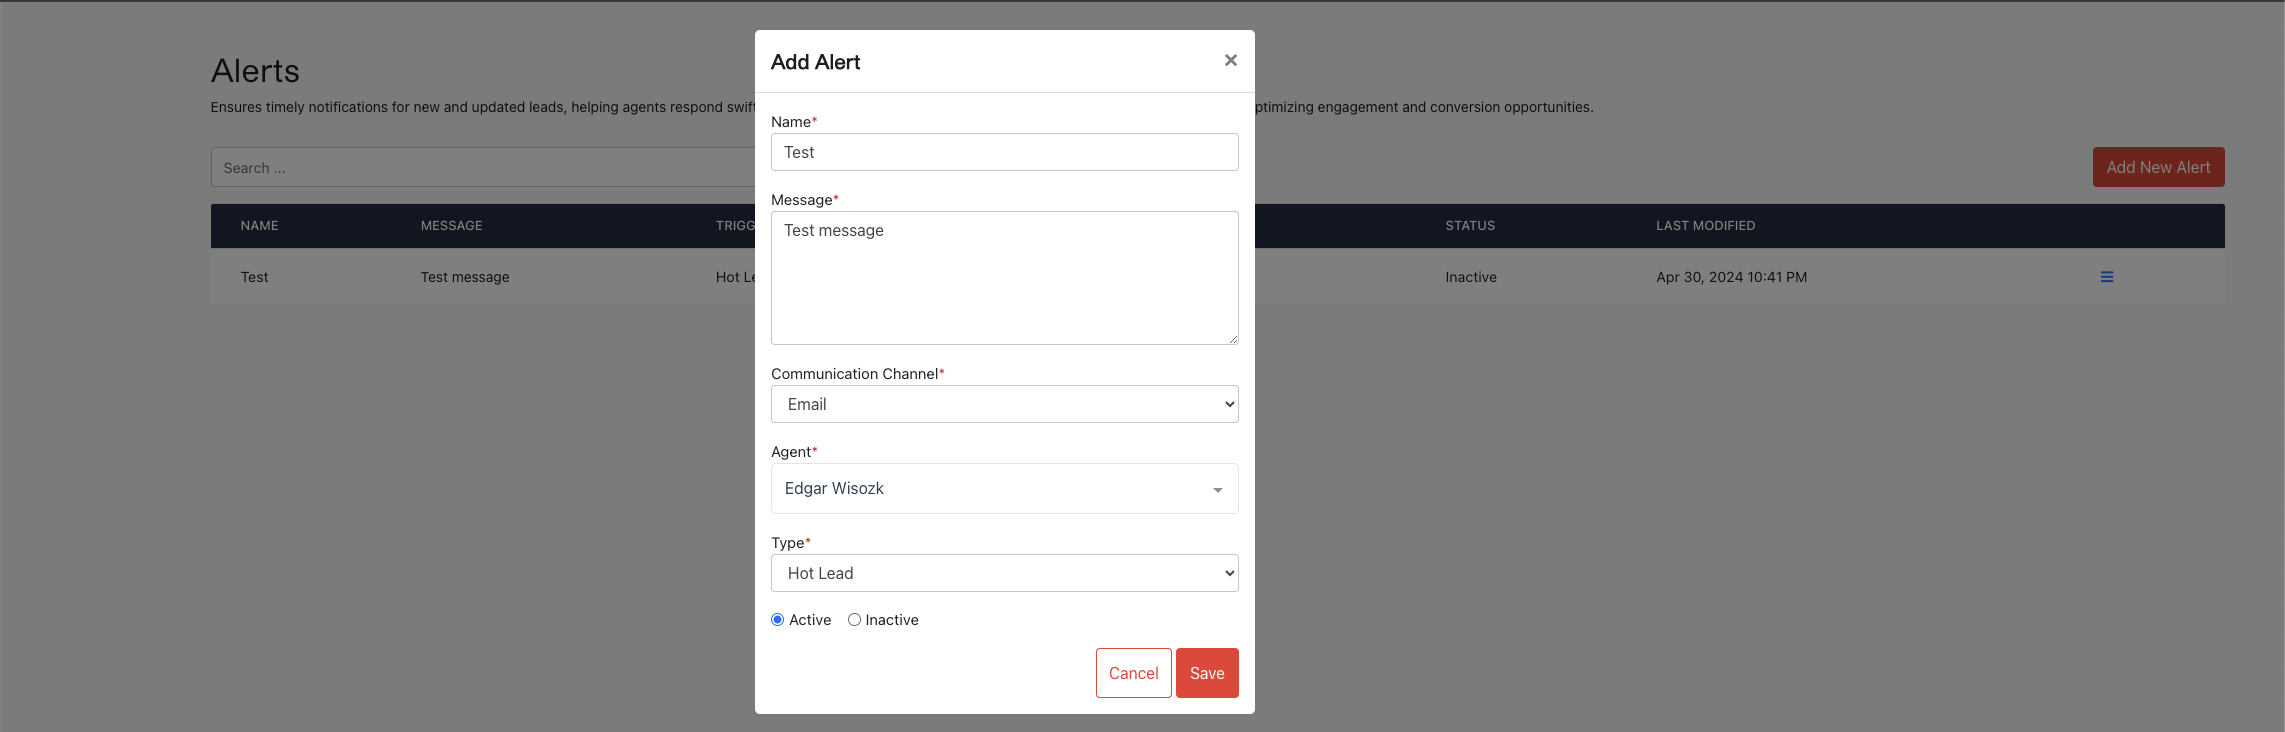
Alerts
This section is designed to provide timely notifications about new and updated leads, enabling agents to respond quickly and effectively. It monitors changes in lead status, upcoming task deadlines, and essential communication requirements, thereby enhancing engagement and maximizing conversion opportunities.
Agent Panel
Agents access a tailored version of the lead management system, designed to streamline their workflow and enhance productivity. Features include:
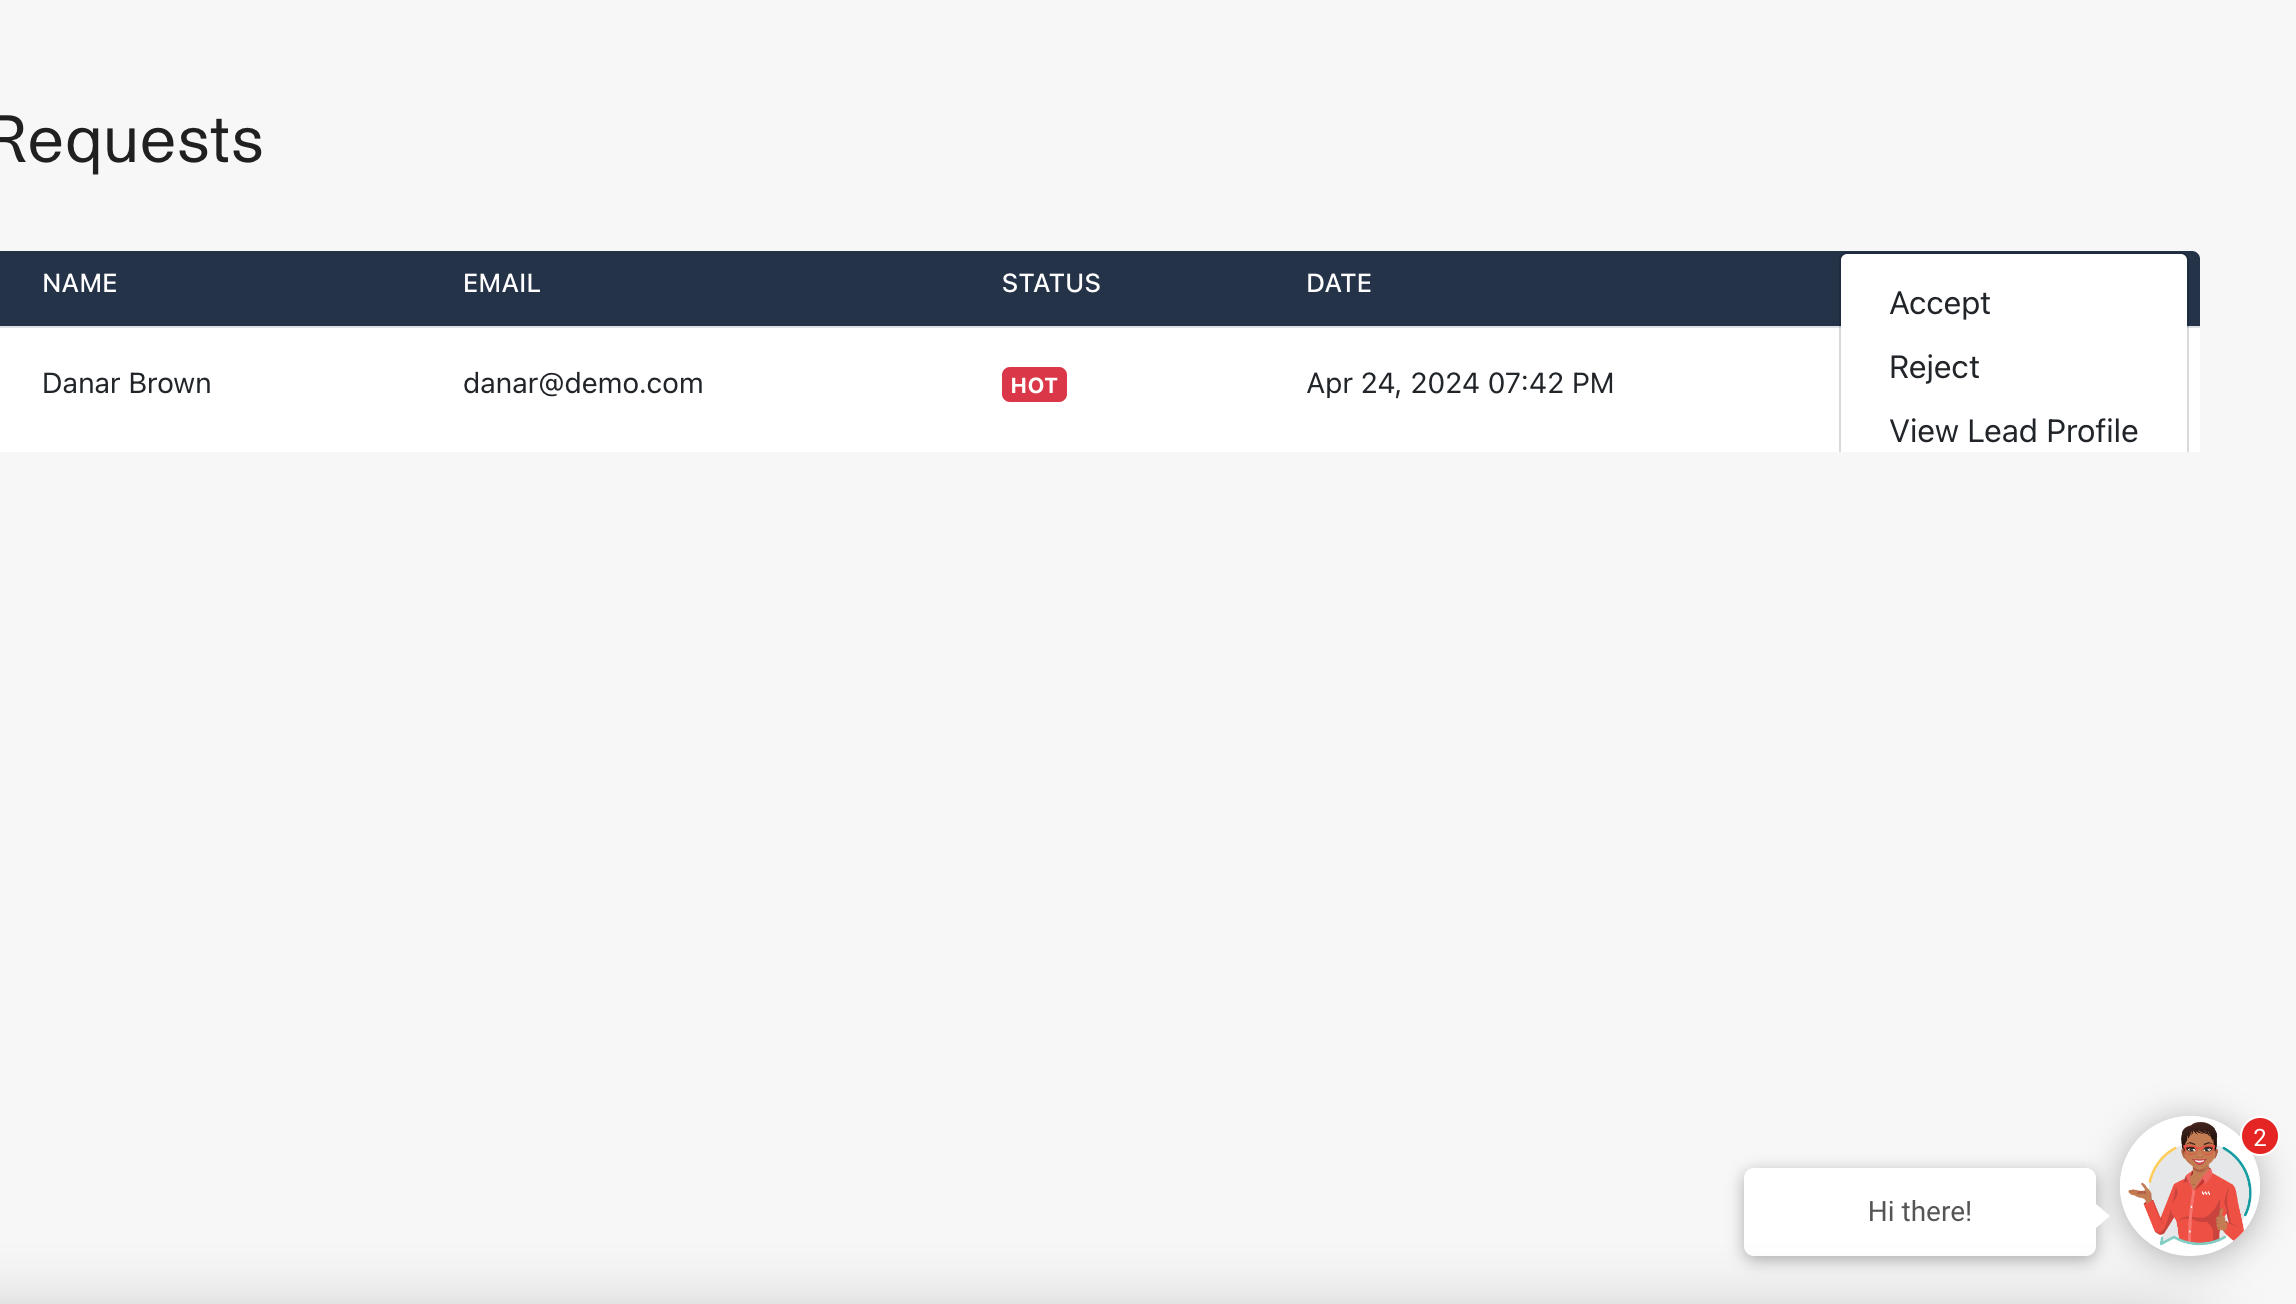
- View a list of lead assignment requests sent by the administrator, which can be accepted or rejected by the agent.
- Can view a list of leads they are assigned to, add a new lead to the system, and filter out records.
- Integration with email and SMS for direct communication with leads, including the ability to create new lead-specific tasks directly from these communications.
- Can view a list of alerts to stay updated on lead interactions and preferences.
Feature Screenshots
In this section, we provide visual insights into the various features available in the lead management system. These screenshots demonstrate the functionality and user interface that agents experience while using the system.
Requests
Leads
Tasks

Installation and Development Guide
Server Requirements - Both API and NUXT facing application
The Clearing House system was built using the Laravel architecture, this framework has the following system requirements. In order for a successful installation your server should meet the following requirements:
Recommended Server: UBUNTU / LINUX
- Ubuntu 18.04 or Higher
- Apache2
- PHP >= 7.0
- OpenSSL PHP Extension
- PDO PHP Extension
- Mbstring PHP Extension
- Tokenizer PHP Extension
- XML PHP Extension
- Ctype PHP Extension
- JSON PHP Extension
- MYSQL >= 5.7
- Composer >= V1
General Base Server Spec: UBUNTU / LINUX
- Memory: 2GB
- vCPUs: 2vCPUs | 1 Dedicated CPU
- Transfer: 3TB
- SSD Disk: 60GB
- Bk/UP: Daily
Once you have configured your server to the specifications above, do the following:
- Go to the Clearing House repository or your Dropbox folder.
- Clone or Download it to your web server root.
- Suppose, you kept the cloned/downloaded files in the main directory.
- Go to your Laravel directory (in Ubuntu Linux, it will be /var/www/Clearing_House).
- Run the following command -> Composer Install.
This will install the required dependencies to run Laravel. It will take some time to install all the dependencies.
If you are on Linux then you should also set write permission to bootstrap/cache and storage directories.
Here’s the command to do so:
sudo chmod -R 777 bootstrap/cache storage
Database Setup and Laravel Configuration
- Download and install MySQL.
- Set up your host, username, and password configuration.
- Create a new blank database “let's call it Clearing_House_tracker”.
After this, you should be able to browse your Clearing House site. If you get a ‘No encrypter found’ error, then it means that your site’s encryption key has not been generated yet.
Generate Encryption Key
- Go to your Clearing House directory.
- Rename .env.example to .env.
- Now, open terminal or command-prompt.
- Run the following command:
php artisan key:generate
You will see the message on the terminal saying application key set successfully. This will update the .env file present in your Laravel root folder. In that file, it will set the value of APP_KEY. This will solve the error, and now you should be able to browse the site properly.
Migrating and Seeding the Database
- Open the .env file you renamed earlier.
- Set your database connections as seen below:
                                        DB_CONNECTION=mysql
                                        DB_HOST=localhost
                                        DB_PORT=3306
                                        DB_DATABASE="your database name"
                                        DB_USERNAME="your MySQL username"
                                        DB_PASSWORD="your MySQL password"
Once that is complete, run the following commands:
-
php artisan migrate
- this will migrate your database. -
php artisan db:seed
- this will seed all the tables with the necessary configurations for Clearing House to work properly.
Now, you should be able to access Clearing House properly without any error, e.g., http://localhost/Clearing_House-tracker/public.
Setting up Email Gateway
The application can use any email provider to execute on sending transactional emails to visitors as well as other users of the system. Below are the fields required:
                                        MAIL_DRIVER=smtp
                                        MAIL_HOST=smtp.mailtrap.io
                                        MAIL_PORT=2525
                                        MAIL_USERNAME=null
                                        MAIL_PASSWORD=null
                                        MAIL_ENCRYPTION=null
Migrating and Seeding Your Database and Default Users
To migrate your database from the command line, run the following commands:
                                        php install --no-interaction --prefer-dist --optimize-autoloader
                                        php artisan migrate --force
                                        php artisan db:seed --force
Setting the Base URL and Nuxt URL in the .env File
In the .env file, set the following to your domain as follows:
                                        APP_URL="https://api.yourdomain.com"
                                        SESSION_DOMAIN=.yourdomain.com
                                        SANCTUM_STATEFUL_DOMAINS=yourdomain.com
Installing and Deploying NUXT JS to Your Server
- On a second server, install the following version of node and npm using
apt-get install nodejs npm
- Verify the versions:
- npm -v 6.14.15
- node -v v14.17.6
- Create a directory, for example,
/var/www/html/
, and pull the code from the repository. - Next, run the following commands to pull in all the required packages:
npm install
npm run build
- Change your IP address in the config file.
- Set up Nginx by installing it and configuring your site:
-
apt-get install nginx
- Type Y when prompted - Edit the Nginx site configuration:
nano /etc/nginx/sites-available/my.app
- Paste the following configuration, replacing the server_name with
your Droplet IP:
server { listen 80; listen [::]:80; index index.html; server_name your_server_ip; # Replace with your Droplet IP location / { proxy_pass http://localhost:3000; proxy_http_version 1.1; proxy_set_header Upgrade $http_upgrade; proxy_set_header Connection 'upgrade'; proxy_set_header Host $host; proxy_cache_bypass $http_upgrade; } } - Save the configuration file and create a symbolic link to the Nginx
'sites-enabled' directory:
ln -s /etc/nginx/sites-available/my.app /etc/nginx/sites-enabled/
- Test the Nginx configuration:
nginx -t
If the output indicates everything is ok, proceed to the next step. - Restart Nginx to apply the changes:
service nginx restart
-
- Install PM2 to manage your application process:
npm install pm2 -g
- The -g flag installs PM2 globally. - Start your application using PM2 from the project root folder:
pm2 start npm -- start
Helpful Links:
Importing Properties
- Setup Horizon by creating a server daemon that executes the
php artisan horizon
command from your site's root directory. - Add the
php artisan horizon:terminate
command to your site's deployment script, as described in Horizon's documentation. - For more information, see Laravel Horizon documentation.
Setup Server Environment
- Navigate to the “.env” file in the root folder of the project or create one if it doesn't exist.
- Ensure the “.env” file has
RETS_USERNAME={YOUR_RETS_USERNAME}andRETS_PASSWORD={YOUR_RETS_PASSWORD}. Add or update accordingly.
Import Currency Information
- Type
php artisan scrape:currency
in the root folder of the terminal. Press enter to begin scraping currency information. - This will start importing currency information. To confirm that this process was completed check /horizon of the domain used for the backend.
- The currency information is imported includes the name of the currency alongside the buying and selling price compared to Jamaican Dollars (JMD)
Import The Properties
- Type
php artisan import-properties
in the root folder of the terminal. Press enter to begin importing properties. - This will start importing MLS properties, which will take some time to complete. The status of processes responsible for importing the properties can be viewed at /horizon of the domain used for the backend.
Import External Agents
- Type
php artisan import:external-agents
in the root folder of the terminal. Press enter to begin importing external agents. - This will start importin RAJ certified agents, some of whom may be responsible for listing the properties imported above. The status of processes responsible for importing the properties can be viewed at /horizon of the domain used for the backend.
Daily Imports
Type
php artisan queue:workin the root folder of the terminal. Press enter to begin importing properties daily and import currency information daily.
Setting up Email Gateway
Below are the fields required for setting up any email provider to send transactional emails:
                    MAIL_DRIVER=smtp
                    MAIL_HOST=smtp.mailtrap.io
                    MAIL_PORT=2525
                    MAIL_USERNAME=null
                    MAIL_PASSWORD=null
                    MAIL_ENCRYPTION=null
Migrating and Seeding Your Database and Default Users
To migrate your database and seed default users, run the following commands from the command line:
                    php install --no-interaction --prefer-dist --optimize-autoloader
                    php artisan migrate --force
                    php artisan db:seed --force
Setting the Base URL and Nuxt URL in the .env File
Set the following in your .env file to configure your domain:
                    APP_URL="https://api.yourdomain.com"
                    SESSION_DOMAIN=.yourdomain.com
                    SANCTUM_STATEFUL_DOMAINS=yourdomain.com
Following these steps will ensure the Clearing House system is properly set up and configured, ready for use. For any further assistance, consult the provided helpful links or reach out to the support team.
Testing Documentation
Table of Contents
- Test Case #1: TC_REALTOR_USER_001 - Add City/Town to Property Listing
- Test Case #2: TC_REALTOR_USER_001 - Create Property (Updated)
- Test Case #3: TC_GUEST_USER_002 - Filter Property Search Results by Number per Page with One Click
- Test Case #4: GUESTUSER 002 - Filter Property Search Results Price in Ascending/Descending Order
- Test Case #5: TC_SYSTEM_ADMINISTRATOR_USER - Import Properties Listed on MLS
- Test Case #6: TC_SYSTEM_ADMINISTRATOR_USER - Update Previously Imported Properties Listed on MLS and Import New Ones
- Test Case #7: TC_GUEST_USER_002 - Search and Filter Properties
- Test Case #8: TC_GUEST_USER_002 - Calculate Mortgage Costs
- Test Case #9: TC_PURCHASER_001 - Verify Logged-in Purchaser Cannot Create Property
- Test Case #10: TC_REALTOR_001 - Filter Buyer’s Source of Funds by Status
- Test Case #11 (First Instance): TC_LAWYER_001 - Lawyer Uploads Sales Agreement and Instrument of Transfer
- Test Case #11 (Second Instance): TC_PURCHASER_002 - Purchaser Generates Offer to Purchase
- Test Case #12: TC_VALUATOR_001 - Valuator Uploads Valuation Report After Job Acceptance and Payment
- Test Case #13: TC_SURVEYOR_001 - Surveyor Uploads Report After Job Acceptance and Payment
Test Plan for VMI TurnKey Platform
Document Version: 1.0
Date: Feb 22 2024
Author: AppFinityTechnologies
1. Introduction
This test plan document provides an overview of the testing strategy and objectives for the Real Estate Platform. It outlines the test cases to be executed to validate the functionalities of property listing, searching, user management, and system integrations.
2. Test Objectives
- To verify that the property listing feature allows realtors to add new properties with accurate details.
- To ensure the property search functionality works as expected, providing users with relevant results based on their queries.
- To validate user role-based access control for different functionalities within the platform.
- To assess the system's ability to import and update property listings from external MLS sources.
3. Scope
The testing scope includes:
- User Interface testing for property listing and search functionalities.
- Backend API testing for user management, property listing, and search services.
- Integration testing with external MLS services for property data import.
- Security testing for user authentication and authorization.
4. Test Strategy
The testing will be conducted in the following phases:
- Unit Testing: Individual components will be tested for expected functionality.
- Integration Testing: Combined parts of the application will be tested to ensure they work together as expected.
- System Testing: The complete integrated system will be tested to verify that it meets all requirements.
- Acceptance Testing: The system will be tested in a real-world scenario to ensure it meets the user's needs.
5. Test Environment
The tests will be carried out in a controlled development environment with a configuration that mimics the production setup. This includes:
- Web and application servers
- Database server
- Test data
- Access to external MLS services for integration testing
6. Test Cases
Refer to the Test Cases section for a detailed list of all the test cases to be executed, including their objectives, steps, expected outcomes, and actual results.
7. Exit Criteria
Testing will conclude when the following criteria are met:
- All test cases have been executed.
- All critical bugs have been fixed and verified.
- The overall success rate of test cases exceeds 95%.
- Acceptance testing has been successfully completed with stakeholder approval.
8. Risks and Mitigation
- Risk: Integration with external MLS services may face unexpected issues. Mitigation: Work closely with service providers to ensure compatibility and have a contingency plan in place.
9. Approval
The test plan will be reviewed and approved by VMI stakeholders before execution.
Test Scripts
Test Case #1: TC_REALTOR_USER_001
Objective: Add City/Town to Property Listing
Author: Rushane Kerr
Pre-Conditions:
- The User is Registered as a Realtor
- The User is logged on
Test Steps:
- Go to ‘/profile/sell-properties/create’
- Select a Parish, this will then show the Towns/City Field with a list of towns and cities generated
- Select a town or city for the location of the property
Expected Output:
- Selecting a parish Should auto-generate a City/Town field with a set of Cities/Towns to choose from which the user may now select from
- Towns and Cities field should be cleared and new set generated if a new parish is selected
Actual Output: Selecting A Parish Created a City/Town Field with cities/towns to choose from
Test Case #2: TC_REALTOR_USER_001 (Create Property Updated)
Objective: Create Property (Updated)
Author: Rushane Kerr
Pre-Conditions:
- The User is Registered as a Realtor
- The User is logged on
Test Steps:
- Go to ‘/profile/sell-properties/create’
- To add a town or city see Test Case #1
- Type or select the values accordingly, validation is in place to ensure values are in the correct format
- Click The Save Changes button at bottom right of the page
Expected Output:
- A new property listing with the status of inactive will be created
Actual Output: A new property was created with the fields I entered being editable. The status was set to inactive.
Test Case #3: TC_GUEST_USER_002
Objective: Filter Property Search Results by number per page with one click
Author: Rushane Kerr
Pre-Conditions:
- There are properties within the database where the status is not (inactive)
- The User is either a guest or is logged-in
Test Steps:
- Go to /properties
- Select the amount of results per page you want to see on the right-most drop-down on the white bar that lists the amount of search results
Expected Output:
- The list of results on the page should be equal to or less than value selected depending on how many search results were returned
Actual Output: The results on the page were equal to or less than the selected value
Test Case #4: GUESTUSER 002
Objective: Filter Property Search Results price in ascending/descending order
Author: Rushane Kerr
Pre-Conditions:
- There are properties in the database where the status is not (inactive)
- The User is either a guest or is logged-in
Test Steps:
- Go to /properties
- Select the option Low/High (ascending) or High/Low (descending) on the second to right-most drop-down on the white bar that lists the amount of search results
Expected Output:
- The list of results on the page should be ordered by price values based on the order that was selected
Actual Output: The results on the page were ordered accordingly ascending order when (Low/High) was selected and descending order when (High/Low) was selected
Test Case #5: TC_SYSTEM_ADMINISTRATOR_USER
Objective: Import Properties Listed on MLS
Author: Rushane Kerr
Pre-Conditions:
- User has SSH access to the back-end that hosts the “VMI Backend” Repository
- User is familiar with Laravel Horizon
- Laravel Horizon is active and running
Test Steps:
- Go to the .env file in the root folder of the server currently hosting the “VMI Backend” Repository. Create one if it does not exist.
- Ensure that the .env file has RETS_USERNAME={YOUR_RETS_USERNAME} and RETS_PASSWORD={YOUR_RETS_PASSWORD}. Add accordingly or update if it is not there or it is incorrect.
- Type “php artisan import-properties” in the root folder of the terminal of the server that is currently hosting the “VMI Backend” Repository.
Expected Output:
- By going to /horizon of the backend hosting address, the user can view the jobs in progress, completed, etc.
- As jobs are in progress/completed by going to /properties of the front-end hosting address, the user can see the successful importation of properties, a maximum 50 at a time per job completed.
Actual Output: Properties are imported by maximum 50 per each job successfully completed.
Test Case #6: TC_SYSTEM_ADMINISTRATOR_USER (Update previously Imported Properties Listed on MLS and Import New Ones)
Objective: Update previously Imported Properties Listed on MLS and Import New Ones
Author: Rushane Kerr
Pre-Conditions:
- User has SSH access to the back-end that hosts the “VMI Backend” Repository.
- User is familiar with Laravel Horizon.
- Laravel Horizon is active and running.
Test Steps:
- Go to the .env file in the root folder of the server currently hosting the “VMI Backend” Repository. Create one if it does not exist.
- Ensure the .env file has RETS_USERNAME={YOUR_RETS_USERNAME} and RETS_PASSWORD={YOUR_RETS_PASSWORD}. Add accordingly or update if it is not there or incorrect.
- Type “php artisan queue:work” if worker isn't already running in the root folder of the terminal of the server that is currently hosting the “VMI Backend” Repository.
Expected Output:
- Based on daily activity on MLS existing properties should be updated and new ones created (this information can be checked by viewing the created_at/updated_at values of properties in the database).
Actual Output: Properties with modification dates post initial import date were either newly added or updated if they were already in the database.
Test Case #7: TC_GUEST_USER_002 (Search and Filter Properties)
Objective: Search and Filter Properties
Author: Rushane Kerr
Pre-Conditions: There are properties in the database without the status “inactive”.
Test Steps:
- Navigate to the home page or any page that has the vertical search and filter feature.
- On the home page, scroll to the form field directly after the site summary.
- Click on the buttons to select the category of the property you are looking for. The button with a “red (grapefruit)” color background will determine the category of the results returned.
- On The form below, there is one text field and the rest are select fields. Select any number of combinations available to search for (1 at a time only for each field).
- The text field requires you to type in information, however, this field is only useful if you type in an existing MLS number; otherwise, the number of results returned will always be zero.
- Click the “Search” button to search for properties or “Reset” button to clear the fields and return to the default state.
Expected Output:
- The user should be navigated to /properties page with the number of results shown and only a list of properties that matches the search criteria.
- Zero to One property result(s) should be returned if the MLS field was utilized in the search.
Actual Output: Navigated to /properties page with the number of results and a list of properties shown matching the search criteria.
Test Case #8: TC_GUEST_USER_002 (Calculate Mortgage Costs)
Objective: Filter Property Search Results price in ascending/descending order
Author: Rushane Kerr
Pre-Conditions:
- There are properties in the database where the status is not (inactive)
- The User is either a guest or is logged-in
Test Steps:
- Go to /properties
- Select the option Low/High (ascending) or High/Low (descending) on the second to right-most drop-down on the white bar that lists the amount of search results
Expected Output:
- The list of results on the page should be ordered by price values based on the order that was selected
Actual Output: The results on the page were ordered accordingly ascending order when (Low/High) was selected and descending order when (High/Low) was selected
Test Case #9: TC_PURCHASER_001
Objective: To verify that a logged-in purchaser cannot create a property
Author: Xanius Hall
Pre-Conditions:
- The user is registered on the platform with the role of “Buyer”
- The user is already logged on
Test Steps:
- Log in with the purchaser account details
- Navigate to the section of the page where property creation is usually available, which is the dashboard menu option that says “Sell Properties”
Expected Output:
- The “Sell Properties” link should not be visible to the logged-in purchaser
- If the purchaser tries to navigate to the property creation directly (via profile/sell-properties), they should be redirected to the dashboard page
Actual Output: The “Sell Properties” link was not visible to the logged-in purchaser. When the purchaser attempted to navigate directly to the property creation page (via profile/sell-properties), they were redirected to the dashboard page
Test Case #10: TC_REALTOR_001
Objective: To verify that the realtor can filter the “Buyer’s Source of Funds” by status (Submitted, Approved, Rejected).
Author: Xanius Hall
Pre-Conditions:
- User is registered as a Realtor on the platform.
- User is logged in.
- There is an existing transaction with various statuses.
Test Steps:
- Log in with the realtor account.
- Navigate by clicking 'Sell Properties' on the dashboard menu and select a transaction from the data table.
- Locate the ‘Buyer’s Source of funds filter”.
- Select the status ‘Submitted’ from the filter.
- Observe the transaction list.
- Change the filter to 'Approved'.
- Observe the transaction list.
- Change the filter to 'Rejected’.
- Observe the transaction list.
Expected Output:
- When the 'Submitted' status is selected, only transactions with the source of funds marked as 'Submitted' should be displayed.
- When the 'Approved' status is selected, only transactions with the source of funds marked as 'Approved' should be displayed.
- When the 'Rejected' status is selected, only transactions with the source of funds marked as 'Rejected' should be displayed.
Actual Results: When a user selected the 'Submitted' status, the transactions with the source of funds marked as 'Submitted' were displayed. When a user selected the 'Approved' status, the transactions with the source of funds marked as 'Approved' were displayed. When a user selected the 'Rejected' status, the transactions with the source of funds marked as 'Rejected' were displayed.
Test Case #11: TC_LAWYER_001
Objective: To verify that a lawyer can upload a Sales Agreement and Instrument of Transfer for a property transaction after accepting a job request and after the client has made the payment.
Author: Xanius Hall
Pre-Conditions:
- User is registered as a Lawyer on the platform.
- A job request has been sent to the lawyer by a user seeking legal services.
- Lawyer is logged in.
Test Steps:
- Log in with the lawyer account using the username and password.
- Navigate to the Job Request section by clicking “My Request” on the dashboard menu.
- Locate the job request and click “Accept” to accept the job request.
- Log in as the purchaser and make payment for the service on the property transaction. Go to the 'Assign Attorney' tab.
- Confirm that the offer to purchase the property has been accepted by the realtor.
- Navigate to the Legal Documents tab for the property transaction.
- Upload the Sales Agreement and Instrument of Transfer documents.
Expected Output:
- The lawyer should be able to see and accept the job request.
- After accepting, the user should be prompted to make a payment.
- Once the payment is made, the offer to purchase should be accepted by the realtor.
- The Sales Agreement and Instrument of Transfer should be successfully uploaded and saved in the system.
Actual Output: The lawyer was able to see and accept the job request. After accepting, the user was prompted to make a payment. After the payment was made, the offer to purchase was accepted by the realtor. The Sales Agreement and Instrument of Transfer were successfully uploaded and saved in the system.
Test Case #12: TC_VALUATOR_001
Objective: To verify that the valuator can upload a valuation report after accepting a job request and receiving payment from a user who is purchasing a property.
Author: Xanius Hall
Pre-Conditions:
- The valuator is registered on the platform.
- The valuator has received a job request from a user for property valuation.
- The valuator and the user are logged in.
- The user has reached the "Property Valuation Report" step in their property transaction flow.
Test Steps:
- Log in with the valuator account using username.
- Navigate to the 'My Requests' view.
- Accept the job request from the user.
- Verify in the system that the user has made the payment under the "Property Valuation Report" step.
- Navigate to 'My Requests' and go to the 'Delivery' tab.
- Upload the valuation report.
- Check if the job status is marked as complete.
Expected Output:
- Valuator should be able to accept the job request.
- System should confirm that the user has made the payment.
- 'Upload' button should be available under the 'Delivery' tab.
- Valuation report should be uploaded successfully.
- The user should be able to download the uploaded report from their "Property Valuation Report" tab.
- The job should be marked as complete.
Actual Output: The valuator accepted the job request. The system confirmed that the user made the payment. The 'Upload' button was available under the 'Delivery' tab. The valuation report was uploaded successfully. The user was able to download the uploaded report from their "Property Valuation Report" tab. The job was marked as complete.
Test Case #13: TC_SURVEYOR_001
Objective: To verify that the surveyor can upload a report after accepting a job request and receiving payment from a user who is purchasing a property.
Author: Xanius Hall
Pre-Conditions:
- The surveyor is registered on the platform.
- The surveyor has received a job request from a user for a surveyor report.
- The surveyor and the user are logged in.
- The user has reached the "Surveyor Report" step in their property transaction flow.
Test Steps:
- Log in with the surveyor account using the username.
- Navigate to the 'My Requests' view.
- Accept the job request from the user.
- Verify in the system that the user has made the payment under the "Surveyor Report" step.
- Navigate to 'My Requests' and go to the 'Delivery' tab.
- Upload the report.
- Check if the job status is marked as complete.
Expected Output:
- Surveyor should be able to accept the job request.
- System should confirm that the user has made the payment.
- 'Upload' button should be available under the 'Delivery' tab.
- Surveyor report should be uploaded successfully.
- The user should be able to download the uploaded report from their "Surveyor Report" tab.
- The job should be marked as complete.
Actual Output: The surveyor was able to accept the job request. The system confirmed that the user made the payment. The 'Upload' button was available under the 'Delivery' tab. The surveyor report was successfully uploaded. The user was able to download the uploaded report from their "Surveyor Report" tab. The job was marked as complete.
REALTOR PROCESS FLOW TEST SCRIPTS
Test Script #1: Becoming A Realtor
Objective: Validate the registration process for users applying to become a realtor on the VM Turnkey Application.
Author: Appfinity
Pre-Conditions:
- The user has not previously registered on the VM Turnkey platform.
- The user is at the registration page ready to select a role.
Test Steps:
- Navigate to the VM Turnkey Application registration page (/register).
From the role selection dropdown, choose "Realtor".
- Expected: The form updates to include realtor-specific fields.
- Enter a valid First Name in the 'First Name' field.
Enter a valid Last Name in the 'Last Name' field.
Input a unique and valid Email address in the 'Email' field.
- Expected: The system checks in real-time or upon submission that the email is unique.
- Enter a password in the 'Password' field and repeat it exactly in the 'Confirm Password' field.
Expected Output:
- The system validates all inputs and submits the form if all validations pass.
- A confirmation message or page is displayed, indicating the successful
submission of the application and that it
is pending administrator approval.
- Expected: The system validates both fields match. Provide a unique registration number in the 'Registration Number' field.
Actual Output: Upon submission, the form was successfully processed, and the user received a confirmation message indicating the application is under review.
VALUATOR PROCESS FLOW TEST SCRIPTS
Test Script #1: Becoming A Valuator
Objective: Ensure the VM Turnkey Application registration process for users applying as a Valuator is validated correctly.
Author: Appfinity
Pre-Conditions:
- The user is at the registration page and has not previously registered as any role on the VM Turnkey platform.
Test Steps:
- Navigate to the VM Turnkey Application registration page (/register).
- Select "Valuator" from the role selection dropdown.
- Expected: The form updates to include Valuator-specific fields.
- Enter a valid First Name in the 'First Name' field and a valid Last Name in
the 'Last Name' field.
- Expected: The system accepts the input without errors.
- Provide a unique and valid Email address in the 'Email' field.
- Expected: The system checks and confirms the email's uniqueness and format.
- Enter a password in the 'Password' field and repeat it in the 'Confirm
Password' field, ensuring an exact match.
- Expected: The system validates the match between the two fields.
- Input a unique registration number in the 'Registration Number' field.
- Expected: The system verifies the uniqueness of the registration number.
- Upload a licensure confirmation certificate, ensuring the file is under
10MB.
- Expected: The system checks the file type and size, accepting the upload if within limits.
- Agree to the Terms and Conditions by ticking the checkbox.
- Submit the registration form by clicking the 'Submit' button.
Expected Output:
- The registration form submission is successful, pending administrator review and approval.
- A message is displayed, indicating the registration is under review and awaiting approval.
Actual Output: The registration form was accepted without errors, and the user received a notification about the pending administrator approval.
Test Script #2: Accept Bid/Request
Objective: Verify Valuators can accept bids or requests for property valuation jobs once the purchaser reaches the appropriate step in the mortgage application process.
Author: Appfinity
Pre-Conditions:
- The Valuator is logged in and has been approved.
- A purchaser has reached step 8 in the Mortgage application Process Flow, enabling job requests for valuation.
Test Steps:
- Log in as a Valuator and navigate to the 'Job Requests' section.
- Review available bids or requests submitted by purchasers.
- Select a bid or request to accept and confirm the action.
Expected Output:
- The selected bid or request is successfully accepted by the Valuator.
- A confirmation message is displayed, and the job is added to the Valuator's active jobs list.
Actual Output: The bid/request acceptance process was completed successfully, and the confirmation of the new job was displayed to the Valuator.
Test Script #3: Counter Bid
Objective: Ensure Valuators can submit counter bids to job requests, adhering to all field requirements and validations.
Author: Appfinity
Pre-Conditions:
- The Valuator is logged in and viewing a bid or job request.
- The initial job request has been made by a purchaser, and the Valuator is considering a counteroffer.
Test Steps:
- Select a job request to counter bid and initiate the counter bid process.
- Enter all required fields for the counter bid, ensuring no fields are left empty and the bid amount is a whole number.
- Submit the counter bid.
Expected Output:
- The counter bid is successfully submitted if all validations pass.
- A message is displayed, indicating the successful submission of the counter bid.
Actual Output: The counter bid submission was validated and processed successfully, with a confirmation message indicating the bid is awaiting purchaser response.
Test Script #4: Providing Service
Objective: Validate that Valuators can deliver their services by uploading necessary documents post-payment by the purchaser.
Author: Appfinity
Pre-Conditions:
- The Valuator is logged in and has an active job for which payment has been made.
- The service delivery tab is accessible for the job.
Test Steps:
- Navigate to the 'Delivery' tab for an active job where payment has been confirmed.
- Attempt to upload the completion document, ensuring it's a text-like file and meets any specified requirements.
- Submit the document for the completed service.
Expected Output:
- The document upload is successful, indicating the service has been provided.
- A confirmation message or status update is displayed, showing the job is complete.
Actual Output: The service delivery document was uploaded without issues, and the job status was updated to complete with a visible confirmation for the valuator.
Test Script #1: Transition to "Under Offer" Status
Objective: Validate the transition of a property's status to "Under Offer" after an offer is submitted and accepted by the realtor.
Author: Appfinity
Pre-Conditions:
- The property is listed as "Active" on the VM Turnkey platform.
- A potential buyer is interested and ready to submit an offer.
Test Steps:
- As a purchaser, navigate to the active property listing and select "Generate Offer to Purchase".
- Fill out the offer to purchase form with the proposed terms and submit the
offer.
- Expected: The system acknowledges the submission and notifies the realtor.
- As the realtor, receive and review the offer in the "Offers" section for the property.
- Accept the offer to initiate negotiations, while keeping the property open
for competing offers.
- Expected: The system updates the property status to "Under Offer" and notifies both the realtor and the purchaser.
Expected Output:
- The property status is successfully updated to "Under Offer" on the platform.
- Both the purchaser and the realtor receive confirmation of the status change.
Actual Output: The offer submission and acceptance process was completed as expected, with the property status updated to "Under Offer" and relevant parties notified.
Test Script #2: Transition to "Under Contract" Status
Objective: Ensure a property's status changes to "Under Contract" after offer acceptance, valuation, survey completion, and initial sale agreement steps are fulfilled.
Author: Appfinity
Pre-Conditions:
- The property is in the "Under Offer" status with an accepted offer.
- The purchaser is ready to proceed with the valuation, survey, and sale agreement.
Test Steps:
- As the purchaser, assign a valuator and surveyor through service requests
and complete payments for these services.
- Expected: Valuation and survey reports are generated and uploaded to the platform.
- Await the attorney to prepare and sign the sale agreement and instrument of
transfer, then upload the proof of deposit or make a deposit payment.
- Expected: The system verifies the documents and payment, allowing the transaction to proceed.
- As the administrator, review the uploaded documents and payment
confirmation, then update the property status to "Under Contract".
- Expected: The property status is updated on the platform, and all parties are notified of the change.
Expected Output:
- The property status is successfully updated to "Under Contract".
- The purchaser, realtor, and other stakeholders are informed of the status change.
Actual Output: The transition to "Under Contract" was executed smoothly with all conditions met, and the platform reflected the new status accurately.
Test Script #3: Transition to "Sold" Status
Objective: Confirm the property status is updated to "Sold" upon completion of all sale contingencies and legal formalities.
Author: Appfinity
Pre-Conditions:
- The property is "Under Contract" with all sale terms agreed upon and contingencies nearing completion.
Test Steps:
- Ensure all sale contingencies, such as final inspections and financing, are completed satisfactorily.
- Confirm all legal documents, including the sale agreement and transfer of ownership, are signed by both parties.
- As the administrator, update the property status to "Sold" in the system
once all conditions are met.
- Expected: The platform reflects the "Sold" status, indicating the successful closure of the transaction.
Expected Output:
- The property is marked as "Sold" on the VM Turnkey platform, indicating the transfer of ownership is complete.
- All relevant parties are notified of the sale completion.
Actual Output: The property status was successfully updated to "Sold" following the completion of the sale process, with notifications sent to all involved parties.
Fee Structure Overview and Test Scripts
Objective: Test the application of various fees throughout the user journey on the VM Turnkey platform, ensuring correct implementation and user notification.
Author: Appfinity
Pre-Conditions:
- Users are performing actions that trigger fee requirements, such as submitting property offers or requesting services.
Test Steps for Each Fee Type
- Perform the action that triggers the specific fee (e.g., submit a property offer for the Property Offer Fee).
- Complete the required steps until the point where the fee should be applied.
- Confirm the fee is displayed, applied correctly, and users are notified of
the fee requirement.
- Expected: The system accurately calculates the fee, applies it to the user's transaction, and provides clear notification and breakdown of the fee.
Expected Output for Each Fee Type:
- The fees are applied correctly at the designated steps in the user journey, with transparent communication to the user regarding the amount and purpose of the fee.
Actual Output: Each fee was applied as expected, with users receiving accurate calculations and notifications regarding the fee applications.
SURVEYOR’S PROCESS FLOW TEST SCRIPTS
Test Script #1: Becoming A Surveyor
Objective: Ensure the registration process for users applying as a Surveyor on the VM Turnkey Application is validated and processed correctly.
Author: Appfinity
Pre-Conditions:
- The user is at the VM Turnkey Application registration page and has not previously registered.
Test Steps:
- Navigate to Registration: Access the VM Turnkey Application registration page.
- Select Role: Choose "Surveyor" from the role selection options.
- Expected: The form dynamically updates to include Surveyor-specific requirements.
- Enter Personal Information: Fill in the First and Last Name fields.
- Expected: Validation checks ensure both fields are populated.
- Provide Email Address: Input a unique and valid Email address.
- Expected: The system verifies the email's uniqueness and format.
- Set Password: Enter a password and repeat it in the password confirmation
field, ensuring both match.
- Expected: The system confirms the passwords match and meet security criteria.
- Registration Number: Input a unique registration number.
- Expected: The system checks the registration number's uniqueness.
- Upload Certification: Attach a licensure confirmation file, ensuring it is
under 10MB.
- Expected: The upload is validated for file type and size.
- Agree to Terms: Mark agreement to the platform's Terms and Conditions.
- Submit Form: Complete the submission of the registration form.
- Expected: The system processes the form, pending administrator review.
Expected Output:
- Registration is successfully submitted and awaits administrator approval.
- A confirmation message indicates the pending status of the application.
Actual Output: The form submission proceeded without errors, and a notification was displayed about the application's review status.
Test Script #2: Accepting Bid/Request
Objective: Validate a Surveyor's ability to accept bids or requests for services once the purchaser is at the relevant mortgage application step.
Author: Appfinity
Pre-Conditions:
- The Surveyor is approved and logged in.
- A purchaser has reached step 9 of the mortgage application process, enabling service requests.
Test Steps:
- View Job Requests: Access the 'Job Requests' section to see available bids.
- Accept Bid/Request: Choose a bid to accept and confirm the acceptance.
- Expected: The system updates the job status to reflect the Surveyor's acceptance.
Expected Output:
- The bid/request is marked as accepted by the Surveyor.
- Both the Surveyor and the purchaser receive confirmation of the acceptance.
Actual Output: The acceptance process was completed as anticipated, with status updates and notifications sent accordingly.
Test Script #3: Counter Bidding
Objective: Test the Surveyor's capability to submit counter bids on job requests, adhering to input validations.
Author: Appfinity
Pre-Conditions:
- The Surveyor is reviewing a bid or job request.
- The initial job request has been made, and the Surveyor considers a counteroffer.
Test Steps:
- Initiate Counter Bid: Select a job request and start the counter bid process.
- Enter Bid Details: Complete all required fields for the counter bid,
ensuring the bid amount is a whole number.
- Expected: The system validates inputs and accepts the counter bid submission.
- Submit Counter Bid: Finalize and submit the counter bid.
- Expected: A validation check occurs, and the bid is submitted if successful
Expected Output:
- The counter bid is submitted successfully, with the system displaying a confirmation message.
- The purchaser is notified of the new counter bid.
Actual Output: Counter bid submission proceeded smoothly, with all parties receiving appropriate notifications.
Test Script #4: Providing Service
Objective: Ensure Surveyors can deliver their services by uploading necessary documentation after service payment by the purchaser.
Author: Appfinity
Pre-Conditions:
- The Surveyor has an active job with confirmed payment.
- The 'Delivery' tab is accessible for uploading completion documents.
Test Steps:
- Access Delivery Tab: Navigate to the 'Delivery' section for an active, paid job.
- Upload Completion Document: Attach the necessary service completion file,
ensuring it's a compatible text-like format.
- Expected: The system checks the file format and accepts the upload.
- Submit Document: Complete the upload process to indicate service delivery.
- Expected: The platform updates the job status to reflect the completed service.
Expected Output:
- The completion document is uploaded successfully, marking the service as delivered.
- The system updates the job status, and the purchaser can access the uploaded document.
Actual Output: Document upload was successful, with the job status updated accordingly and the purchaser notified of the service completion.
MORTGAGE CALCULATOR TEST SCRIPTS
Test Script: Mortgage Calculator Functionality
Objective: Validate the functionality of the Mortgage Calculator by verifying that it accurately computes monthly mortgage payments based on input values for loan period, property cost, deposit, and interest rate.
Author: Appfinity
Pre-Conditions:
- The Mortgage Calculator is accessible on the VM Turnkey platform.
- User has property cost, deposit amount, loan period in years, and interest rate ready for input.
Test Steps:
- Access Mortgage Calculator: Navigate to the Mortgage Calculator feature on the platform.
- Input Loan Period: Enter a loan repayment period, e.g., 25 years, and
confirm the calculator converts this to months (e.g., 300 months).
- Expected: The calculator automatically converts years to months.
- Determine Loan Amount: Input the property cost and deposit amount. The
calculator should subtract the deposit from the property cost to find the
loan amount.
- Expected: The loan amount displayed is the property cost minus the deposit.
- Set Interest Rate: Enter an annual interest rate, and confirm the calculator
converts this to a monthly rate by dividing by 12 and converting to decimal.
- Expected: The monthly interest rate is accurately calculated and displayed.
- Calculate Monthly Payment: With all inputs set, initiate the mortgage
payment calculation.
- Calculation Steps:
- Multiply the loan amount by the monthly interest rate.
- Compute the denominator of the formula as 1 minus (1 + monthly rate)^(-total months).
- Divide the numerator by the denominator, then divide by 10 and round off to the nearest whole number.
- Finally, round the monthly payment up to the nearest 10.
- Expected: The calculator outputs the monthly payment amount, rounded as specified.
- Calculation Steps:
Expected Output:
- The Mortgage Calculator provides an accurate monthly payment amount based on the inputs, adhering to the specified rounding rules.
Actual Output: Upon entering the test data and performing the calculation, the Mortgage Calculator displayed the expected monthly payment, confirming its accuracy and functionality according to the described calculation process.
ATTORNEY PROCESS TEST SCRIPTS
Test Script #1: Attorney Registration and Profile Setup
Objective: Ensure attorneys can register, get approved by an administrator, and successfully set up their profiles, including service offerings.
Author: Appfinity
Pre-Conditions:
- The user has not previously registered on the VM Turnkey platform.
- The administrator is available to review and approve new registrations.
Test Steps:
- Registration: Navigate to the registration page and select "Attorney" as the
role. Fill in the required fields: Name, Email, and Password. Submit the
registration form.
- Expected: A confirmation message indicates that the registration is pending approval.
- Administrator Approval: Log in as an administrator and approve the
attorney's registration.
- Expected: The attorney receives an email notification about the approval.
- Profile Setup: The attorney logs in and navigates to the profile setup page.
Enters Bio, uploads a Display Image, and outlines services with
descriptions, costs, and SLAs.
- Expected: The profile is updated successfully with all the new information
Expected Output:
- The attorney's registration is approved, and the profile is fully set up with detailed service offerings.
Actual Output: The attorney was able to register, receive approval, and complete the profile setup, including service details.
Test Script #2: Managing Job Requests
Objective: Validate attorneys' ability to receive, accept, or reject direct job requests from buyers, including the payment of a retainer fee and SLA upload.
Author: Appfinity
Pre-Conditions:
- The attorney has an active profile on the VM Turnkey platform.
- Buyers are able to send job requests to attorneys.
Test Steps:
- Receive Job Request: The attorney receives a direct job request via email.
- Accept Job Request: The attorney accepts the job request. The buyer is then
required to pay a retainer fee.
- Expected: Upon payment, the attorney uploads the SLA for the service.
- Reject Job Request: Alternatively, the attorney rejects a job request.
- Expected: The buyer receives an email notification about the rejection.
Expected Output:
- The attorney successfully manages job requests, with actions including accepting with SLA upload or rejecting with notifications to the buyer.
Actual Output: Job requests were managed as expected, with all necessary communications and document exchanges completed.
Test Script #3: Participation in Auctions and Document Management
Objective: Test attorneys' ability to participate in property auctions and manage documents efficiently within the system.
Author: Appfinity
Pre-Conditions:
- Auctions for property purchasing are available on the VM Turnkey platform.
- The attorney has access to the Document Management and Exchange System.
Test Steps:
- Bid in Auctions: The attorney views auction details and places a bid.
- Expected: If the bid is successful and the retainer fee is received, the attorney proceeds with SLA upload.
- Document Management: The attorney uses the Document Management System to
upload necessary documents for transactions.
- Expected: Documents are uploaded efficiently, streamlining the transaction process.
Expected Output:
- The attorney actively participates in auctions and manages documents effectively, enhancing transaction efficiency.
Actual Output: The attorney's participation in auctions and document management was executed seamlessly, aligning with the platform's efficiency goals.
Test Script #4: Notifications and Alerts
Objective: Confirm that attorneys receive timely notifications and alerts regarding auction bids, client interactions, and SLA deadlines.
Author: Appfinity
Pre-Conditions:
- The attorney is involved in auctions and has active job requests or bids from clients.
- The system is set to send notifications and alerts based on predefined triggers.
Test Steps:
- Receive Auction Bid Status Updates: The attorney gets notified about the status of auction bids.
- Client Bid Approval/Rejection Notifications: The attorney is informed when a client approves or rejects their bid.
- SLA Deadline Alerts: The attorney receives system alerts related to SLA delivery deadlines.
- Offer to Purchase Notifications: The attorney gets an email notification
when an Offer to Purchase is made on a client's property.
- Expected: The attorney can take timely actions based on these notifications.
Expected Output:
- The attorney stays well-informed through timely notifications and alerts, allowing for prompt responses to auction updates, client interactions, and SLA obligations.
Actual Output: Notifications and alerts were delivered as expected, ensuring the attorney remained updated on all relevant activities and deadlines.
Test Script #5: Uploading Signed Sale Agreement
Objective: Ensure attorneys can successfully upload signed sale agreements for transactions, further streamlining the property sale process.
Author: Appfinity
Pre-Conditions:
- The attorney is actively involved in a property transaction on the VM Turnkey platform.
- A sale agreement has been drafted, signed by the relevant parties, and is ready for upload.
Test Steps:
- Access Transaction: The attorney logs in and navigates to the specific property transaction requiring the sale agreement upload.
- Upload Document: Selects the option to upload documents and chooses the
signed sale agreement file from their device.
- Expected: The system checks the file type and size, ensuring it meets the platform's requirements.
- Confirm Upload: Submits the document for upload to the platform, associating
it with the relevant transaction.
- Expected: The system confirms the successful upload and updates the transaction status accordingly.
Expected Output:
- The signed sale agreement is uploaded successfully to the platform, with the transaction updated to reflect this critical step.
Actual Output: The attorney completed the upload of the signed sale agreement without issue, and the transaction status was updated to indicate the progress, enhancing the transparency and efficiency of the sale process.
BUYER PROCESS TEST SCRIPTS
Test Script #1: Buyer Registration and Property Selection
Objective: Confirm that a prospective buyer can register on the VM Turnkey platform, select a property, and initiate the transaction process by choosing a payment method.
Author: Appfinity
Pre-Conditions:
- The prospective buyer has not previously registered on the VM Turnkey platform.
- There are available properties listed on the platform.
Test Steps:
- Registration: The prospective buyer visits the VM Turnkey platform,
navigates to the registration page, fills in the required details, and
submits the registration form.
- Expected: The platform acknowledges the registration and prompts the buyer to verify their email address, completing the registration process.
- Property Selection: After logging in, the buyer browses the property
listings, selects a property of interest by clicking the "Own Now" button,
and is directed to the property transaction view.
- Expected: The transaction view displays detailed information about the property and prompts the buyer to choose a payment method.
- Choose Payment Method: The buyer selects their preferred payment method from
the options provided: cash or mortgage.
- Expected: The system updates the transaction process based on the selected payment method and guides the buyer to the next steps.
Expected Output:
- The buyer successfully registers, selects a property, and initiates the transaction process by choosing a payment method.
Test Script #2: Mortgage Application and Property Viewing
Objective: Verify the buyer's ability to apply for mortgage pre-qualification, upload a pre-approval letter, submit fund source documents, and optionally schedule a property viewing.
Author: Appfinity
Pre-Conditions:
- The buyer has initiated a property transaction and selected mortgage as their payment method.
Test Steps:
- Mortgage Pre-Qualification/Pre-Approval Letter Upload: The buyer either
selects a mortgage institution and applies for pre-qualification or uploads
a pre-approval letter from a financial institution.
- Expected: The platform records the buyer's choice and status is pending until lender approval is received.
- Lender Approval: The buyer awaits confirmation from the lender. If rejected,
the buyer is prompted to upload a pre-approval letter.
- Expected: The buyer either moves forward with lender approval or uploads a pre-approval letter to proceed.
- Fund Source Document Submission: Following lender approval, the buyer
submits the required fund source documents for the realtor's review.
- Expected: The realtor reviews the documents, and approval allows the process to proceed.
- Schedule Property Viewing (Optional): The buyer may choose to schedule a
viewing appointment with the realtor.
- Expected: The system facilitates the scheduling, and the buyer awaits confirmation from the realtor.
Expected Output:
- The buyer successfully navigates the mortgage application process, submits fund source documents, and optionally schedules a property viewing.
Test Script #3: Offer Submission, Legal Engagement, and Transaction Advancement
Objective: Ensure the buyer can engage an attorney, submit an Offer to Purchase, and proceed with the transaction upon offer acceptance.
Author: Appfinity
Pre-Conditions:
- The buyer has completed the initial steps of the mortgage application process or has chosen cash as the payment method.
Test Steps:
- Engage Attorney: The buyer selects an attorney through the platform to
represent them in the transaction.
- Expected: The attorney is linked to the buyer's transaction.
- Generate and Submit Offer to Purchase: The buyer fills out and submits the
Offer to Purchase Form.
- Expected: The offer is submitted for review by the realtor/seller.
- Await Offer Acceptance: The buyer waits for the offer to be accepted to move
forward with the transaction.
- Expected: Upon acceptance, the transaction process advances to the next steps
Expected Output:
- The buyer successfully engages an attorney, submits an Offer to Purchase, and the transaction advances upon offer acceptance.
Test Script #4: Completion of Transaction Process
Objective: Validate the completion of the transaction process for both mortgage and cash purchases, including document submissions and final steps.
Author: Appfinity
Pre-Conditions:
- The buyer's Offer to Purchase has been accepted.
- The buyer is at the final stages of completing the transaction.
Test Steps:
- Valuator and Surveyor Assignment: For both mortgage and cash purchases, the
buyer assigns a valuator and surveyor to the transaction.
- Expected: Valuation and survey reports are completed and linked to the transaction.
- Sale Agreement and Proof of Deposit: The buyer waits for the attorney to
upload the signed Sale Agreement and provides proof of deposit or initiates
payment.
- Expected: The transaction is updated to reflect these milestones.
- Stamped Sale Agreement Upload: For mortgage purchases, the buyer's attorney
uploads the stamped Sale Agreement, which the buyer then downloads.
- Expected: The buyer proceeds to the next steps of the mortgage process.
- Document Submission for Mortgage: For mortgage purchases, the buyer's
attorney uploads necessary documents for the mortgage application, followed
by any additional required submissions.
- Expected: The financial institution reviews the documents, approves the mortgage, and initiates the loan disbursement process.
Expected Output:
- The transaction process is completed successfully for both mortgage and cash purchases, with all necessary steps and document submissions fulfilled.
GUEST PROCESS TEST SCRIPTS
Test Script #1: Accessing VM Turn Key Solution as a Guest User
Objective: Ensure that a guest user can effortlessly access the VM Turn Key Solution website and is instantly presented with the property search interface on the homepage.
Author: Appfinity
Pre-Conditions:
- The user has internet connectivity and a web browser available.
- The user has not registered or logged into the VM Turn Key Solution platform.
Test Steps:
- Open Web Browser: Launch the user's preferred web browser.
- Navigate to VM Turn Key Solution: Enter the VM Turn Key Solution's URL in
the browser's address bar and initiate the page load.
- Expected: The VM Turn Key Solution homepage loads efficiently, showcasing a welcoming and intuitive interface.
- Review Homepage Interface: Examine the homepage to ensure the property
search interface is prominently featured and ready for use.
- Expected: The search interface is immediately accessible to the guest user, prominently displayed, facilitating an easy start to property searches.
Expected Output:
- The guest user successfully accesses the VM Turn Key Solution website and is met with a user-friendly search interface upon arrival at the homepage.
Test Script #2: Exploring Properties via "Life Goals" Tab as a Guest User
Objective: Confirm that guest users can explore property listings through the "Life Goals" tab and refine their property search using specific filters without login requirements.
Author: Appfinity
Pre-Conditions:
- The guest user is browsing the VM Turn Key Solution platform.
- The "Life Goals" tab is prominently displayed within the platform's main navigation.
Test Steps:
- Navigate to 'Life Goals' Tab: Click on the "Life Goals" tab in the main
navigation menu.
- Expected: A dropdown menu or a new section should unfold, presenting various options, including "Properties".
- Choose 'Properties': Select the "Properties" option to access the listings.
- Expected: The interface transitions to display a variety of properties, with a search and filter interface available for user interaction.
- Employ Search Filters: Apply filters such as "Location", "Price Range", and
"Type of Property" to tailor the search results to the guest user's
preferences.
- Expected: The property listings dynamically update to only show properties that match the applied filters, aiding the guest user in pinpointing suitable properties.
Expected Output:
- Guest users can navigate to the "Life Goals" tab, access a diverse range of property listings, and utilize detailed search filters to identify properties that align with their search criteria on the VM Turn Key Solution platform.
Test Script #3: Property Search Functionality on VM Turn Key
Objective: Ensure the VM Turn Key application's property search feature allows users to comprehensively filter properties using multiple criteria to find their ideal property efficiently.
Author: Appfinity
Pre-Conditions:
- The user has accessed the VM Turn Key application and is on the property search interface.
- A variety of properties are listed on the platform, enabling diverse search results.
Test Steps:
- Initiate Search: Confirm the user is on the property search page, which
should prominently display search filters and a search button.
- Expected: The search interface is user-friendly, with clear labels for each filter.
- Filter by Building Style: From the "Building Style" dropdown, select a
preferred architectural style or layout (e.g., Modern, Victorian) and
observe the search results.
- Expected: The property listings update to only show properties matching the selected building style.
- Filter by Type of Property: Use the "Type of Property" filter to specify the
property type (e.g., House, Apartment, Townhouse) and review the updated
listings.
- Expected: The search results refine to include only the selected type of property.
- Set Budget Limits: Enter minimum and maximum values in the "Budget Limits"
fields to filter properties within a specific price range.
- Expected: Properties displayed are within the specified budget range, excluding those outside the set limits.
- Apply Additional Filters: Utilize other filters such as location, currency,
and specific property features (e.g., number of bedrooms, bathrooms,
amenities) to further narrow down the search.
- Expected: With each additional filter applied, the search results become more tailored to the user's preferences, showing only properties that meet all selected criteria.
- Review and Select Property: Examine the filtered properties, select one that
aligns with the user's requirements, and click on it for more details.
- Expected: The user is directed to a detailed view of the selected property, providing comprehensive information including photos, descriptions, and possibly a virtual tour.
Expected Output:
- The VM Turn Key application's property search functionality operates as intended, enabling users to apply various filters effectively and find properties that closely match their search criteria.
Actual Output: The detailed property search process allowed the user to efficiently filter and select a property that met all specified requirements, demonstrating the functionality's effectiveness and user-friendliness.
Test Report Summary for VM Turnkey Platform
Overview
This report provides a consolidated overview of the testing phase conducted on the VM Turnkey platform, which encompasses a wide range of functionalities from property listings, integration with MLS, to specific actions across various user roles.
Test Execution Overview
- Total Test Cases Executed: 40
- Success Rate: Approximately 93%
- Passed: 37
- Failed or Issues Identified: 3
- Blocked/Incomplete: 0
Key Observations
- The platform demonstrated strong performance in areas such as property listing creation, search and filtering capabilities, and role-based functionalities, contributing to a high success rate.
- The identified issues in 3 test cases highlight areas that require immediate attention to ensure comprehensive platform reliability.
Areas for Improvement
- Resolution of Identified Issues: Immediate action is required to address and rectify the issues identified in the failed test cases to enhance overall platform integrity.
- User Interface Enhancements: Insights from the testing phase suggest opportunities for refining the user interface to further improve the user experience.
- Performance Optimization: Targeted optimization efforts for features that encountered issues can help in achieving smoother platform operations.
- Security Measures: Reinforcing security protocols and data protection measures is paramount, especially in areas where issues were detected.
- Adaptive Feedback Mechanisms: Integrating a system for capturing real-time user feedback can aid in identifying and addressing issues post-launch, fostering continuous platform evolution.
Recommendations
- Prioritize Issue Mitigation: Swiftly addressing the identified issues will not only improve the success rate but also bolster user confidence in the platform.
- Expand Testing Coverage: Adopting more extensive and possibly automated testing approaches could provide broader coverage and early identification of potential issues.
- Scalability Assessments: As the platform scales, conducting tests to evaluate performance under increased loads is essential to maintain a high-quality user experience.
- Ongoing Monitoring: Continuous monitoring post-deployment will be crucial for maintaining operational excellence and quickly resolving any new issues that arise.
Conclusion
The VM Turnkey platform has showcased a commendable level of readiness with a 93% success rate in the testing phase, indicating a robust and user-friendly platform. Addressing the few identified issues and implementing the recommended strategies will further solidify the platform's standing and ensure a seamless experience for all users.
System Process Flow Diagrams
Realtors
Realtors sign up on the platform and await approval from the administrator for the application. Upon approval, they gain access to log in and proceed with creating or updating property listings. In the event of application rejection, realtors receive an email notification containing a detailed reason for the decision.
After a realtor creates a property listing, it undergoes an approval process by the administrator before being showcased on the platform for potential buyers. Upon approval, the realtor promptly receives an email notification confirming the property's acceptance. Conversely, if the property is rejected, the realtor is promptly notified via email.
Realtors have the authority to accept or reject purchasers who submit documents to prove their source of funds for purchasing a property. Purchasers will then receive email notifications when the realtor accepts or rejects their submitted documents. Additionally, realtors can schedule appointment dates that potential buyers can book to view the property.
Furthermore, realtors hold the power to accept or reject offers made on a property. Any acceptance or rejection of an offer will result in an email notification being sent notifying the buyer of the decision. They can also download a stamped sale agreement and submit seller documents required for the selected buyer's mortgage application.
Realtors have visibility into the mortgage application process flow for the selected buyer, enabling them to track progress until the property transaction is completed.
This streamlined process ensures a seamless experience for users, realtors, and administrators, ultimately leading to the successful completion of property transactions on the platform.
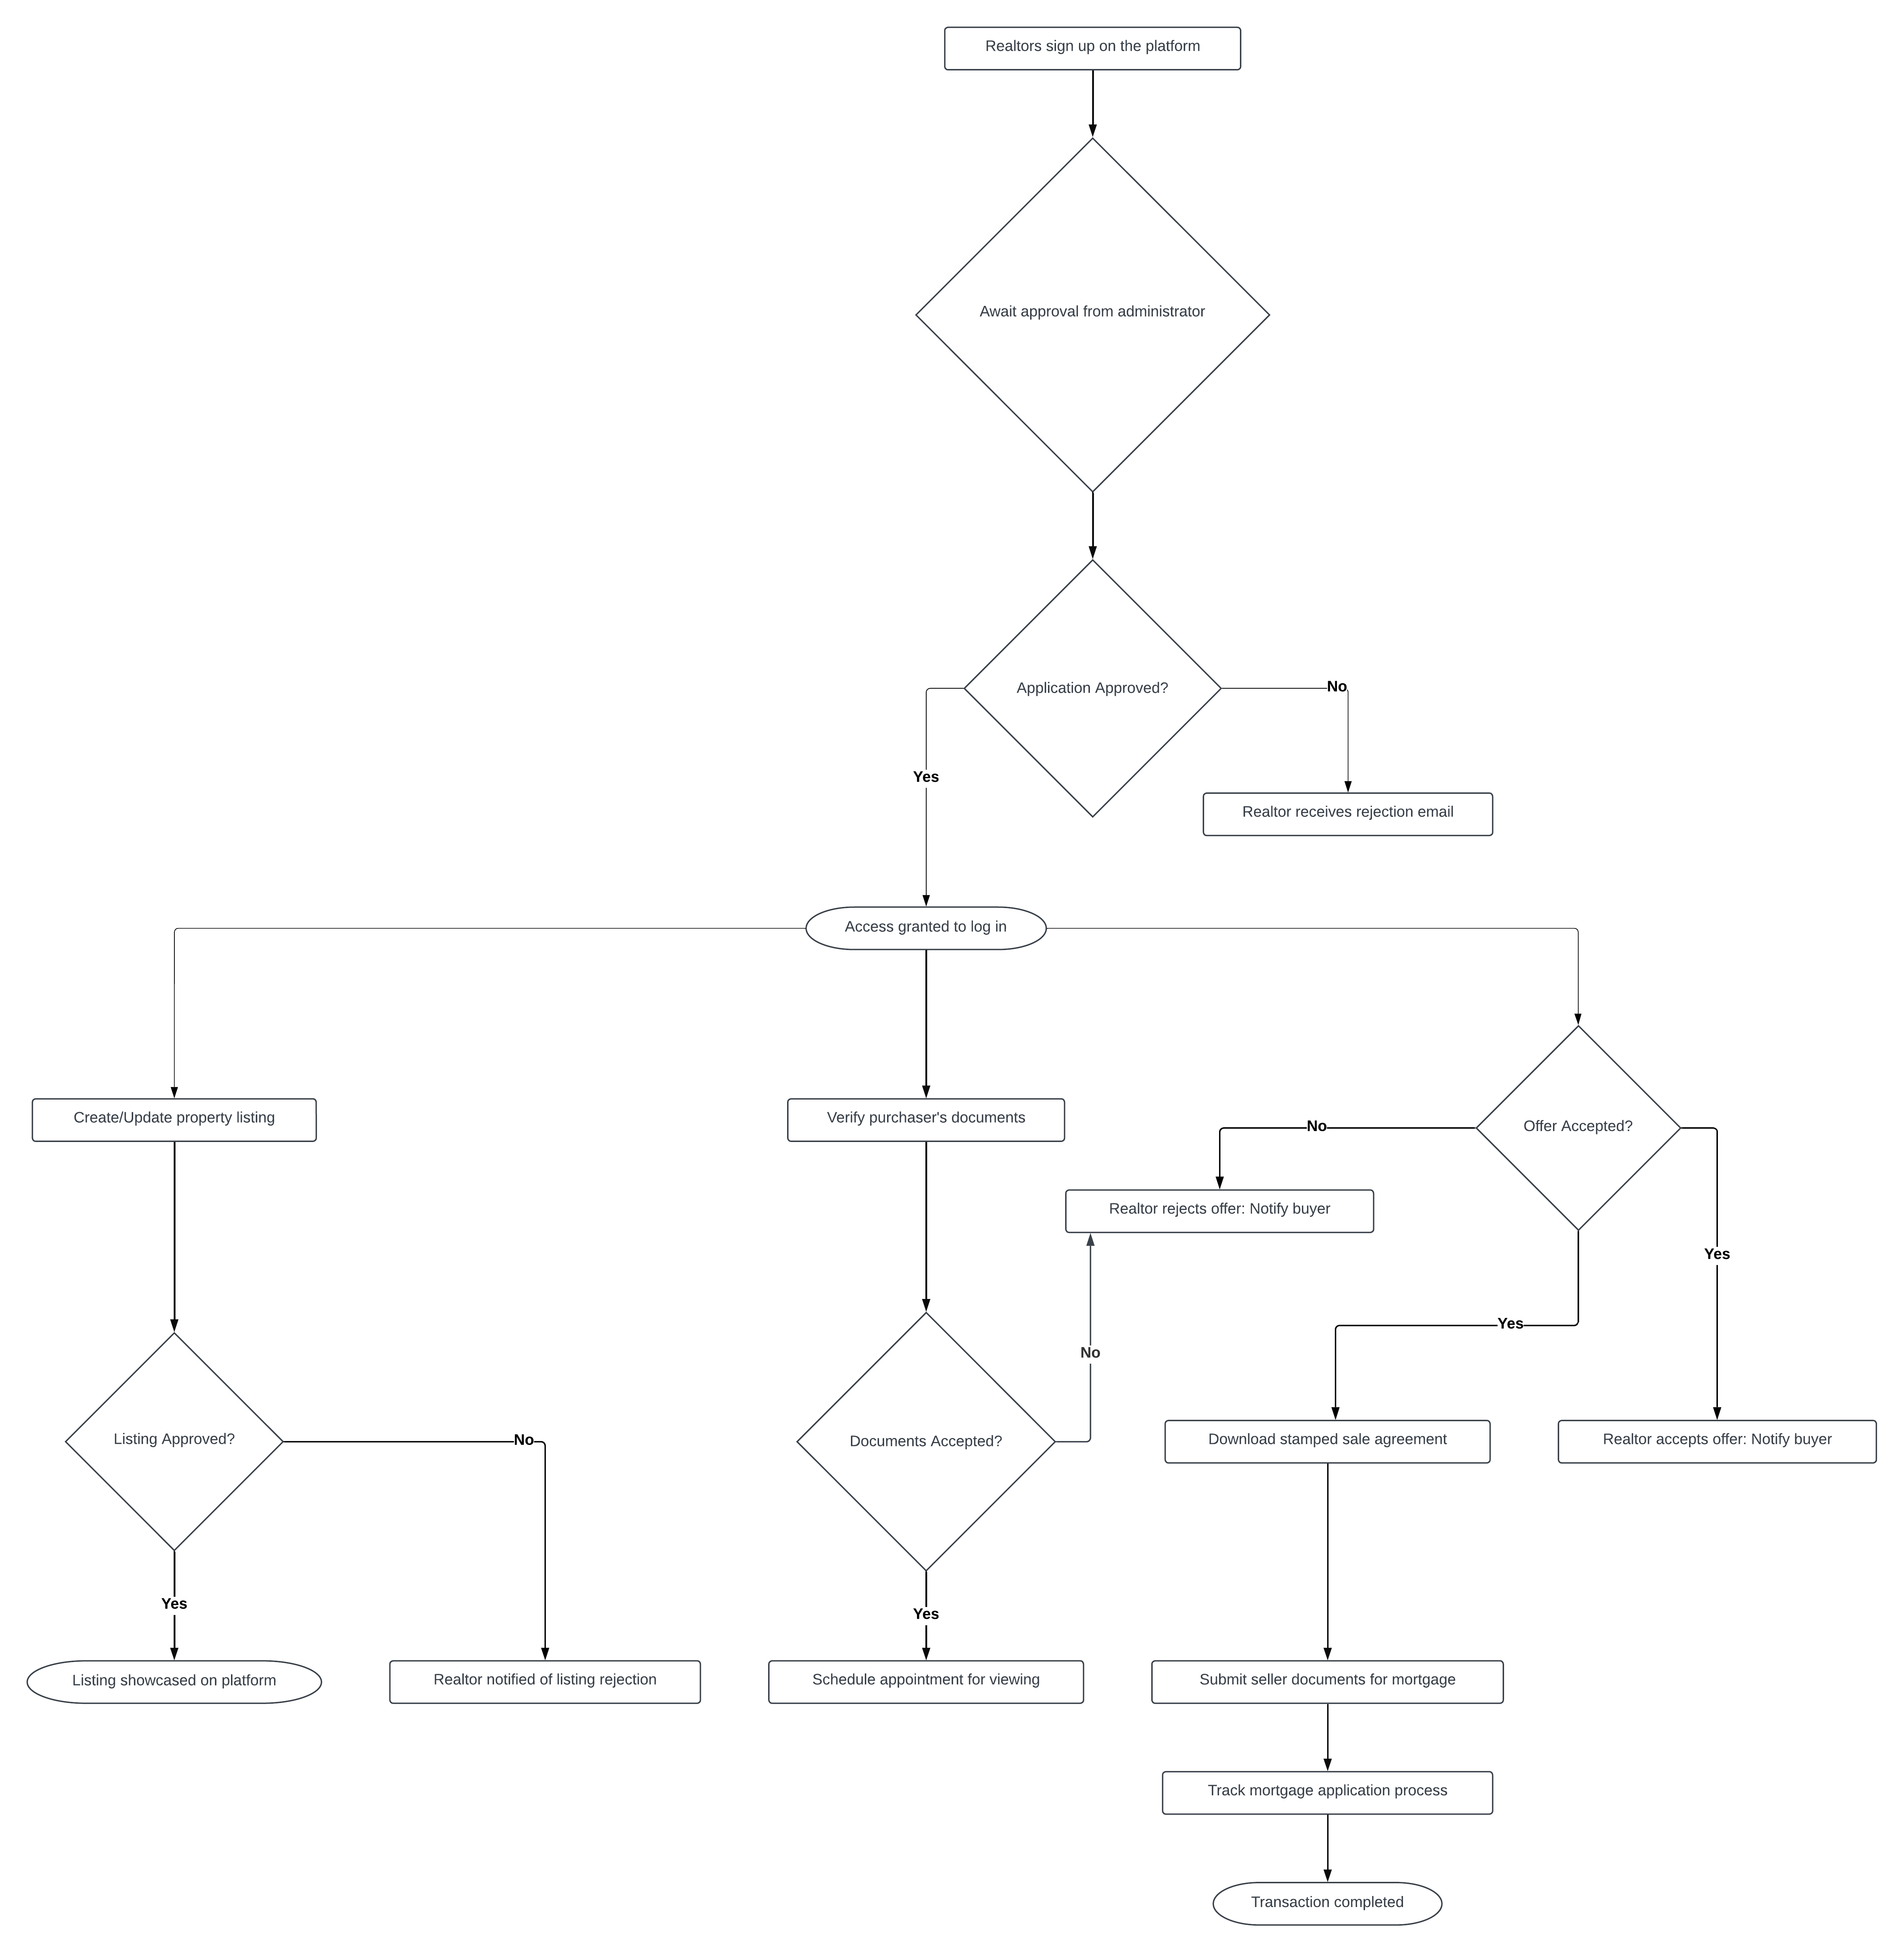
Surveyors
The process flow begins with the creation of a user profile by the Surveyor. This involves populating entry fields such as Name, Profession, Qualifications & Experience, and uploading a Display Image. Following this, the Surveyor creates their service offerings, which includes providing a clear outline of the services they offer, including brief descriptions, cost breakdowns, and types of Service Level Agreements (SLA) where applicable.
Once the profile and service offerings are set up, the Surveyor can participate in auctions. This involves bidding in auctions created by Mortgage Applicants and Property Vendors. During this phase, the Surveyor can view auction details, enter proposed project approaches, and submit bid amounts. Upon winning bids and completing projects, the Surveyor can receive milestone payments after their project deliverables have been approved by clients.
To manage documents effectively, a Document Management and Exchange System is implemented. This system allows the Surveyor to create documents, modify document templates, annotate existing documents, upload documents, and scan documents. The scanning capability is enhanced with Optical Character Recognition (OCR) to enable electronic editing, searching, and storage of scanned files. Additionally, the Surveyor can sign documents electronically and share them collaboratively with clients and stakeholders. When sharing documents, specific user roles are assigned, such as Editor, Annotator, and Viewer, each with specific permissions for modifying, annotating, and viewing documents.
Throughout the process, the Surveyor receives notifications to enhance efficiency. These notifications include updates on auction bid statuses, changes in mortgage application statuses related to assigned service offers or projects, and updates on document management module activities such as sharing, editing, and annotating documents. These notifications ensure that the Surveyor stays informed and can take timely actions based on the status of auctions, projects, and document management activities.
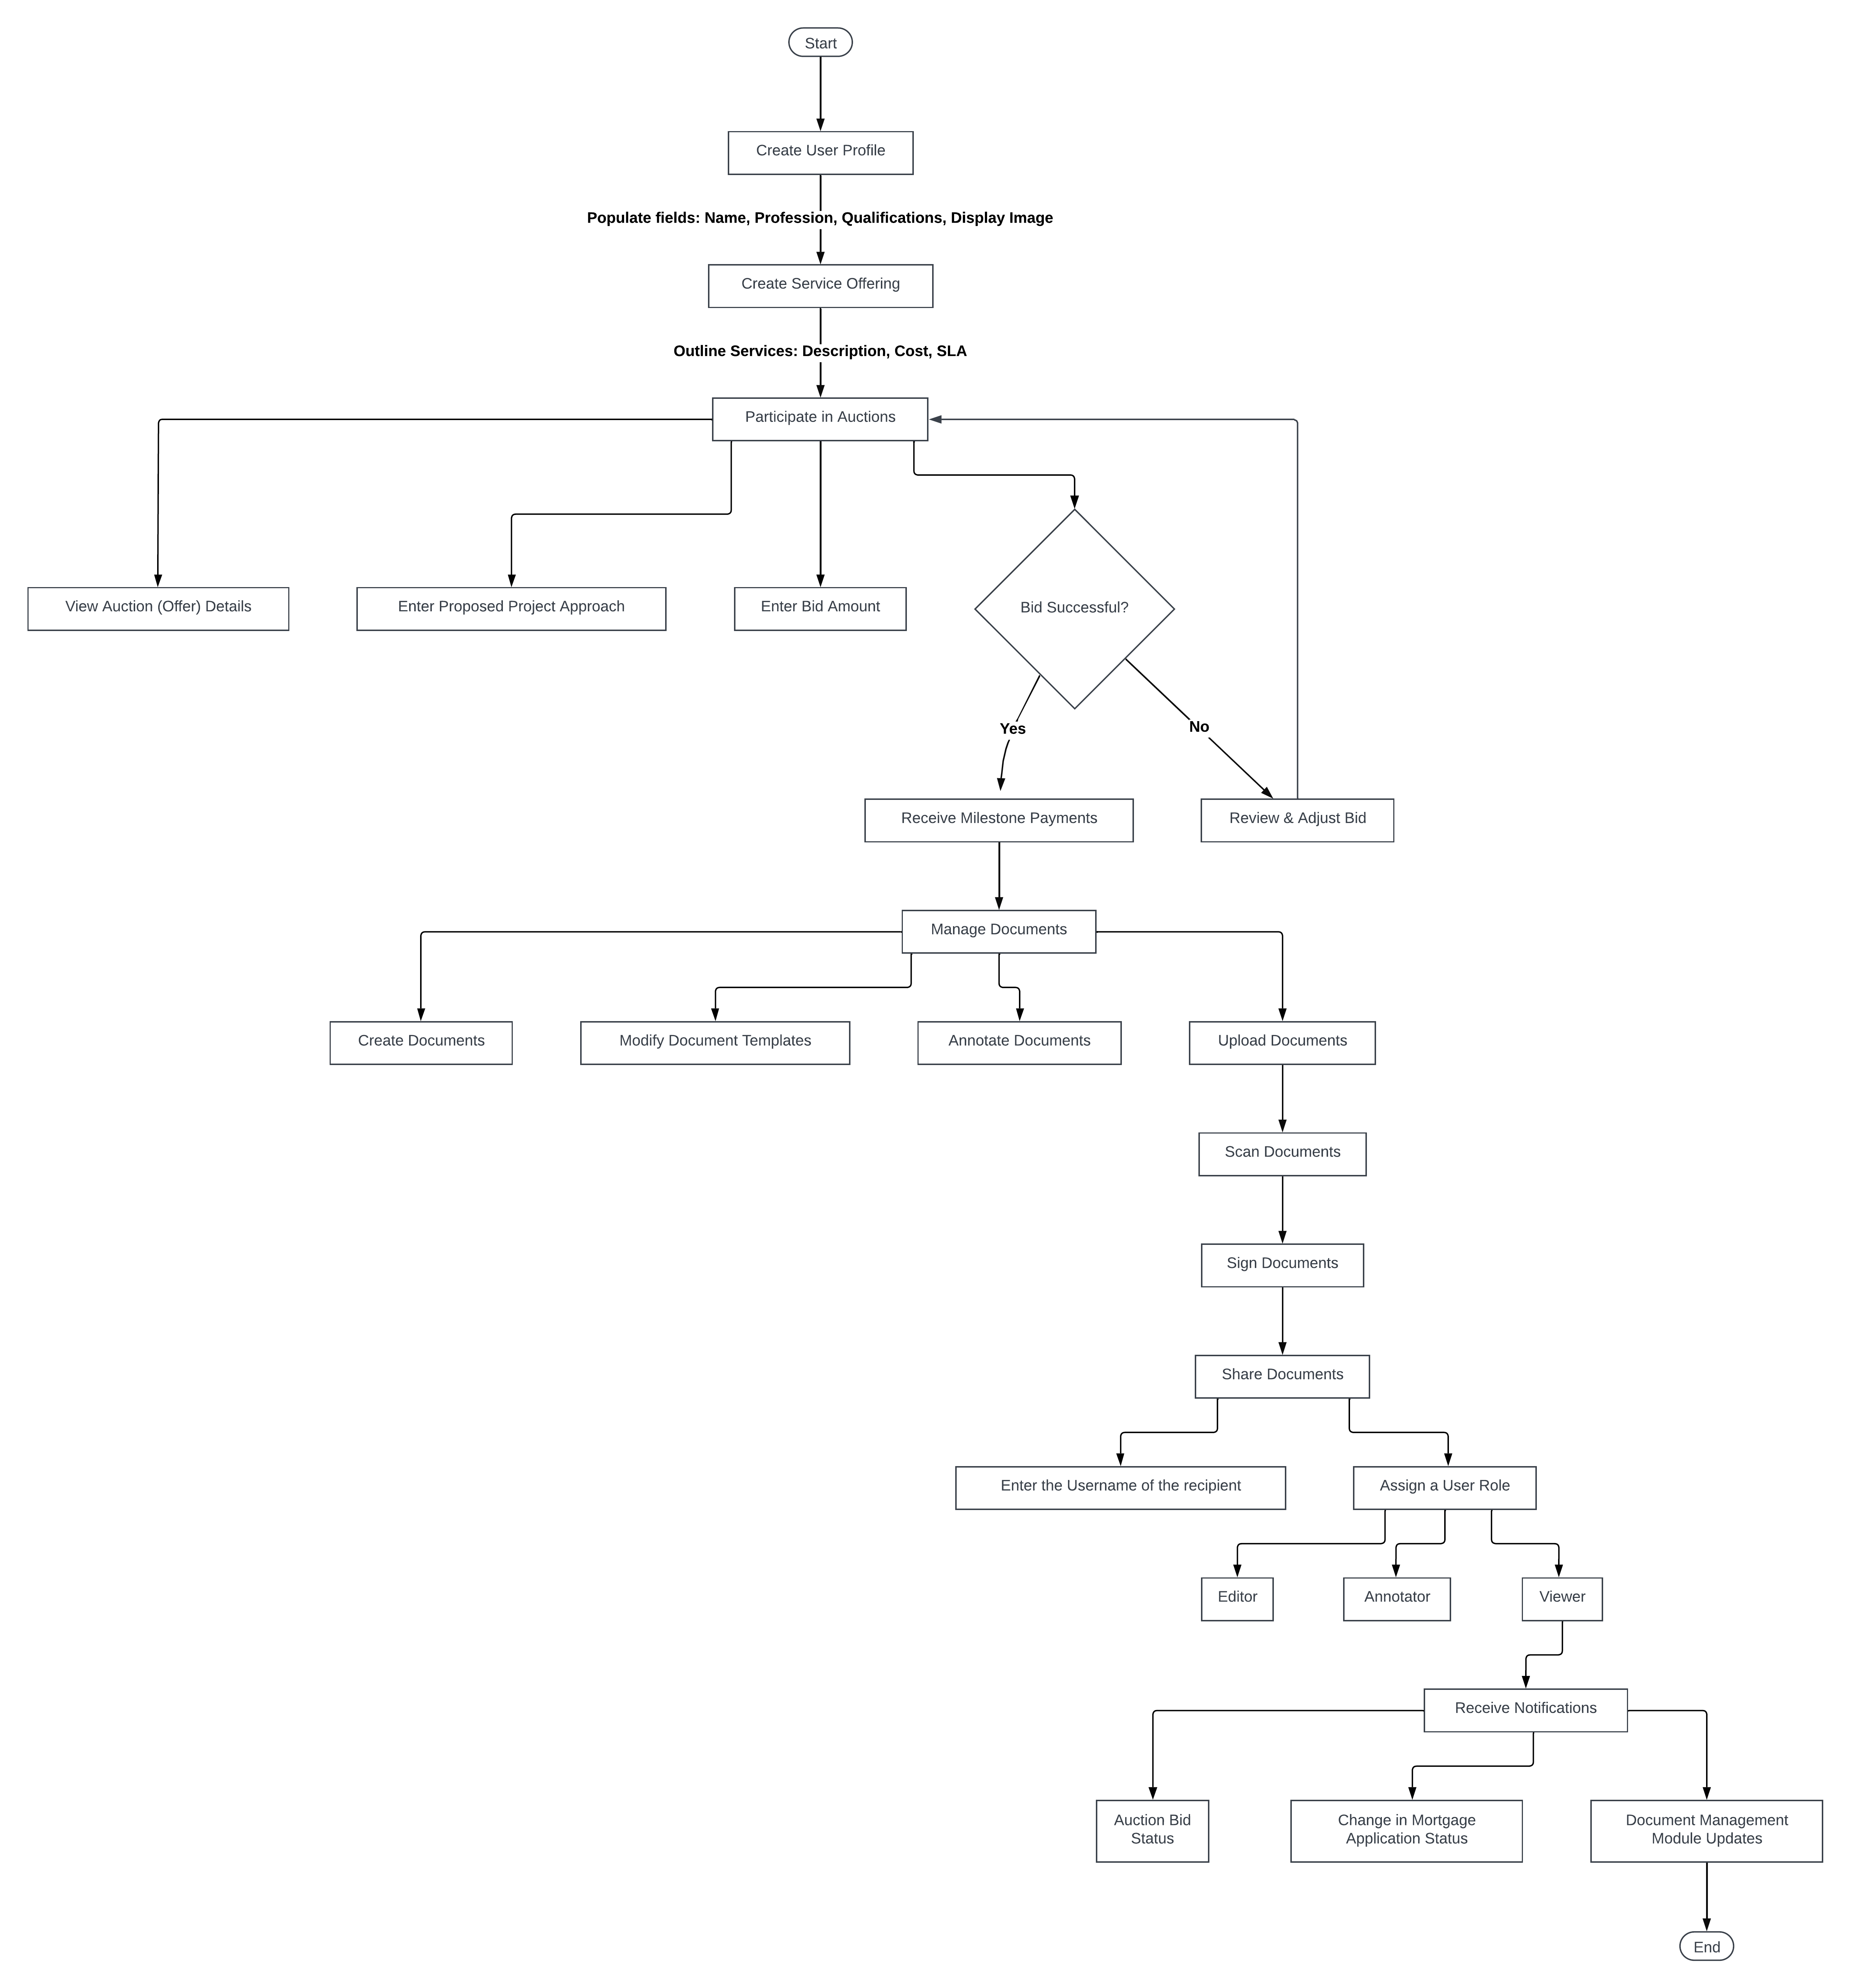
Valuators
The Valuator Interface initiates with the creation of a user profile, accomplished by filling in entry fields such as Name, Profession, Qualifications & Experience, and uploading a Display Image. Subsequently, the Valuator outlines their service offerings, including a clear description, cost breakdown, and applicable Service Level Agreement (SLA) types for each service.
Participation in auctions is enabled for the Valuator, allowing them to bid in auctions initiated by Mortgage Applicants and Property Vendors. Within this module, the Valuator can view auction details, propose project approaches, and enter bid amounts as necessary.
Upon completing projects and obtaining client approval, the Clearing House Platform facilitates milestone payments for the Valuator. These payments are received after project deliverables have been approved by clients, ensuring a seamless transaction process.
Document management is streamlined through the implementation of a Document Management and Exchange System. The Valuator can create documents, modify templates, annotate existing documents, upload files, sign documents electronically, and share documents collaboratively. Different user roles, such as Editor, Annotator, and Viewer, are assigned specific permissions to modify, annotate, and view documents accordingly.
Efficiency is enhanced through notifications sent to the Valuator. These notifications include updates on auction bid statuses, informing the Valuator of client approval or rejection of their bids. Additionally, updates on document management module activities, such as sharing, editing, and annotating documents, are provided based on the permissions of the assigned user role.
Furthermore, the Valuator receives system alerts generated automatically, providing transaction-specific alerts based on the deadlines associated with the delivery of Service Level Agreements. These alerts ensure timely actions and adherence to deadlines, contributing to the overall efficiency of the mortgage application process within the Valuator Interface.
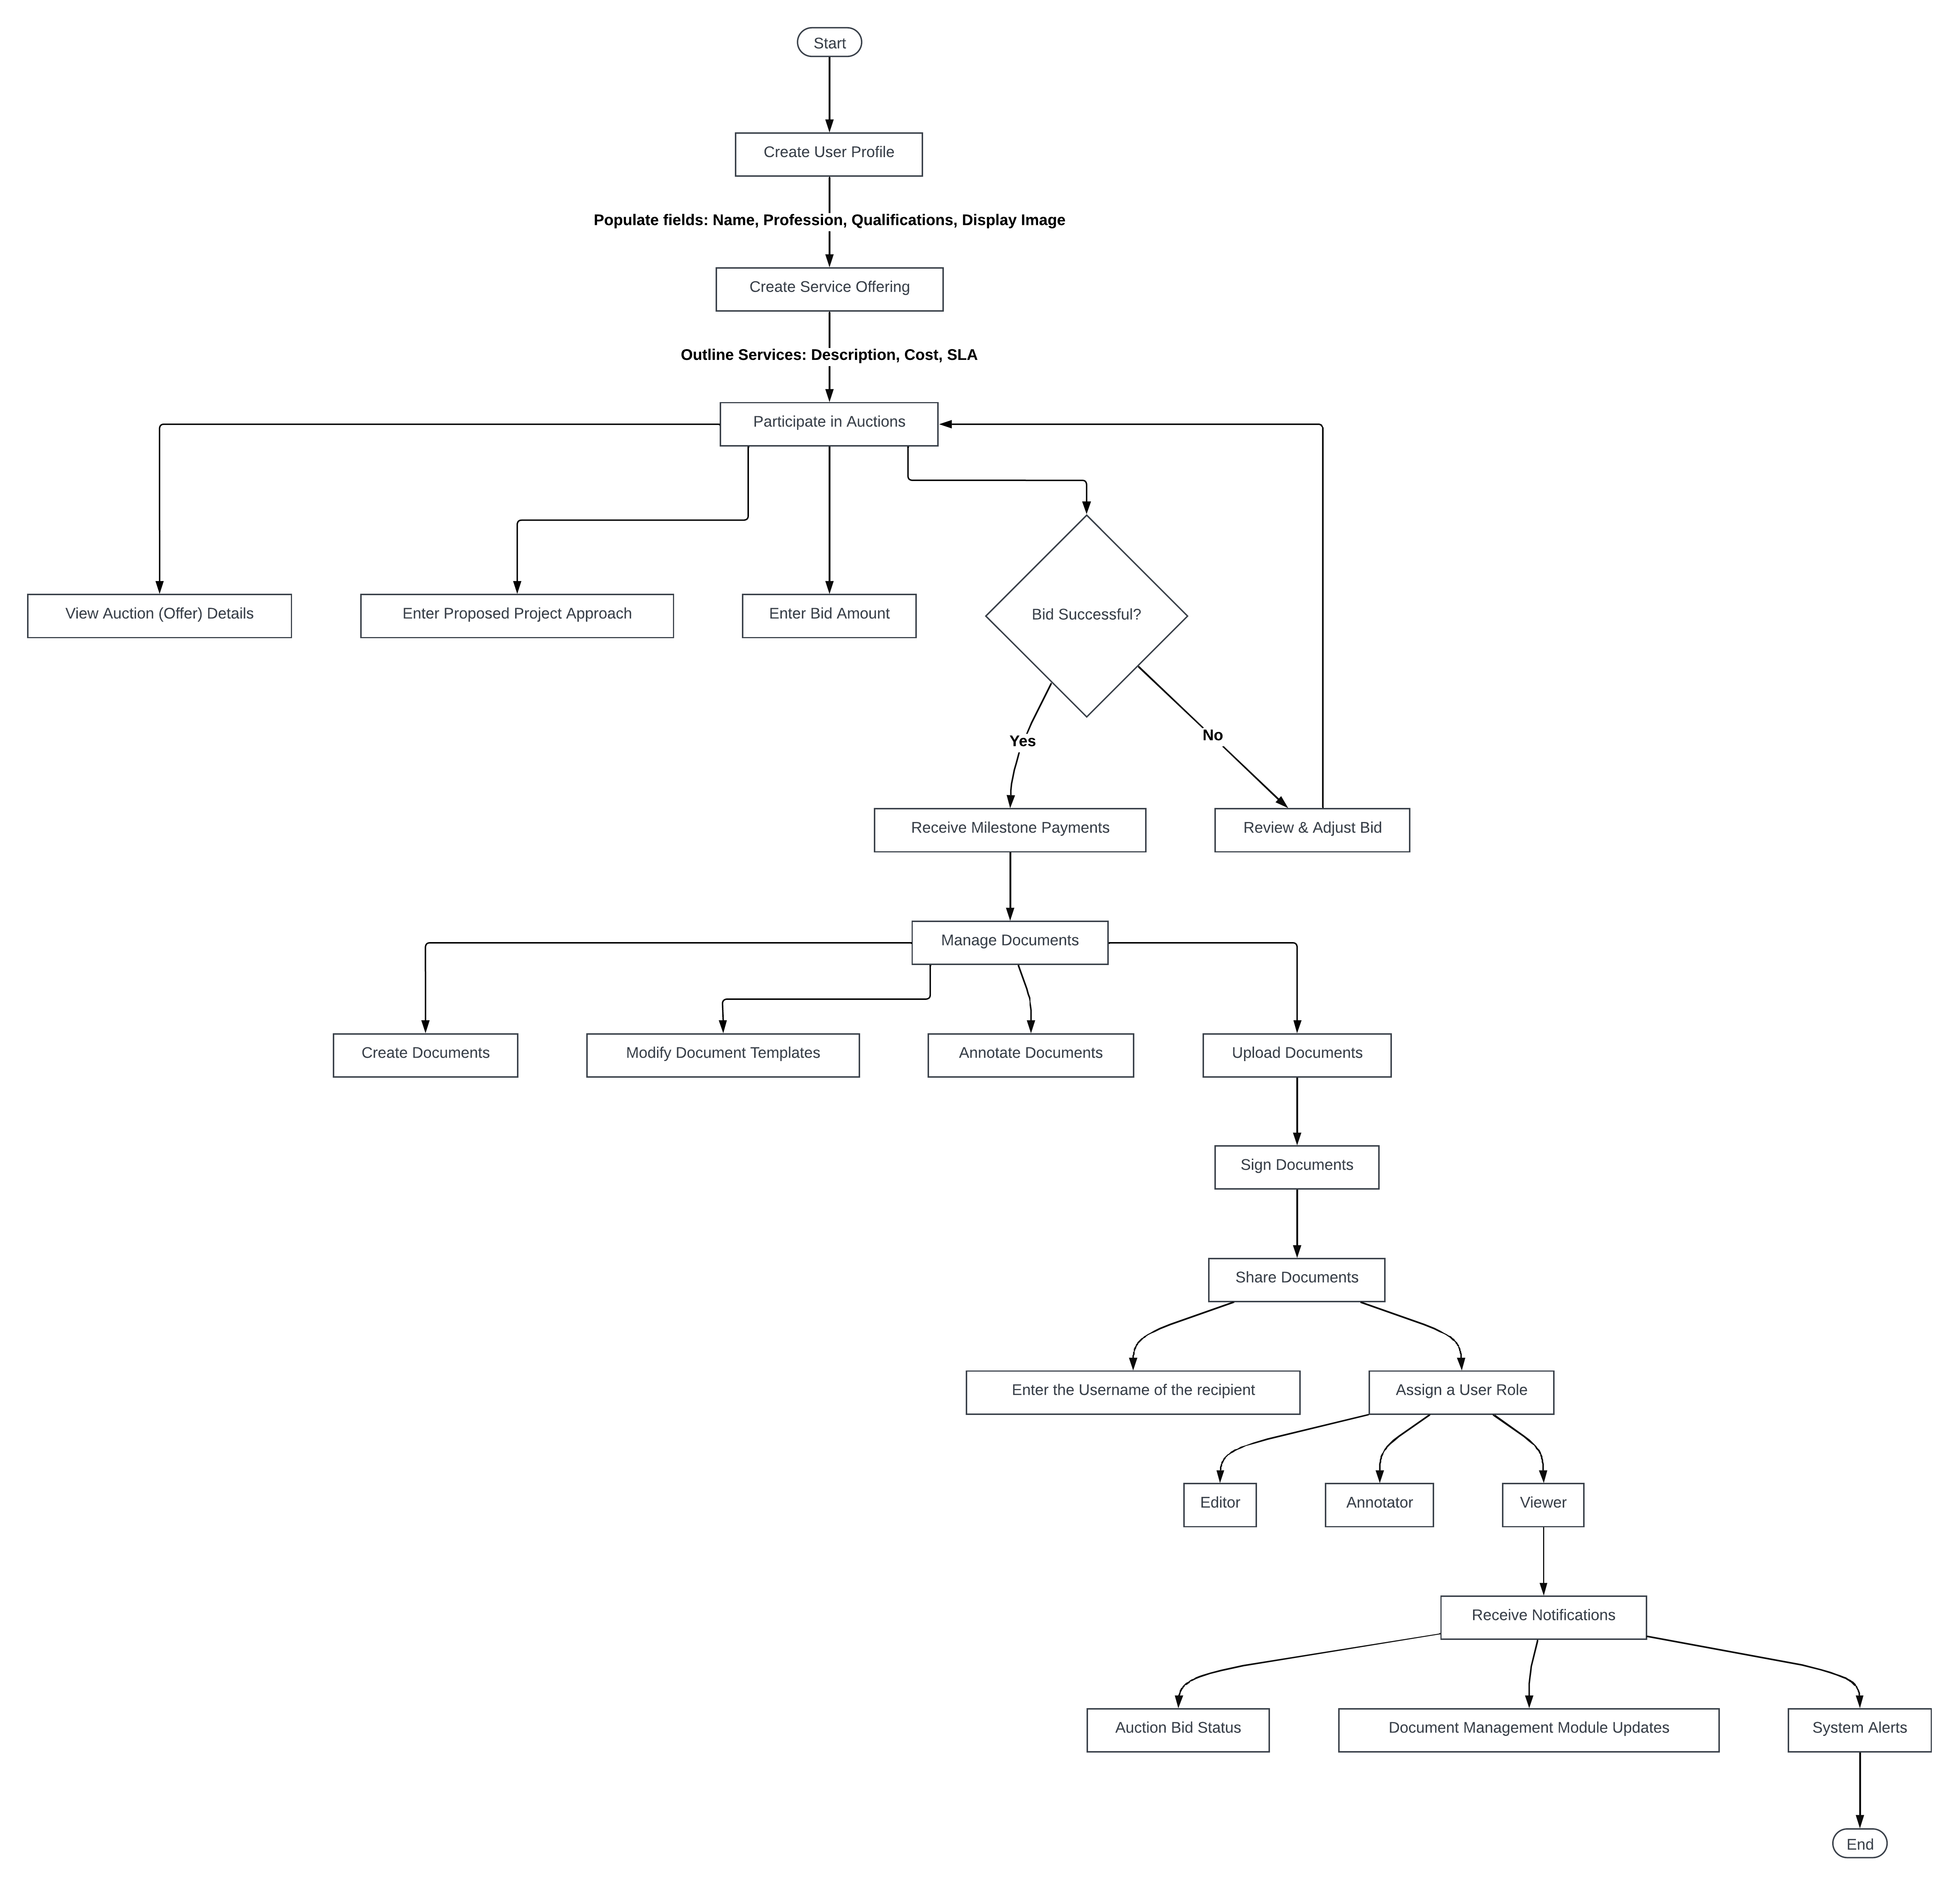
Buyers
Upon discovering a property of interest, the prospective buyer will begin the transaction process by selecting the "own now" button, which directs them to the property transaction view.
In the initial phase, the buyer will determine their preferred payment method – cash or mortgage. For those opting for a mortgage, the process unfolds as follows:
The buyer is presented with two options: they can either select a Mortgage Institution and apply for pre-qualification or upload a valid pre-approval letter from a financial institution. Once their choice is made, they must await the lender's approval to proceed. If the request is rejected, obtaining a pre-approval letter from a bank becomes necessary for further progression.
Following lender approval, the buyer must submit fund source documents for review by the property realtor. Approval allows the process to proceed, while rejection necessitates reassessment. Additionally, the buyer may choose to schedule a viewing appointment with the realtor to inspect the property, though this step is optional.
Engagement of an attorney is essential at this stage to navigate the legal aspects of the transaction. Once legal representation is secured, the buyer proceeds to generate an Offer to Purchase Form and submits it. The buyer then awaits acceptance of the offer to move forward.
Further steps include the assignment of a valuator and surveyor, as well as the receipt of the signed Sale Agreement and Instrument of Transfer. These documents are crucial for the subsequent stages of the process.
Additionally, the buyer must provide proof of deposit or initiate payment within the application, awaiting vendor approval. Subsequently, the buyer's attorney uploads the stamped Sale Agreement. Once uploaded, the buyer can download the agreement and proceed to the next steps.
For the submission of documents for mortgage purposes, the buyer's attorney uploads necessary documents, followed by additional submissions if required. The financial institution then reviews the submitted documents. Upon approval, signing processes commence, leading to loan disbursement.
For cash purchases, the buyer follows a simplified process:
The buyer submits fund source documents for realtor approval, optionally scheduling a viewing appointment. Legal representation is secured through engagement with an attorney. The buyer then generates an Offer to Purchase Form and submits it. Following this, the buyer awaits the acceptance of the offer.
Subsequent steps include the assignment of a valuator and surveyor, as well as the receipt of the signed Sale Agreement and Instrument of Transfer. Upon providing proof of deposit or initiating payment, the buyer awaits the stamped Sale Agreement.
Completion of these steps concludes the transaction process for both cash and mortgage purchases.
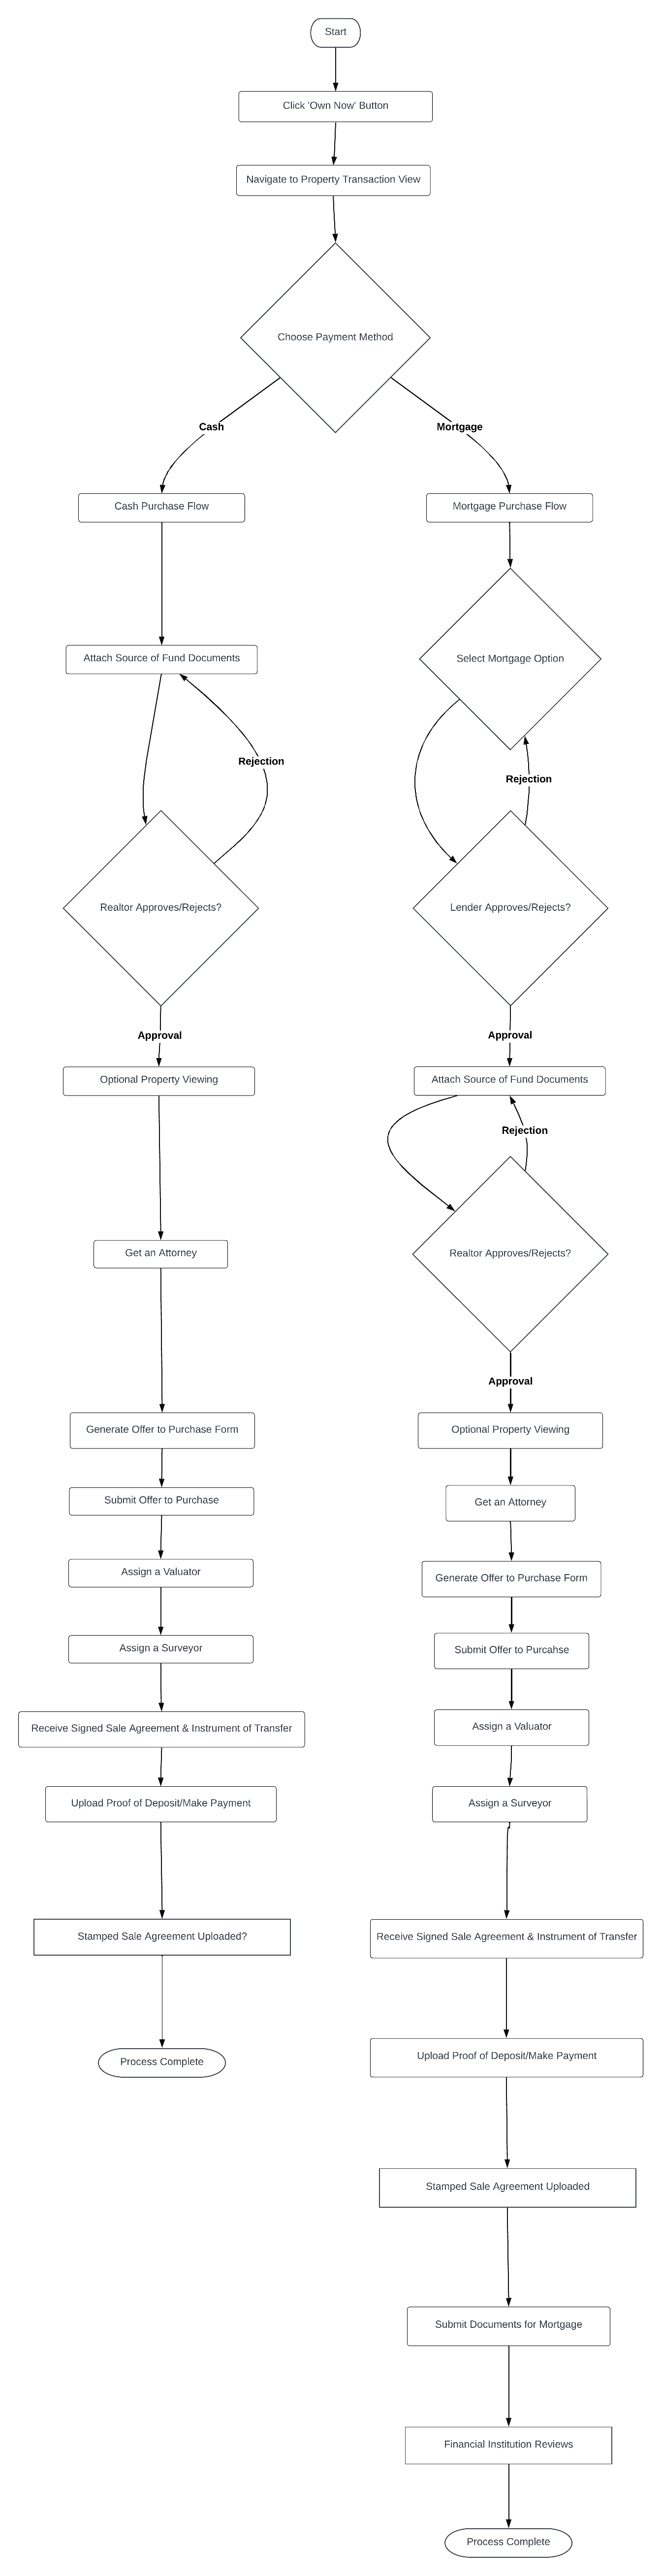
Attorneys
To begin using the platform, users must first register and await administrator review of their application. Upon approval by the administrator, users can then log in and proceed to create their user profile. This involves populating entry fields such as Name, Email, Bio, and uploading a Display Image. Subsequently, attorneys can outline the services they offer by providing a clear description, cost breakdown, and applicable Service Level Agreement (SLA) types for each service.
Attorneys have the option to receive direct job requests from buyers via email. Upon accepting a job request, the buyer must pay a retainer fee before the attorney proceeds with uploading the Service Level Agreement (SLA). Rejection of a job request is also an option, and upon rejection the buyer will receive an email notification. Additionally, attorneys can view other job requests posted by buyers within the system and place bids accordingly.
Participation in auctions is facilitated for attorneys, allowing them to bid on auctions created by individuals interested in purchasing properties. Within this module, attorneys can view auction details and enter bid amounts. If successful in their bid and upon receipt of the retainer fee from the buyer, attorneys can proceed with uploading the Service Level Agreement (SLA).
Document management is streamlined through the implementation of a Document Management and Exchange System. Attorneys can upload documents efficiently, ensuring seamless transaction processes.
Efficiency is further enhanced through notifications sent to attorneys. These notifications include updates on auction bid statuses, and informing attorneys of a prospective client's (Mortgage Applicant) approval or rejection of their bid. Additionally, autogenerated system alerts are provided based on the deadlines associated with the delivery of Service Level Agreements, ensuring timely actions. Moreover, attorneys receive autogenerated email notifications when an Offer to Purchase has been made on their client's property, enabling them to stay informed and take necessary actions promptly.
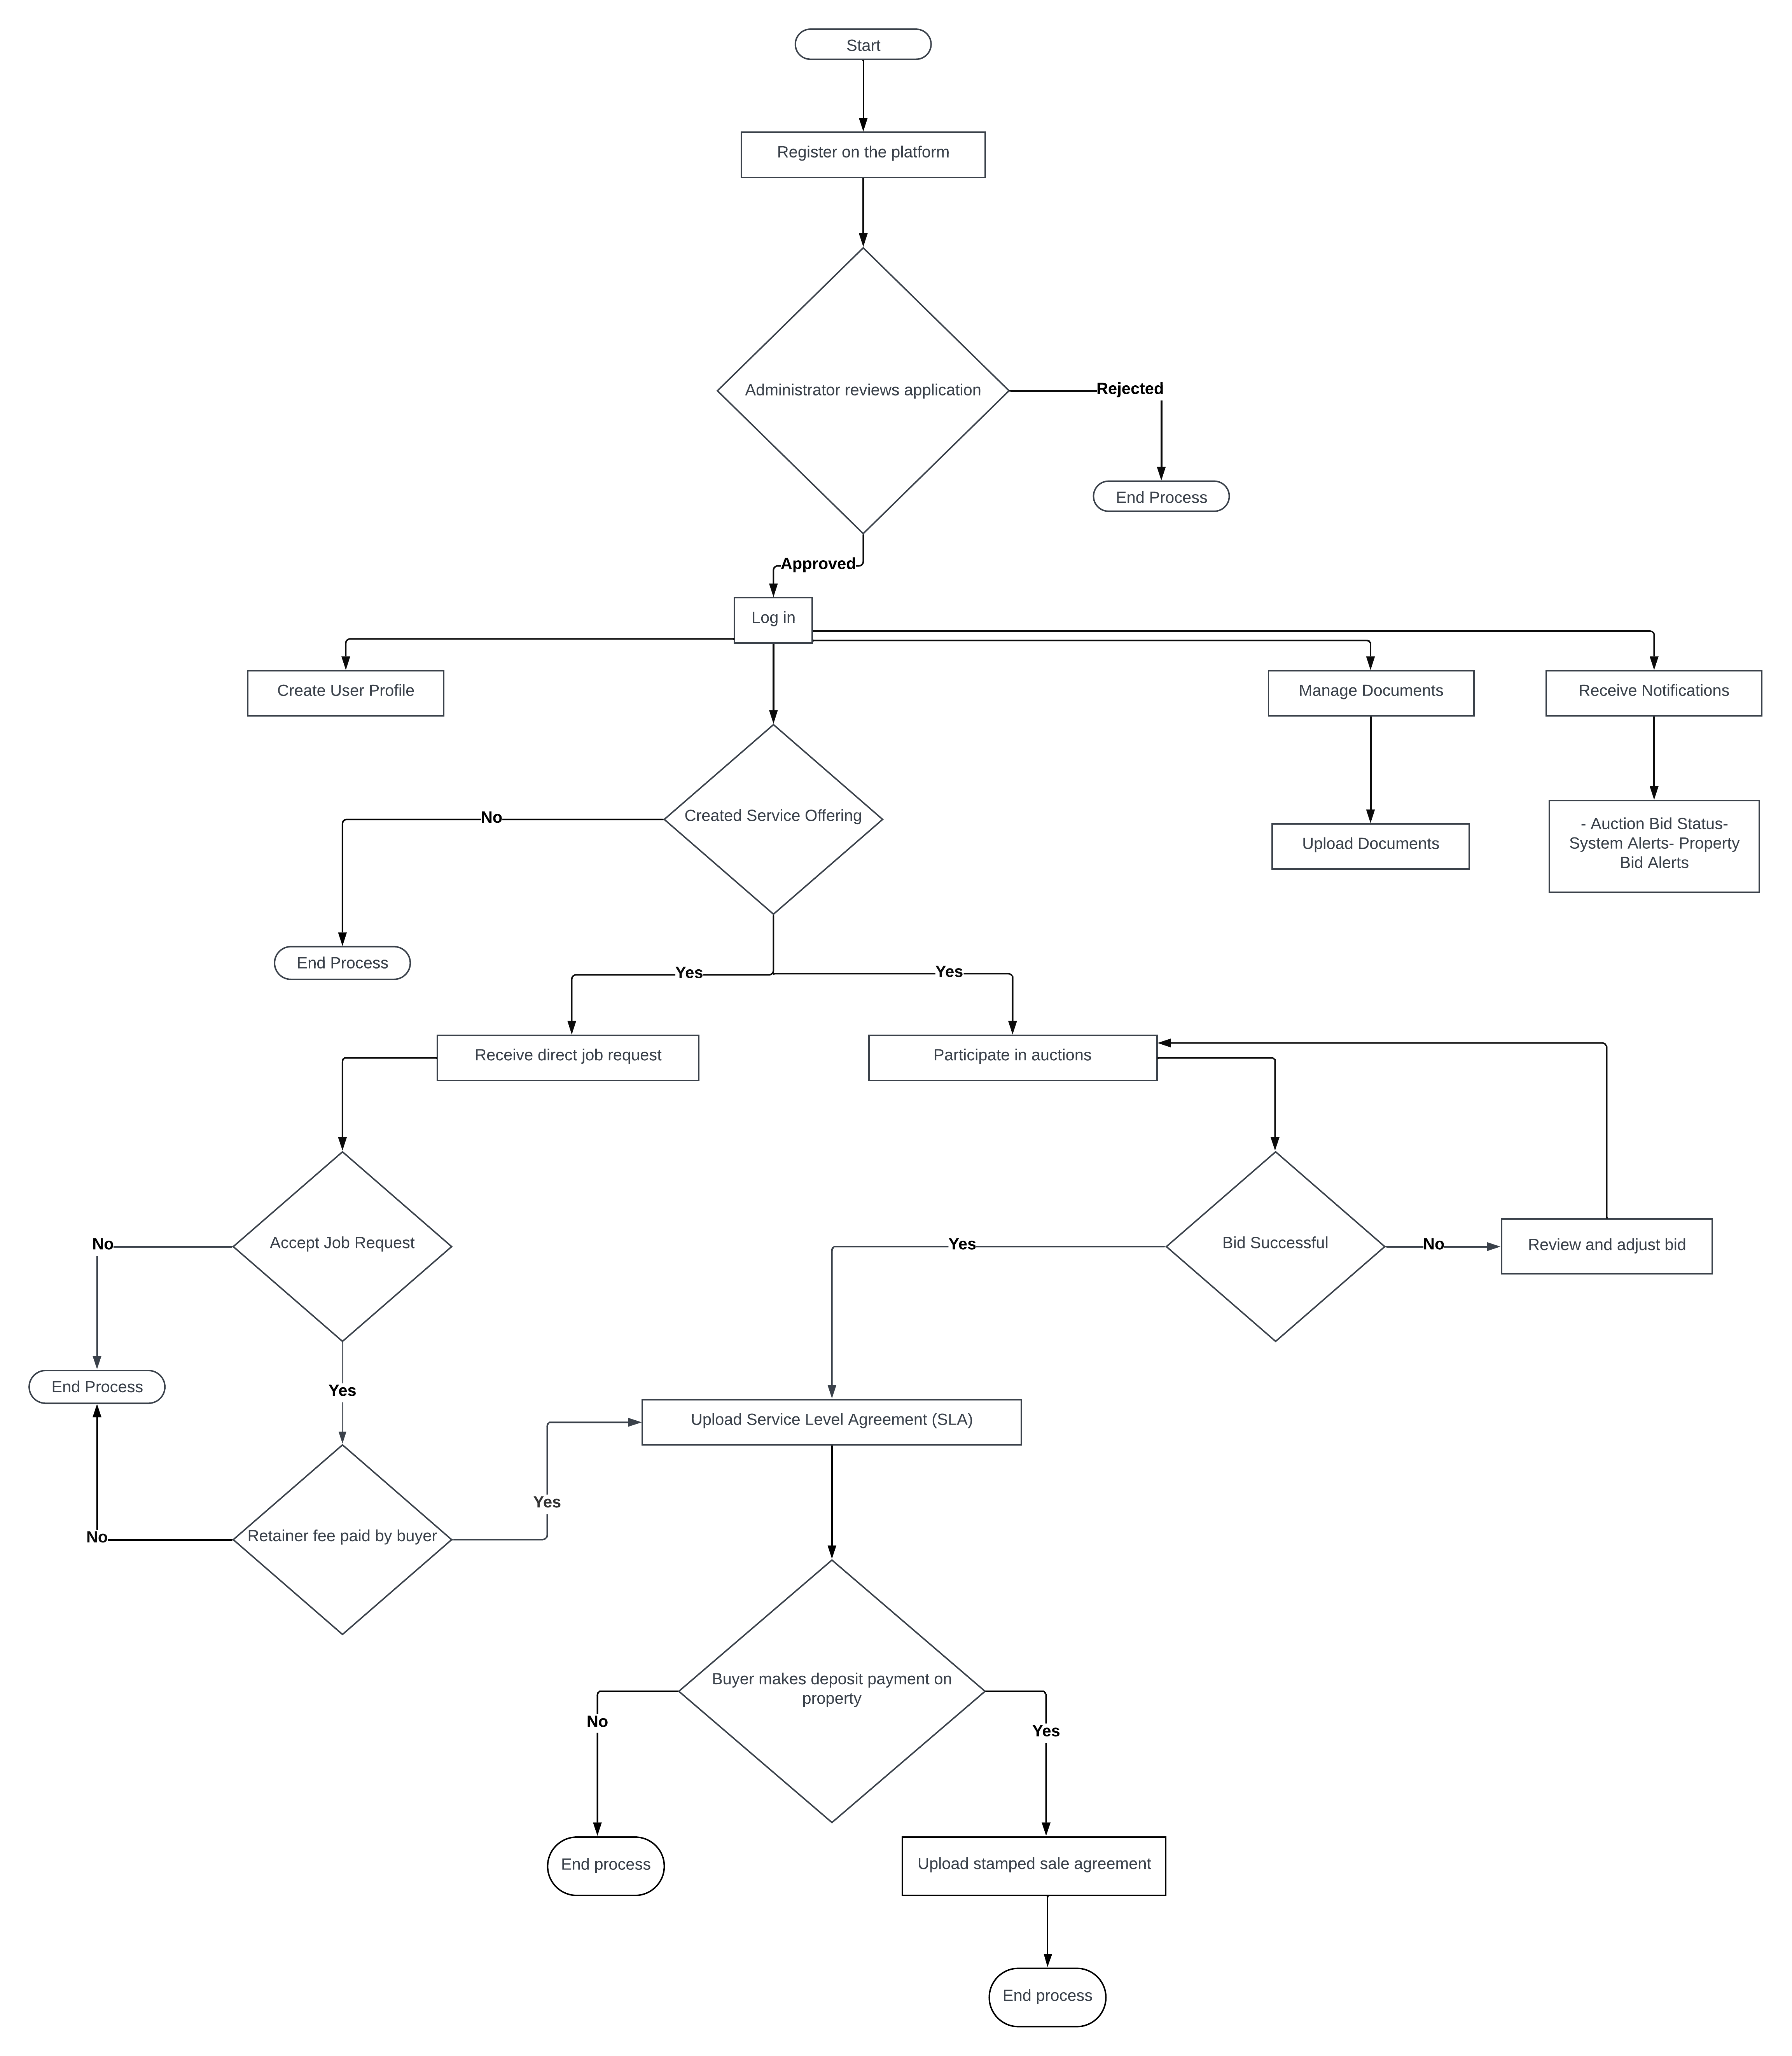
Leads Management
The process begins with the user logging into the application to access the lead management system. The user can utilize various features such as the MLS login, eLand Jamaica, and the Xposure App. From here, the system assigns a lead to an available agent, and an email notification is sent to the assigned agent.
The agent then has the option to accept or reject the assigned lead. If the lead is accepted, it is officially assigned to the agent for further management. If rejected, the lead becomes available for reassignment to another agent.
Once a lead is assigned to an agent, the agent has access to a range of capabilities to manage the lead effectively. These include scheduling meetings or showings with the lead, editing lead details and interaction history, changing the lead source for marketing analysis, categorizing leads based on criteria such as property interest, budget, or location preferences, scheduling and tracking appointments or follow-ups, generating reports on lead activity, conversion rates, and agent performance, integrating with social media platforms for lead capture and engagement tracking, attaching documents or images to lead profiles, logging call notes or interaction details, setting reminders or follow-up tasks, sharing property listings or relevant information with leads, collaborating with other agents or teams, accessing lead history and previous interactions, categorizing leads based on potential value, urgency, or other criteria, providing feedback on lead quality, and customizing agent profiles and settings.
The system checks if the lead is registered. If the lead is not registered, the system sends an in-app notification or email to the lead, informing them about the assigned agent and advising them to register to communicate with the agent.
The Turnkey system assigns an interest level (hot, cold, warm) to the lead based on their activity within the system, such as the number of visits, property views, or other engagement metrics.
Agents can schedule appointments with leads or clients directly through the application. If an appointment is set up, the system sends automated confirmation and reminder emails to the client. If the client reschedules, the process loops back to appointment scheduling. If the client confirms, the process ends.
The system also provides automated reminders for agents about upcoming appointments, tasks, and follow-ups, which can be customized in terms of frequency and lead time. Additionally, agents can set and handle custom reminders for tasks linked to leads or properties, such as sharing information or making follow-up calls, ensuring important tasks are completed on time.
The system offers a daily digest, which provides a concise summary of upcoming appointments and tasks to agents, helping them organize their day effectively.
Lastly, agents can input and save search criteria on behalf of clients, including location, property type, price range, and other preferences.
The data flow diagram illustrates the comprehensive lead management process, from lead capture and assignment to agent workflow, client communication, appointment scheduling, task reminders, and client search criteria management.
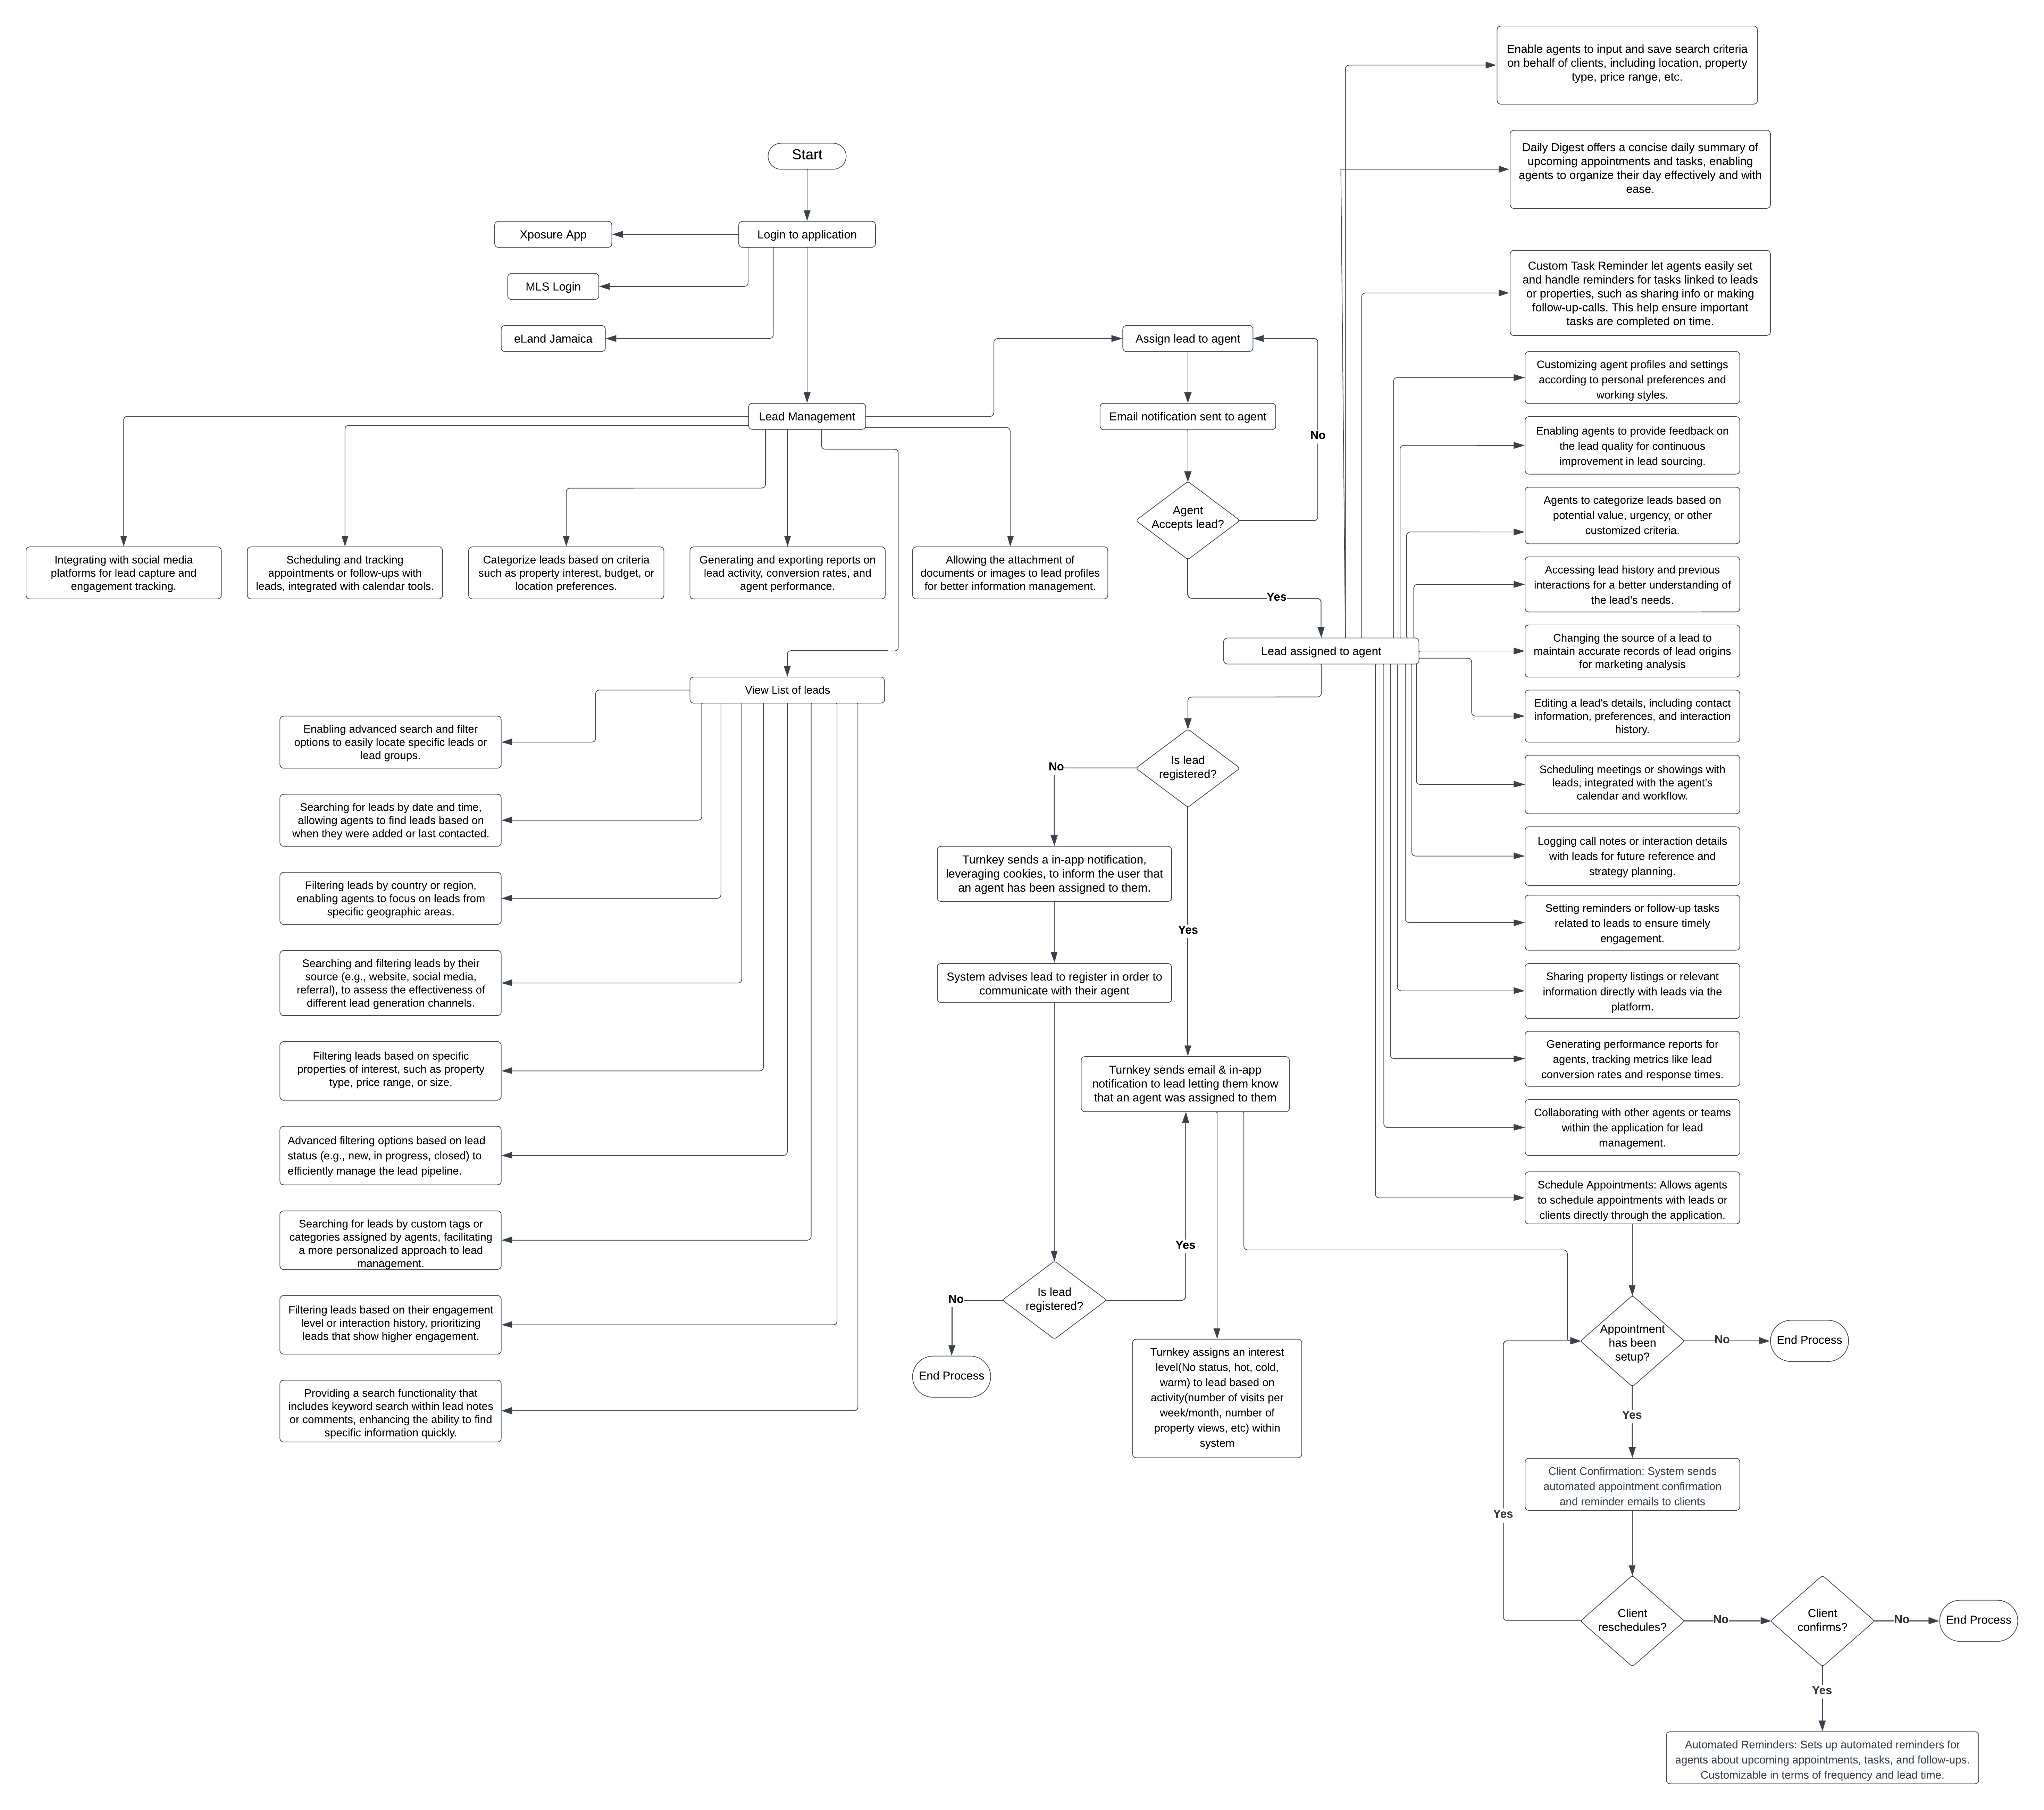
Mortgage Calculator
The Calculation for the mortgage payments is as follows- First determine the period that the loan will paid back which is the years needed to be repaid eg.(25 years) multiplied by 12 which represents the months of the year which would be (300 months)
- Then determine the loan amount which is the difference that is obtained from subtracting the Property Cost and the Deposit
- Next up the rate is calculated by expressing the percentage as a decimal number or dividing by 100 and due to the rate being converted from yearly to monthly, the decimal value divided by 12
- With this we can begin the process of calculating the loan amount first by multiplying the previously obtained Monthly Rate and Loan Amount values, the product will be the numerator for the monthly payment loan
- The denominator for the formula we get by calculating a factor based on the loan's interest rate and the total number of months, which represents the present value of the annuity. This is a standardized formula for amortization loans which is as follows: One minus 1 plus rate to the power of negative total months to repay or 1-(1+rate -300)
- We next divide the the dividend of the two previous two steps by 10 where we round off the value to the nearest whole number
- Finally The Monthly payment is rounded up to 10 to reflect a standardized payment amount
Realtor
Becoming A Realtor:
- Go To Register for the VM Turnkey Application
- Select The Role Realtor. If Any other role is selected The User Will not be able to become a realtor at a later date. They will be required to re-do the registration process and ensure that they selected the right role with a different email address and registration number. The Registration form requires a role to be selected for it to be successful submitted otherwise registration will fail
- Enter First and Last Name. The Registration form requires both name fields to be entered when submitting otherwise registration will fail.
- Enter Email. The Registration form requires the email field to be entered when submitting otherwise registration will fail. Email must be unique, that is there is no other registered user regardless of role with the same email in the application. If there is another then registration will fail. The email must be a valid email address eg (mail@mail.com, mail@mil.org, mail@mail.edu mail@organiztion.com etc)
- Enter the password and password confirmation fields. Both fields should consist of the exact same characters and same letter cases. If there is any variation between these two fields the registration will fail. If either of these fields are left blank the registration will fail.
- Enter The registration number. Users must enter a registration number in order to successfully submit the registration form. The registration number is unique to all users similarly to the email field before and will also fail at registering the user if the value entered is the same as another user already on the system.
- Upload Certificate to Confirm license. The file uploaded can be of any type but cannot be larger than 10mb or else the form submission would fail.
- Agree to the Terms and Conditions. If the user does not agree, they will not be able to submit the registration form.
- Submit Registration Form
- Users Will Become a Realtor when the administrator approves them as a partner. By reviewing the data submitted and the certificate uploaded, The administrator will ultimately make the decision as to whether to approve the user as a realtor or reject them.
Getting Assigned a Property
Properties may be added by automated tasks performed by the system, These properties are active by default and as long as there is no realtor attached to the property within the system. The administrator may attach that property to a realtor.The Realtor would need to be approved for them to be assigned to a property. If a realtor is not approved then they will not show up in the list of realtors in the dialog that appears that assigns realtors.
Create Property:
Any realtor while approved may create any amount of properties which will by default be assigned to them. These properties will require the approval of the administrator however. This is done by the admin setting the property to active. If The property is not set active it will not show up while browsing or searching for properties on https://turnkey.vmpropertyservices.com/properties. To successfully create a property these conditions must be met:
- The property address, parish, purchase tenure, category, price, currency, minimum deposit amount and property type fields must not be blank, if a Realtor tries to create a property with these fields being empty the property will not be added and various error messages highlighting that these fields are needed will be displayed.
- The maximum number of characters that the Property address field can hold is 255, If the realtor attempts to add a property with an address above that threshold then the property will not be added and an error message explaining the issue will be shown.
- The City\Town field is an optional field that only appears once a parish has been selected. It displays a list of appropriate cities and towns for that parish. If an option is selected from this field and a new parish field is selected then the City\Town field will be unselected.
- The Property Type field is a required field that only populates with options once a Category has been selected. It displays a list of appropriate property types for each category. If an option is selected from this field and a new category field is selected then the Property Type field will be unselected.
- The No. of Bedrooms field has to be a number greater than zero when entered. If the realtor attempts to add a property by breaking this rule the property will not be added and an error message indicating what the problem is will occur. The realtor would also only be required and prompted to enter this field if the property type selected is one of the following.
- Apartment
- Fractional Ownership
- Hotel
- House
- New Development (Residential)
- Resort Apartment
- Resort Apartment/Villa
- Townhouse
- The No. of Bathrooms field has to be a number greater than zero when entered. If the realtor attempts to add a property by breaking this rule the property will not be added and an error message indicating what the problem is will occur. The realtor would also only be required and prompted to enter this field if the property type selected is one of the following.
- Apartment
- Commercial Bldg/Offices
- Factory
- Fractional Ownership
- Hotel
- House
- New Development (Commercial)
- New Development (Residential)
- Resort Apartment
- Resort Apartment/Villa
- Retail Space
- Townhouse
- Warehouse
- Commercial Spaces/Offices
- If percentage is selected for the field labeled “The minimum deposit should be a fixed or percentage of the property price” Then the minimum Deposit Percentage field cannot exceed 100. If it exceeds that amount then the property will not be added and an error message detailing what the issue is will show.
Review Source of Funds:
A Buyer or Purchaser must First Submit Their Source of funds. Buyers may choose to have it submitted by either uploading a pre-approval letter from an external lending institution OR using the services of a lending institution connected to VM Turnkey.
Add Appointments:
The Realtor may set start and end date and time they have available for potential buyers to tour the available houses. They can also set the time period that these appointments will last for.
- They may do this by navigating to the sell properties page while signed in (profile/sell-properties).
- Clicking on The “View Sale” Button and advancing to the second step of Process flow for selling that particular property.
Approve Appointments:
The Realtor may approve appointments after they have been requested by buyers.
- They may do this by navigating to the sell properties page while signed in (https://turnkey.vmpropertyservices.com/profile/sell-properties).
- Clicking on The “View Sale” Button and advancing to the second step of Process flow for selling that particular property.
- Click on the Requested Appointments Tab And review the appointments in the table below if any were submitted. If no purchaser user had requested an appointment date then the table will have no records in it
Review/Accept Offers
If a buyer has submitted their “offer to purchase form” for the property. The Realtor may review that offer and either Reject or Accept it. If the offer to purchase form has not been submitted then Th Realtor will not be able to advance to the next step of the process and there will be a message indicating this on the page.
Uploading Seller’s Documents
Following the upload of the stamped sale agreement by the lawyer of the purchaser, the realtor may now provide the relevant documents the seller of the property needs to disclose for the purchaser’s lending institution to process their mortgage.
Surveyor
Becoming A Surveyor:
- Go To Register for the VM Turnkey Application
- Select The Role Surveyor. If Any other role is selected The User Will not be able to become a Surveyor at a later date. They will be required to re-do the registration process and ensure that they selected the right role with a different email address and registration number. The Registration form requires a role to be selected for it to be successful submitted otherwise registration will fail
- Enter First and Last Name. The Registration form requires both name fields to be entered when submitting otherwise registration will fail.
- Enter Email. The Registration form requires the email field to be entered when submitting otherwise registration will fail. Email must be unique, that is there is no other registered user regardless of role with the same email in the application. If there is another then registration will fail. The email must be a valid email address eg (mail@mail.com, mail@mil.org, mail@mail.edu mail@organiztion.com etc)
- Enter the password and password confirmation fields. Both fields should consist of the exact same characters and same letter cases. If there is any variation between these two fields the registration will fail. If either of these fields are left blank the registration will fail.
- Enter The registration number. Users must enter a registration number in order to successfully submit the registration form. The registration number is unique to all users similarly to the email field before and will also fail at registering the user if the value entered is the same as another user already on the system.
- Upload Certificate to Confirm license. The file uploaded can be of any type but cannot be larger than 10mb or else the form submission would fail.
- Agree to the Terms and Conditions. If the user does not agree, they will not be able to submit the registration form.
- Submit Registration Form
- Users Will Become a Surveyor when the administrator approves them as a partner. By reviewing the data submitted and the certificate uploaded, The administrator will ultimately make the decision as to whether to approve the user as a Surveyor or reject them.
Accept Bid/Request:
The Surveyor May Accept Any Bid Submitted by the user or Any counter bid that the Surveyor placed and was accepted by the purchaser to take on the job. An initial job request and any subsequent bidding that follows is only possible once the purchaser reaches step 9 of The Mortgage application Process.
Counter Bid:
A Job request by a purchaser is a bid so it may be counter bidded as by the Surveyor at any time. The Surveyor may counter bid any amount of the bids available whether or not they were submitted by themselves or the purchaser. The Surveyor is required to enter all fields to submit a counter bid, if any field is left empty then the bid will fail. The amount being counter bidded has to be a whole number if it's a number with decimals then the bid will fail and an error message indicating what the two nearest whole number values rounded off would be.
Providing Service:
Following the purchaser's payment for the service, The Surveyor will have access to the delivery tab For the Job request where they may upload the necessary documents for the completion of the service. If The Surveyor tries to deliver their service before payment is applied, this action will fail. If the service is paid then the Surveyor will be able to upload the file that indicates they have completed the service. The file has to be a text- like file otherwise it will fail to upload.
Valuator
Becoming A Valuator:
- Go To Register for the VM Turnkey Application
- Select The Role Valuator. If Any other role is selected The User Will not be able to become a Valuator at a later date. They will be required to re-do the registration process and ensure that they selected the right role with a different email address and registration number. The Registration form requires a role to be selected for it to be successful submitted otherwise registration will fail
- Enter First and Last Name. The Registration form requires both name fields to be entered when submitting otherwise registration will fail.
- Enter Email. The Registration form requires the email field to be entered when submitting otherwise registration will fail.. Email must be unique, that is there is no other registered user regardless of role with the same email in the application. If there is another then registration will fail. The email must be a valid email address eg (mail@mail.com, mail@mil.org, mail@mail.edu mail@organiztion.com etc)
- Enter the password and password confirmation fields. Both fields should consist of the exact same characters and same letter cases. If there is any variation between these two fields the registration will fail. If either of these fields are left blank the registration will fail.
- Enter The registration number. Users must enter a registration number in order to successfully submit the registration form. The registration number is unique to all users similarly to the email field before and will also fail at registering the user if the value entered is the same as another user already on the system.
- Upload Certificate to Confirm license. The file uploaded can be of any type but cannot be larger than 10mb or else the form submission would fail.
- Agree to the Terms and Conditions. If the user does not agree, they will not be able to submit the registration form.
- Submit Registration Form
- Users Will Become a Valuator when the administrator approves them as a partner. By reviewing the data submitted and the certificate uploaded, The administrator will ultimately make the decision as to whether to approve the user as a Valuator or reject them.
Accept Bid/Request:
The Valuator May Accept Any Bid Submitted by the user or Any counter bid that the valuator placed and was accepted by the purchaser to take on the job. An initial job request and any subsequent bidding that follows is only possible once the purchaser reaches step 8 of The Mortgage application Process Flow titled “Property Valuation Report”.
Counter Bid:
A Job request by a purchaser is a bid so it may be counter bidded as by the valuator at any time. The Valuator may counter bid any amount of the bids available whether or not they were submitted by themselves or the purchaser. The Valuator is required to enter all fields to submit a counter bid, if any field is left empty then the bid will fail. The amount being counter bidded has to be a whole number if it's a number with decimals then the bid will fail and an error message indicating what the two nearest whole number values rounded off would be.
Providing Service:
Following the purchaser's payment for the service, The Valuator will have access to the delivery tab For the Job request where they may upload the necessary documents for the completion of the service. If The Valuator tries to deliver their service before payment is applied, this action will fail. If the service is paid then the valuator will be able to upload the file that indicates they have completed the service. The file has to be a text- like file otherwise it will fail to upload.
Property Status Management
This section outlines the various statuses properties may assume throughout our processes, from active to sale. Clear documentation of property statuses is crucial for transparency and efficiency in real estate transactions. We'll define each status, explain transitions between them, and outline associated responsibilities.
Property Statuses:
Active:
Definition: The status "Active" indicates that a property is currently available for sale on the market.
Description: Properties in this status are actively listed and open for offers from potential buyers.
Conditions to make a property active:
- Listing Agreement: There must be a valid and current listing agreement between the property owner and a real estate brokerage.
- Market Availability: The property must be made available on the market, meaning it is listed on multiple listing services (MLS). Realtors can also create a property however they must be approved by the admin before they are displayed on the website.
- No Accepted Offers: The property should not have any accepted offers. Once an offer is accepted and the property goes under contract, the status changes to "Pending" or "Under Contract."
- Choosing Purchase Method: The purchaser decides whether to buy the property with cash or through a mortgage. This initial step is crucial for determining the subsequent steps in the process.
- Pre-Qualification or Pre-Approval: If opting for a mortgage, the purchaser needs to either select a mortgage institution for pre-qualification or upload a valid pre-approval letter from a financial institution.
Under Offer:
Definition: The status "Under Offer" indicates that the realtor for the property has accepted an offer from a potential buyer.
Description: During this stage, negotiations may be ongoing between the buyer and seller regarding the terms of the offer. The property remains available for other potential buyers to make competing offers until the seller officially accepts an offer.
Conditional to make a property under offer:
- Submitting an Offer: After viewing a property and deciding to proceed, the purchaser generates and submits an offer to purchase form. This action transitions the property status from active to under offer.
- Offer Review and Acceptance: The offer is reviewed by the realtor, who can approve or reject it. If accepted, negotiations may proceed, and the property remains available for other potential buyers to make competing offers.
Under Contract:
Definition: A property is "Under Contract" when the seller has accepted an offer from a buyer, and the sale process is underway but not yet complete.
Description: This status means that both parties have agreed to the sale terms, but are completing necessary conditions such as inspections and financing.
Conditional to make a property under contract:
- Valuation and Survey Reports: Upon offer acceptance, the purchaser assigns a valuator and a surveyor through service requests. Payment is made for these services, and upon completion, the valuation and survey reports are uploaded for the purchaser's access.
- Sale Agreement and Deposit: The purchaser waits for their attorney to receive the signed sale agreement and instrument of transfer, uploads proof of deposit or makes a deposit payment, and awaits approval from the vendor.
Sold:
Definition: The "Sold" status marks the completion of the sale process, with ownership officially transferred from the seller to the buyer.
Description: This final status indicates that all legal documents have been signed, contingencies met, and the transaction has been successfully closed. The property is no longer available.
Fee Structure Overview
The platform introduces a versatile fee management system accessible through the administrator dashboard, allowing for the creation of both fixed and percentage-based fees. These fees are integral to the platform's revenue model and are applied at various stages of the user journey, including property transactions, service requests, and promotional features.
Job Request Fee
Purpose: Charged when a purchaser involves a service provider (valuator, attorney, or surveyor) in a property transaction.
Conditions: This fee is applied during specific transaction steps: assigning a valuator, surveyor, or attorney.
Property Offer Fee
Purpose: Required for a purchaser to submit an offer on a property, ensuring serious intent and contributing to the platform's revenue.
Condition: Triggered during the "Property Generate Offer To Purchase" step.
Feature Property Fee
Purpose: Allows realtors to highlight properties on the platform, increasing visibility and potential interest.
Conditions: Realtors can feature a property by navigating to "Sell Properties" on the dashboard, then using the action column dropdown in the data table to select "Feature Property," given the property's status is active.
Feature Partner Fee
Purpose: Service providers (valuators, surveyors, realtors, attorneys) can gain prominent placement on the platform, enhancing their visibility to potential clients.
Conditions: Accessed through "Profile Details," where users can click "Get Featured" to highlight their services on the home page.
Deposit Fee
Purpose: Offers a secure, platform-based option for purchasers to pay property deposits via credit or debit card, bypassing traditional proof of deposit uploads.
Conditions: Applied during the "Deposit Payment" step in the property transaction process.
Administration Fee
Purpose: This can be applied in conjunction with the other fees, covering the platform's administrative costs.
Lead Scoring and Status Determination
The Turnkey system utilizes a lead scoring mechanism to determine the status of a lead based on their interactions with the platform. The lead status can be classified as new, cold, warm, or hot, depending on the lead's engagement level.
The lead scoring logic is implemented in the Laravel backend code and works as follows:
- The system retrieves all the interactions associated with the lead, either based on their visitor ID (cookie) or lead ID.
- For each interaction, the lead score is incremented based on the type of interaction:
- Viewing a property: +1 point
- Adding a property to the wishlist: +2 points
- Submitting an enquiry: +5 points
- Expressing interest to own a property now: +10 points
- After calculating the total lead score, the system determines the lead status based on the following thresholds:
- Hot: Lead score >= 10
- Warm: Lead score >= 5
- Cold: Lead score >= 2
- New: Lead score < 2
This lead scoring and status determination logic allows the Turnkey system to prioritize and categorize leads based on their level of engagement and interest in the properties. The lead status is dynamically updated as the lead interacts with the platform, ensuring that the sales team always has an up-to-date view of each lead's engagement level.